Make the workspace feel like home. Open a screenplay, choose its language, and find the panels you will use every day.
Four ways to begin
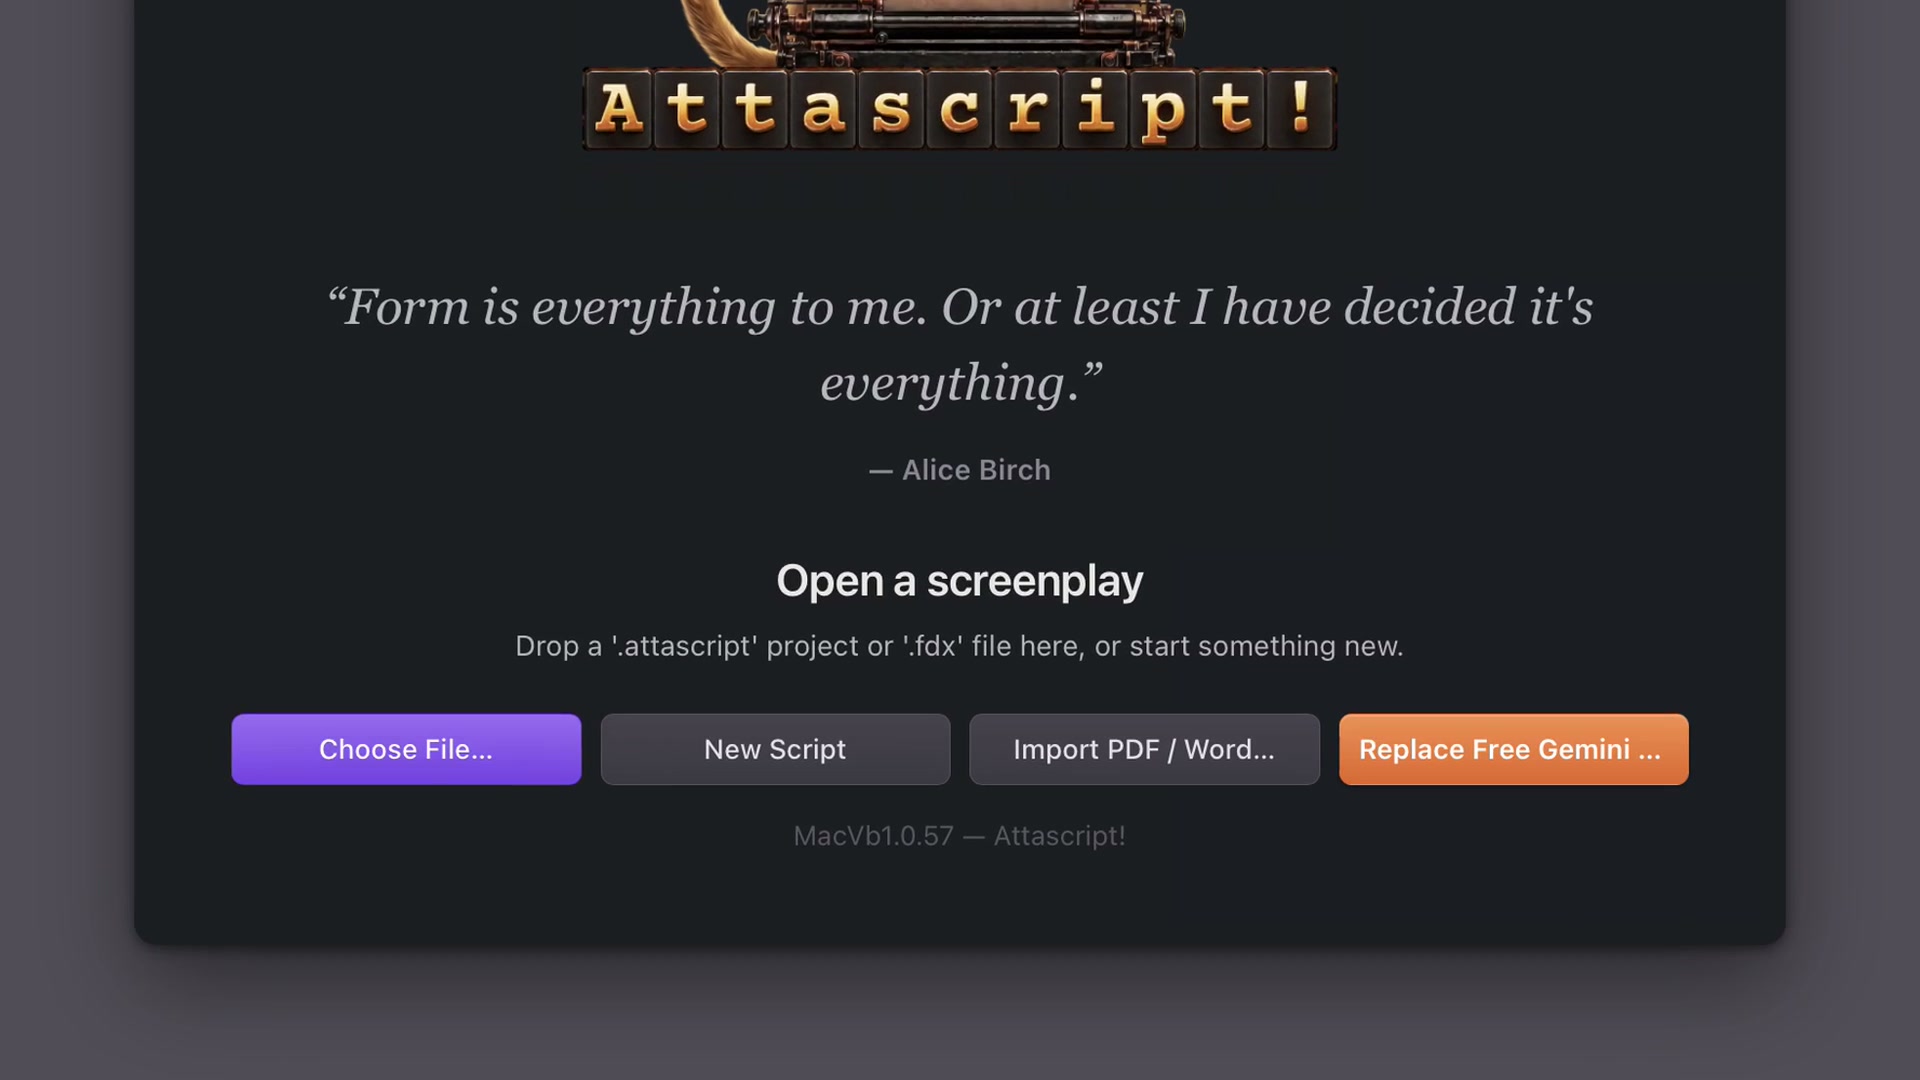
Choose File opens an existing project or Final Draft script. New Script starts a fresh screenplay. Import PDF / Word turns an existing document into editable screenplay elements. The Gemini key button connects the optional AI tools. You can also drop an Attascript or Final Draft file onto the welcome window.
The next chapter walks through the one-time setup of Free and Paid keys. If a key is already connected, the welcome button offers to replace it. You do not need to reconnect a key every time you write.
The welcome screen provides four ways into your project.From lesson 01, 0:11 · Select the image to enlarge.
Choose the writing profile
Open Format, then Primary Language. Start typing the language name and choose the profile that fits your screenplay. Where regional styles are available, select the appropriate one. The profile controls conventions, page direction and the interface language; translating existing words is a separate action.
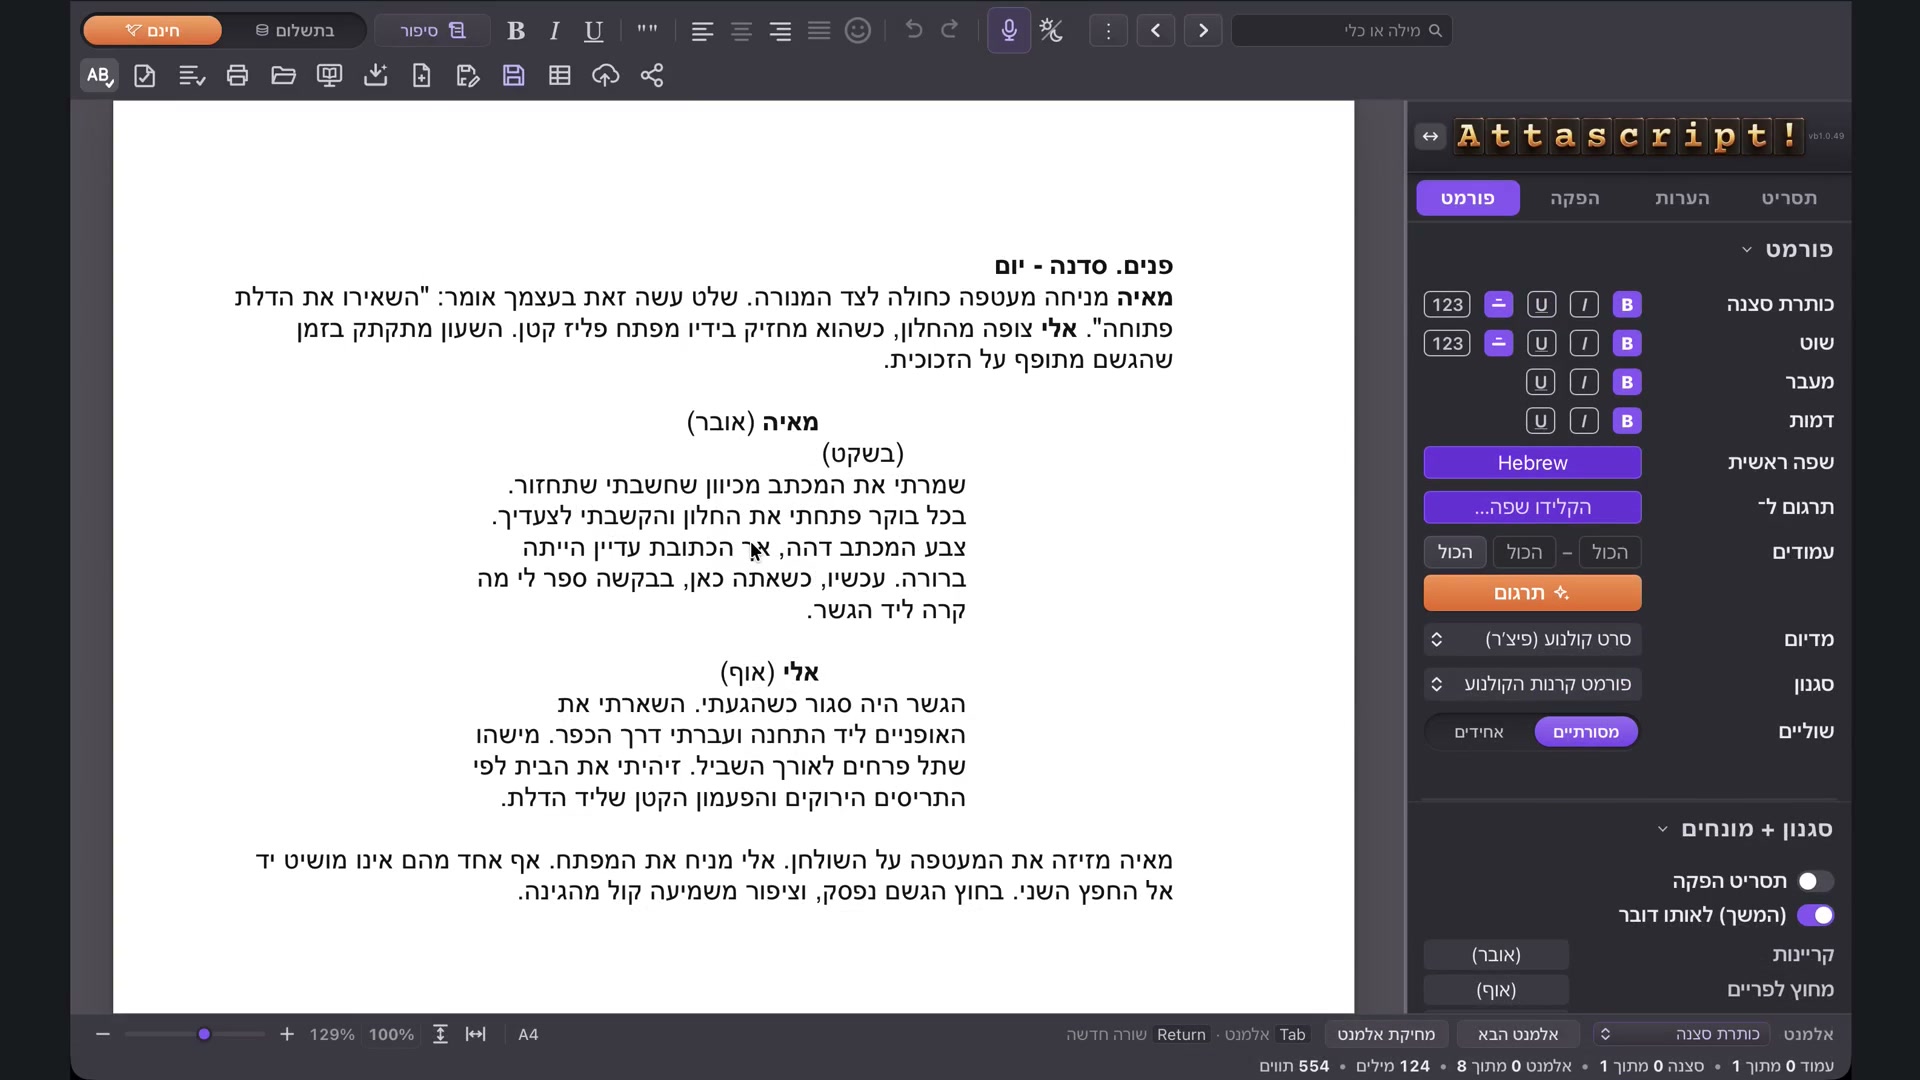
Arabic, Farsi and Hebrew use a right-to-left layout, with the sidebar on the right. The double-arrow control lets you place the sidebar on either side yourself. Hebrew and Arabic examples in this course retain scene numbers.
Start writing
Choose New Script. The pale sample page demonstrates a scene heading, action, character and dialogue. It is a guide, not text to select and delete: your first keystrokes replace the example.
The course uses The Tulip Deal for many demonstrations. You can follow the same steps with your own screenplay. Save an editable project early, then save regularly as you work.
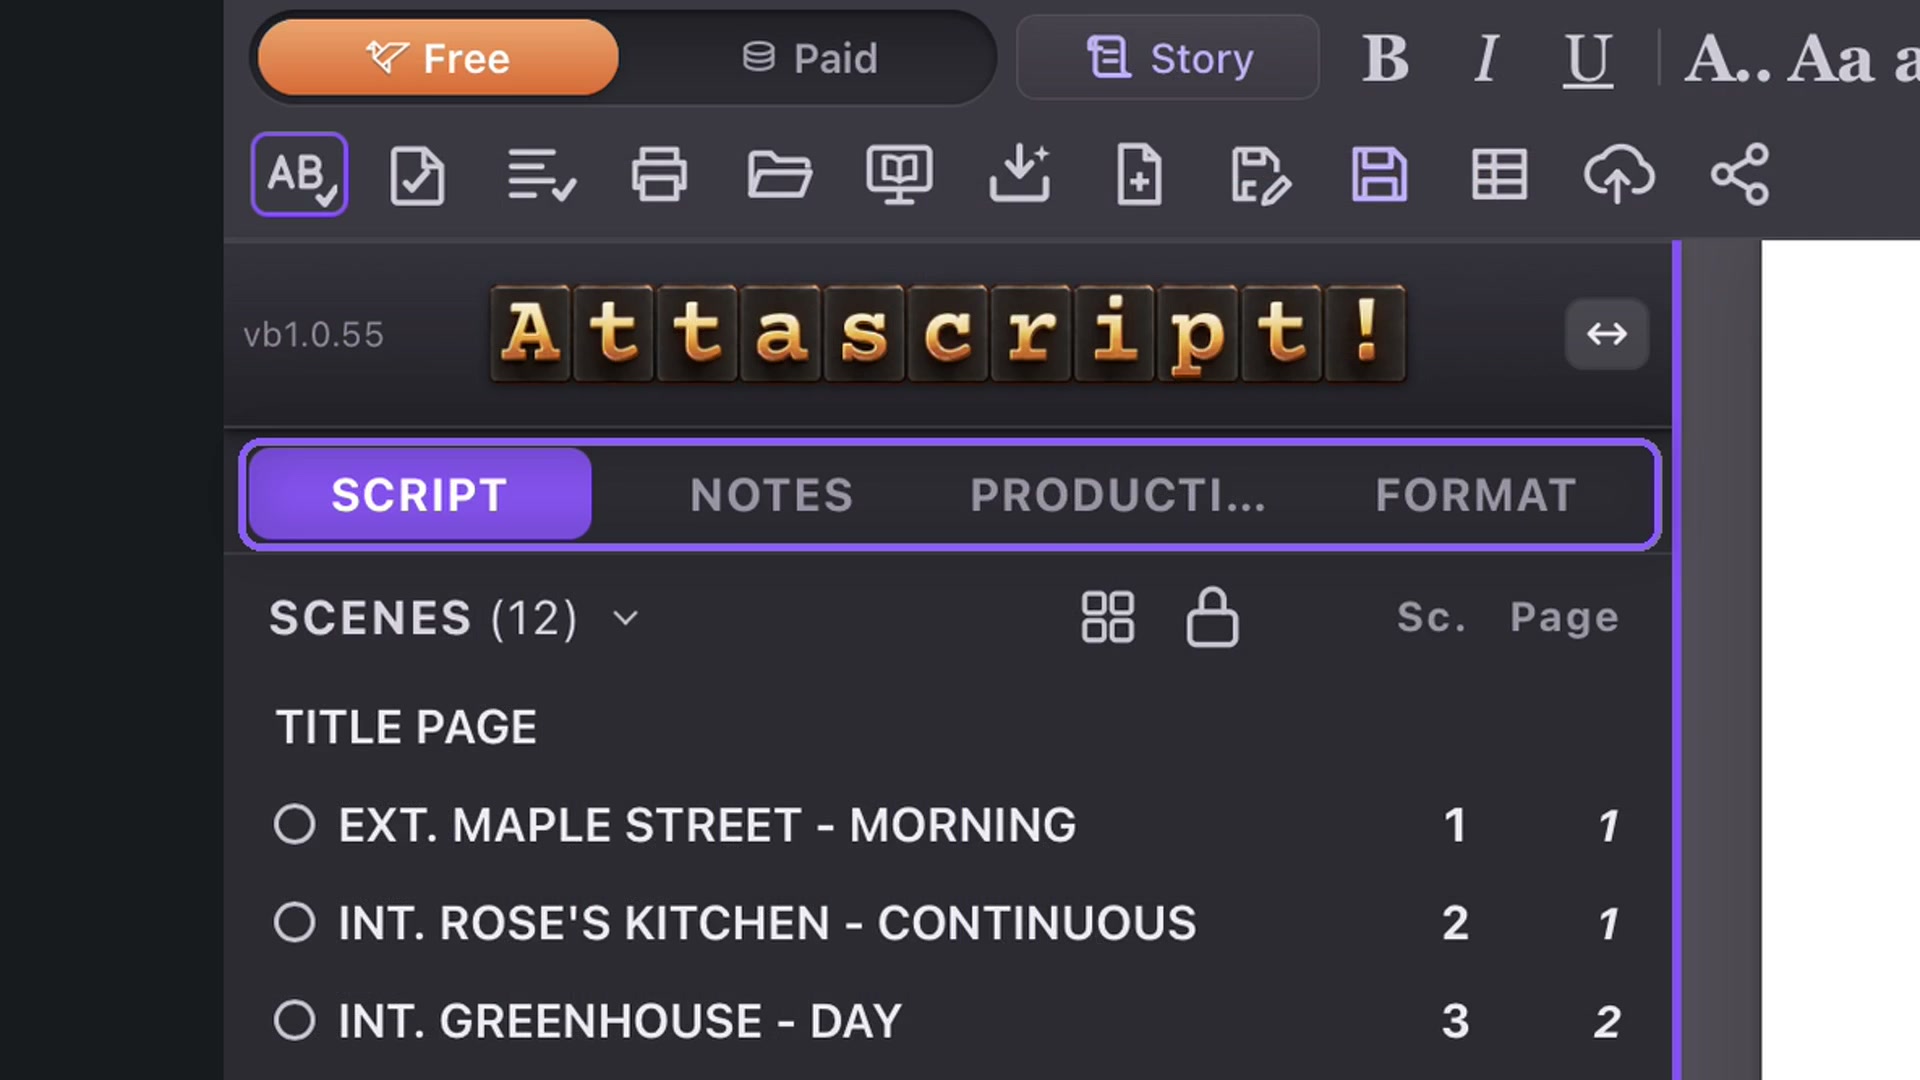
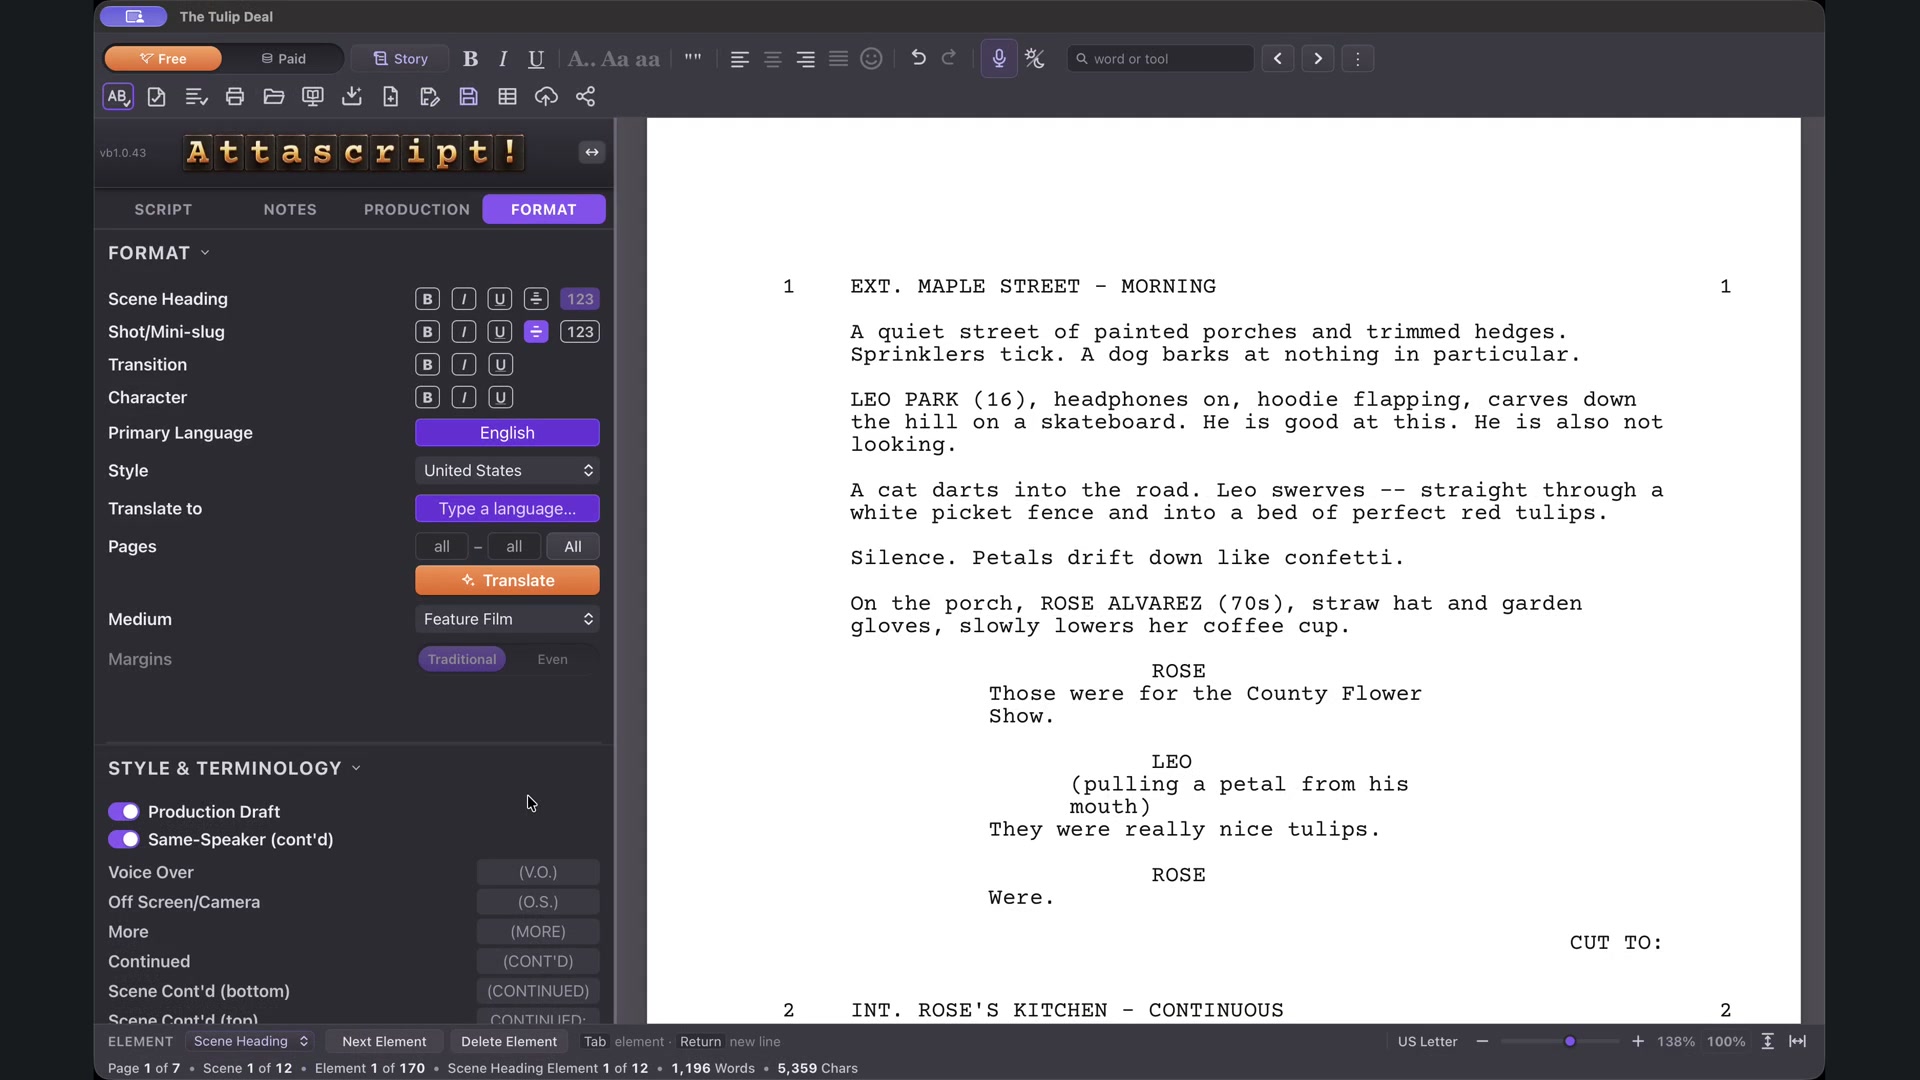
The four sidebar tabs organize the everyday writing tools.From lesson 01, 1:54 · Select the image to enlarge.
Four tabs, two panels each
Script contains Scenes and Characters. Notes contains Ask the Monkey and your own notes. Production contains Tagging and Revisions. Format contains page controls and Style & Terminology.
Drag the sidebar edge to change its width. Fold a panel with the arrow beside its title, or drag the divider to give one panel more room than the other. The build number beside the logo is useful when reporting a problem.
CHAPTER 02
Connect your Gemini keys
Connect Gemini in four simple steps: open, create, copy and paste. Finish Free mode first, then connect Paid mode if you want it.
Free mode: open, create, copy, paste
In Attascript, click the Gemini key button, then Get a key. Google AI Studio opens. On your first visit, sign in with your Google account and complete the setup Google presents.
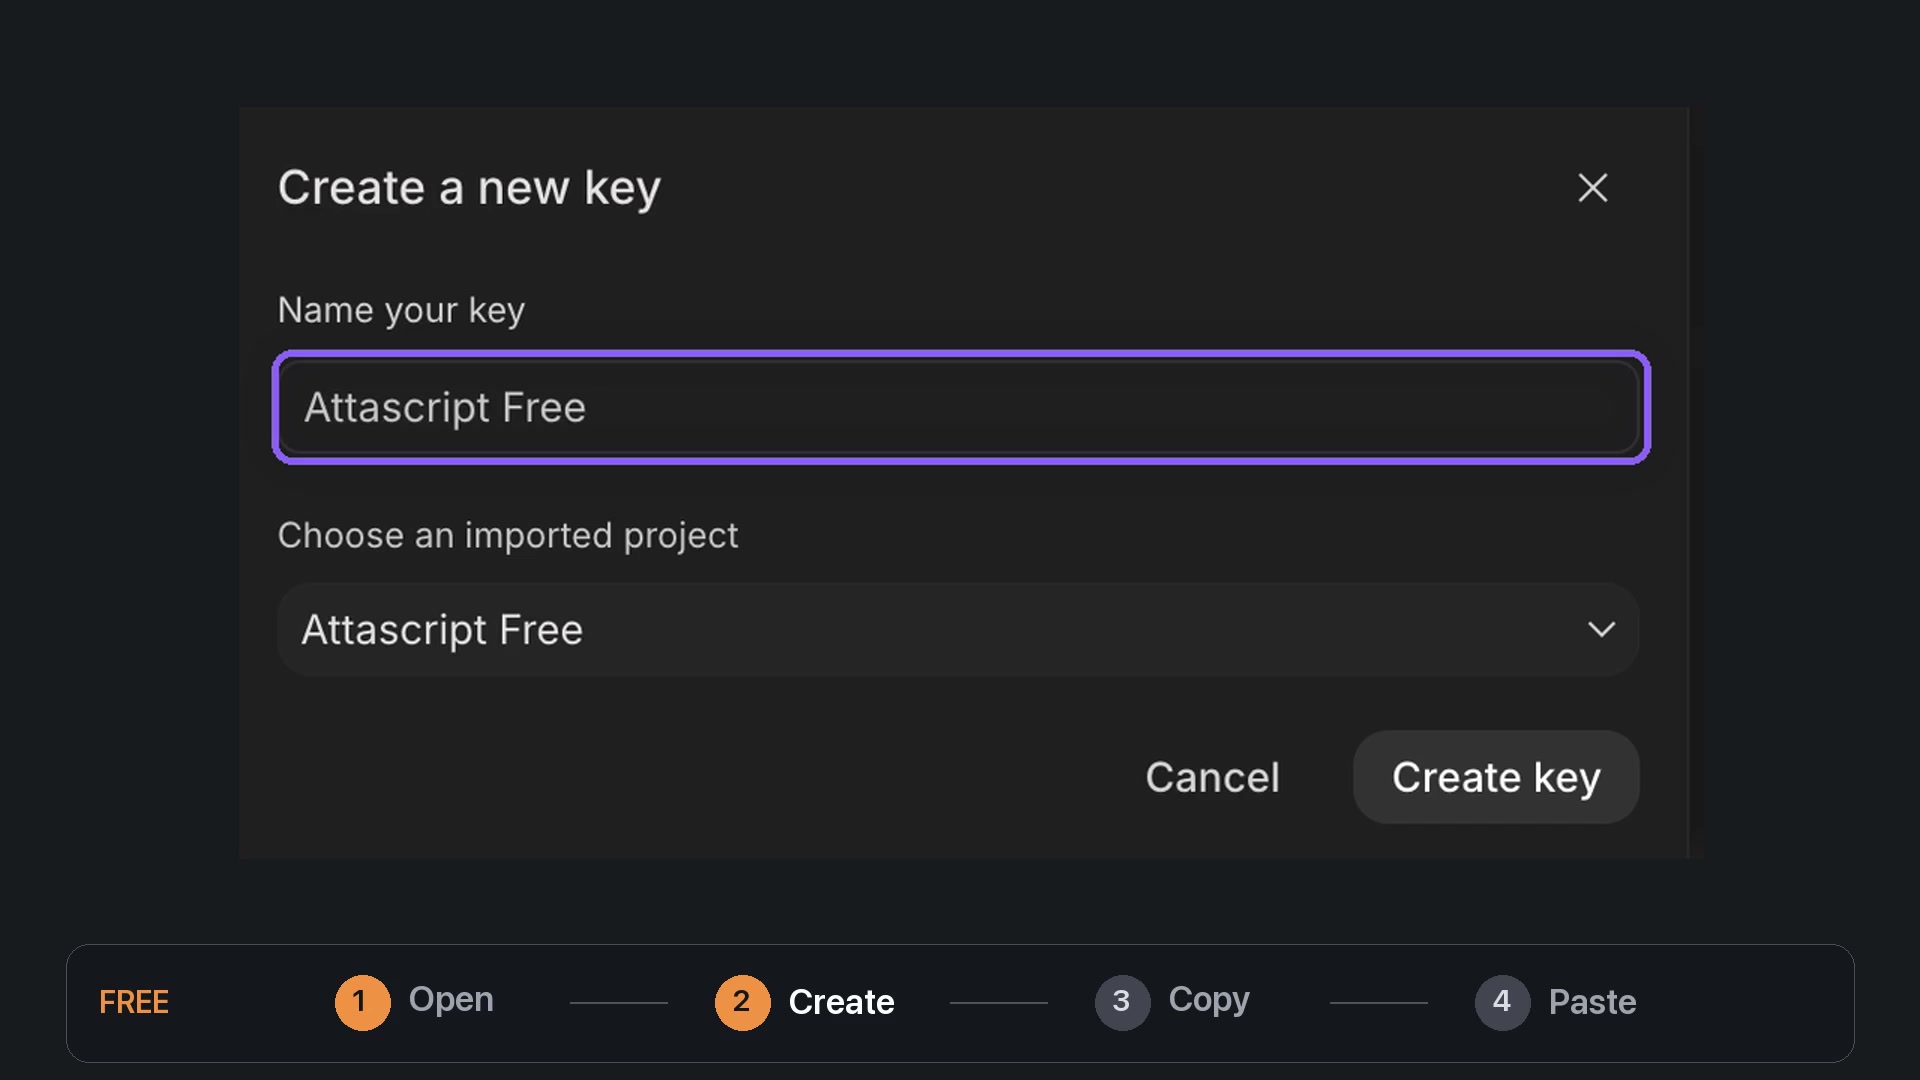
Click Create API key. Name the key Attascript Free. Select your Free project, or create one called Attascript Free. Leave billing off for this project, then create the key.
Open the new key and choose Copy key.
Return to Attascript, paste into the key field and confirm. Your key is saved. Orange Free mode is ready.
Create and name the key in Google AI Studio.From lesson 02, 0:26 · Select the image to enlarge.
Why Paid mode uses a separate project
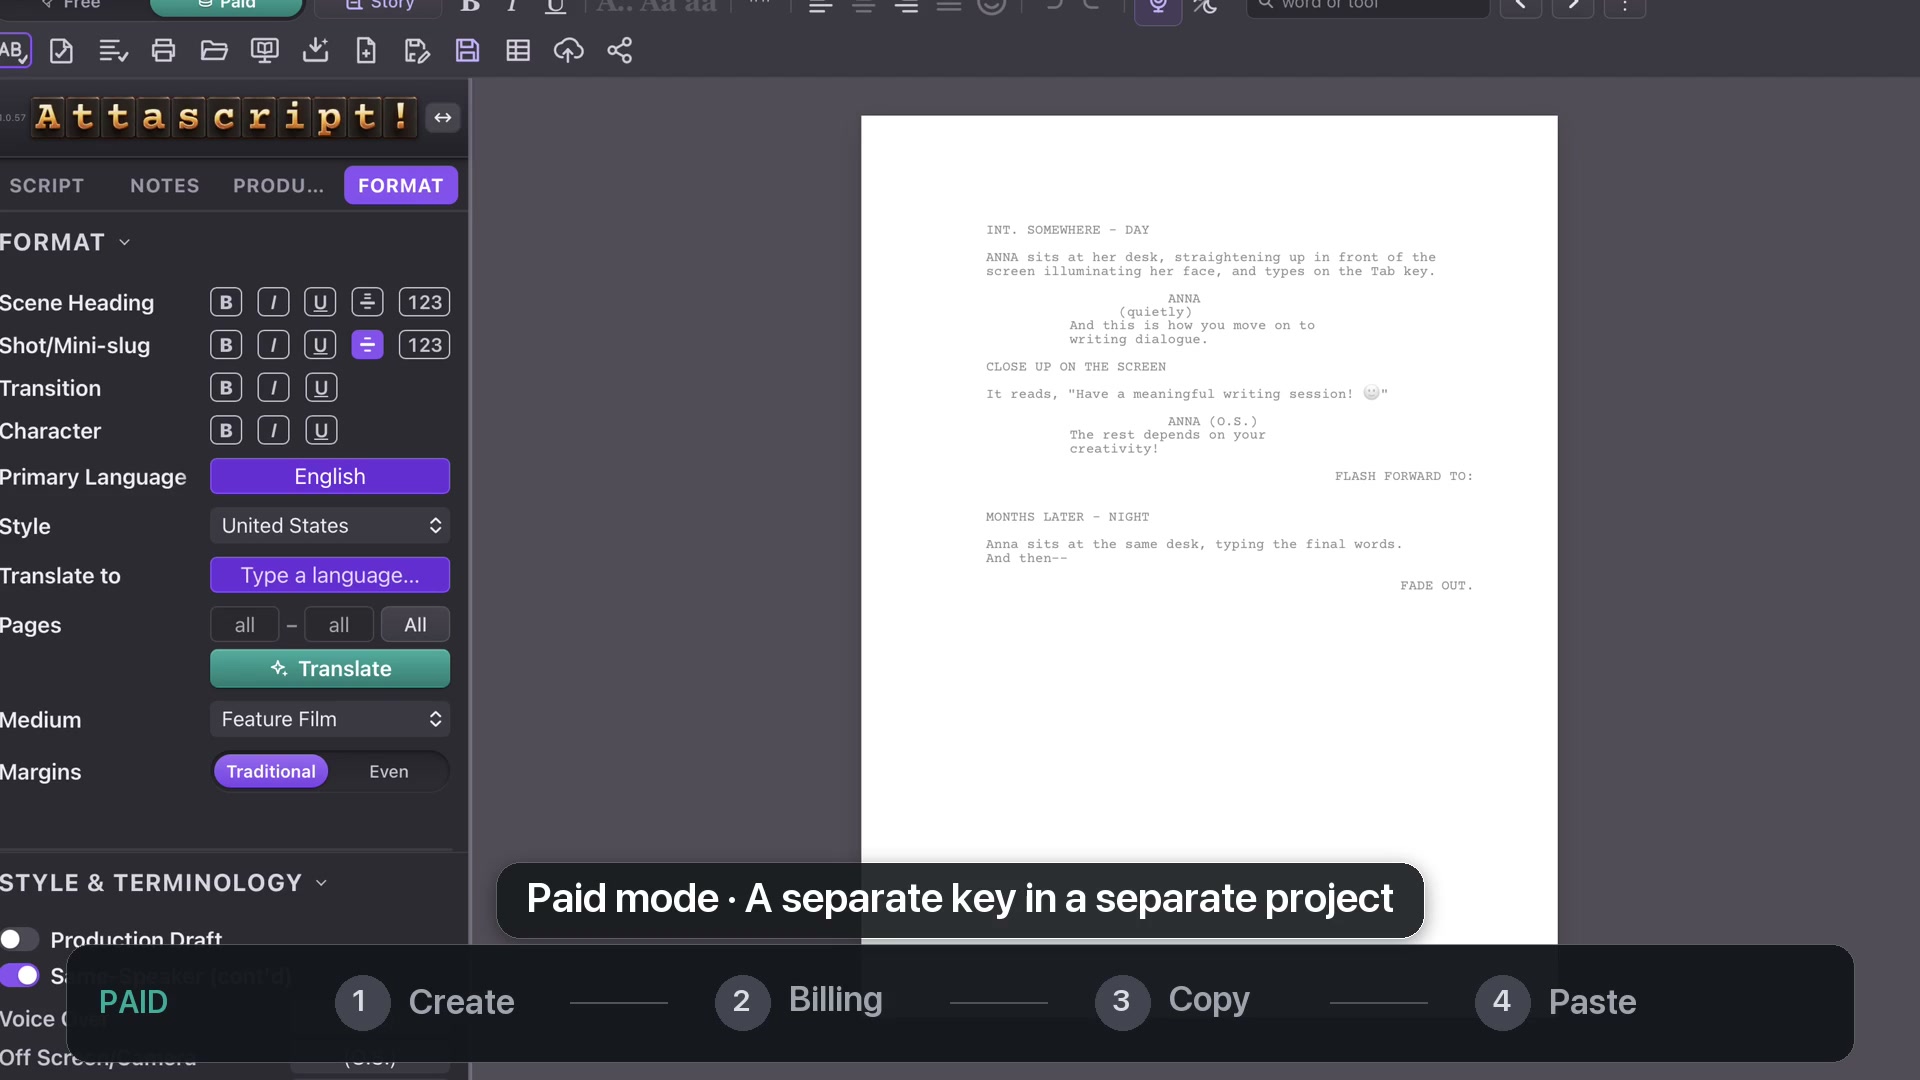
The teal Paid mode has its own key. Create it in a different Google project, because Google attaches billing to the project, not just to the name of a key. This keeps your unbilled Free project separate from the project used for paid requests.
Connecting a Paid key is optional. Google manages the billing account and the charges for its service. The tutorial shows where to begin billing setup; enter your payment details only in Google’s own interface when you choose to enable paid requests.
Paid mode: create, billing, copy, paste
In AI Studio, create a key named Attascript Paid in a separate project also named Attascript Paid.
On that project, use Set up billing and follow Google’s billing setup.
Open the Paid key and click Copy key.
Back in Attascript, select teal Paid mode, open Gemini API Key from the app menu, paste the Paid key and confirm.
Free and Paid use separate Google projects.From lesson 02, 0:57 · Select the image to enlarge.
Replace a key later
If you change Google accounts or replace a key, use the wide key button on the welcome screen or the key icon in Ask the Monkey. Choose the intended Free or Paid mode and replace that mode’s key.
Both keys remain saved for later sessions. Orange selects Free; teal selects Paid. Keep the key itself private when sharing screenshots or asking for support.
CHAPTER 03
Write your first scene
Use Tab and Return to build a correctly structured scene while keeping your attention on the story.
Write a short exchange
In Scene Heading, type I and choose INT. Add GREENHOUSE, a dash and DAY. Suggestions help complete familiar heading terms.
Press Tab for Action: ROSE hands Leo a trowel. Capitalizing a speaking character’s first introduction makes it clear who is entering the story.
Press Tab for Character and type ROSE.
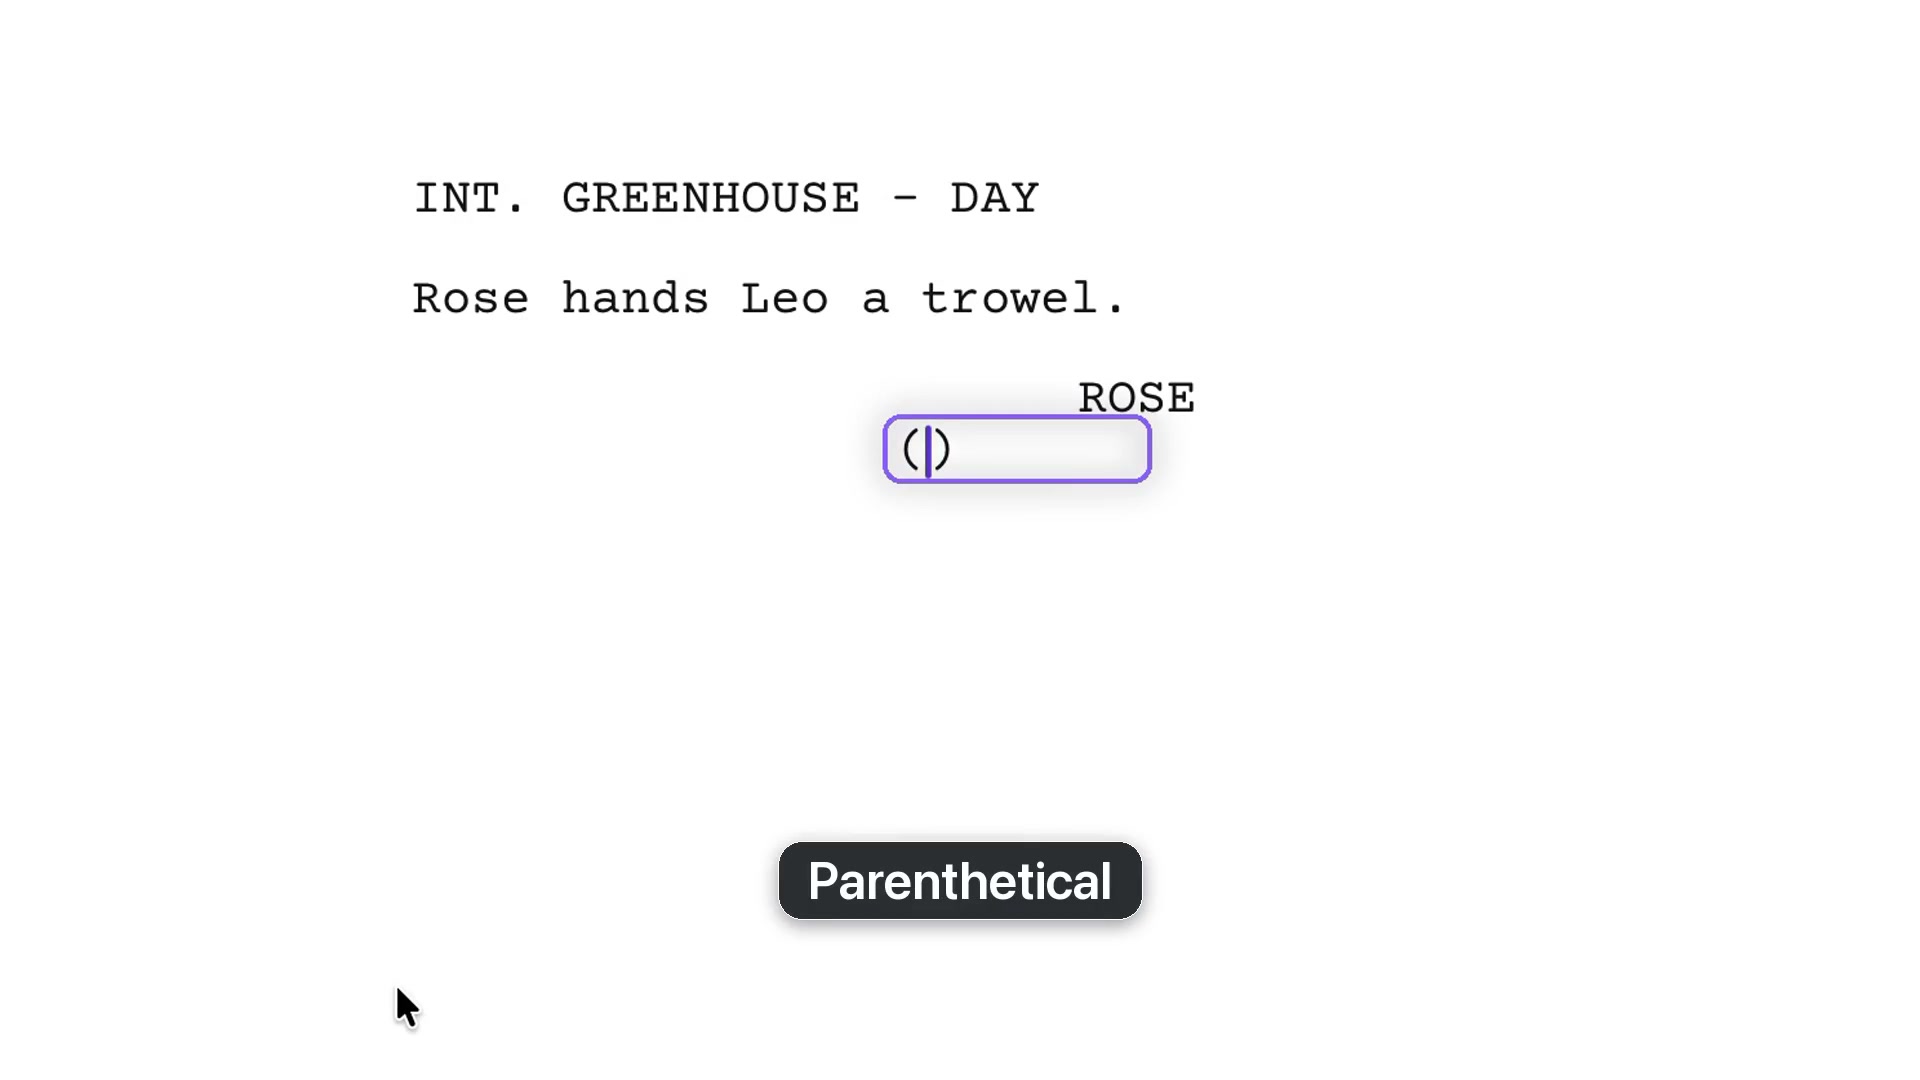
Press Tab for a Parenthetical, then type gently inside the supplied brackets.
Press Tab for Dialogue and write her line.
A parenthetical opens with its brackets already in place.From lesson 03, 0:41 · Select the image to enlarge.
Let the next element follow naturally
Return at the end of a speech takes you back to Action. Tab from Action creates a Character element. Begin typing an established character’s name and choose the suggestion. If no parenthetical is needed, Return after the Character goes directly to Dialogue.
The Element box in the bottom bar tells you the current type. You are creating screenplay elements, not using spaces to imitate margins.
Choose on an empty line
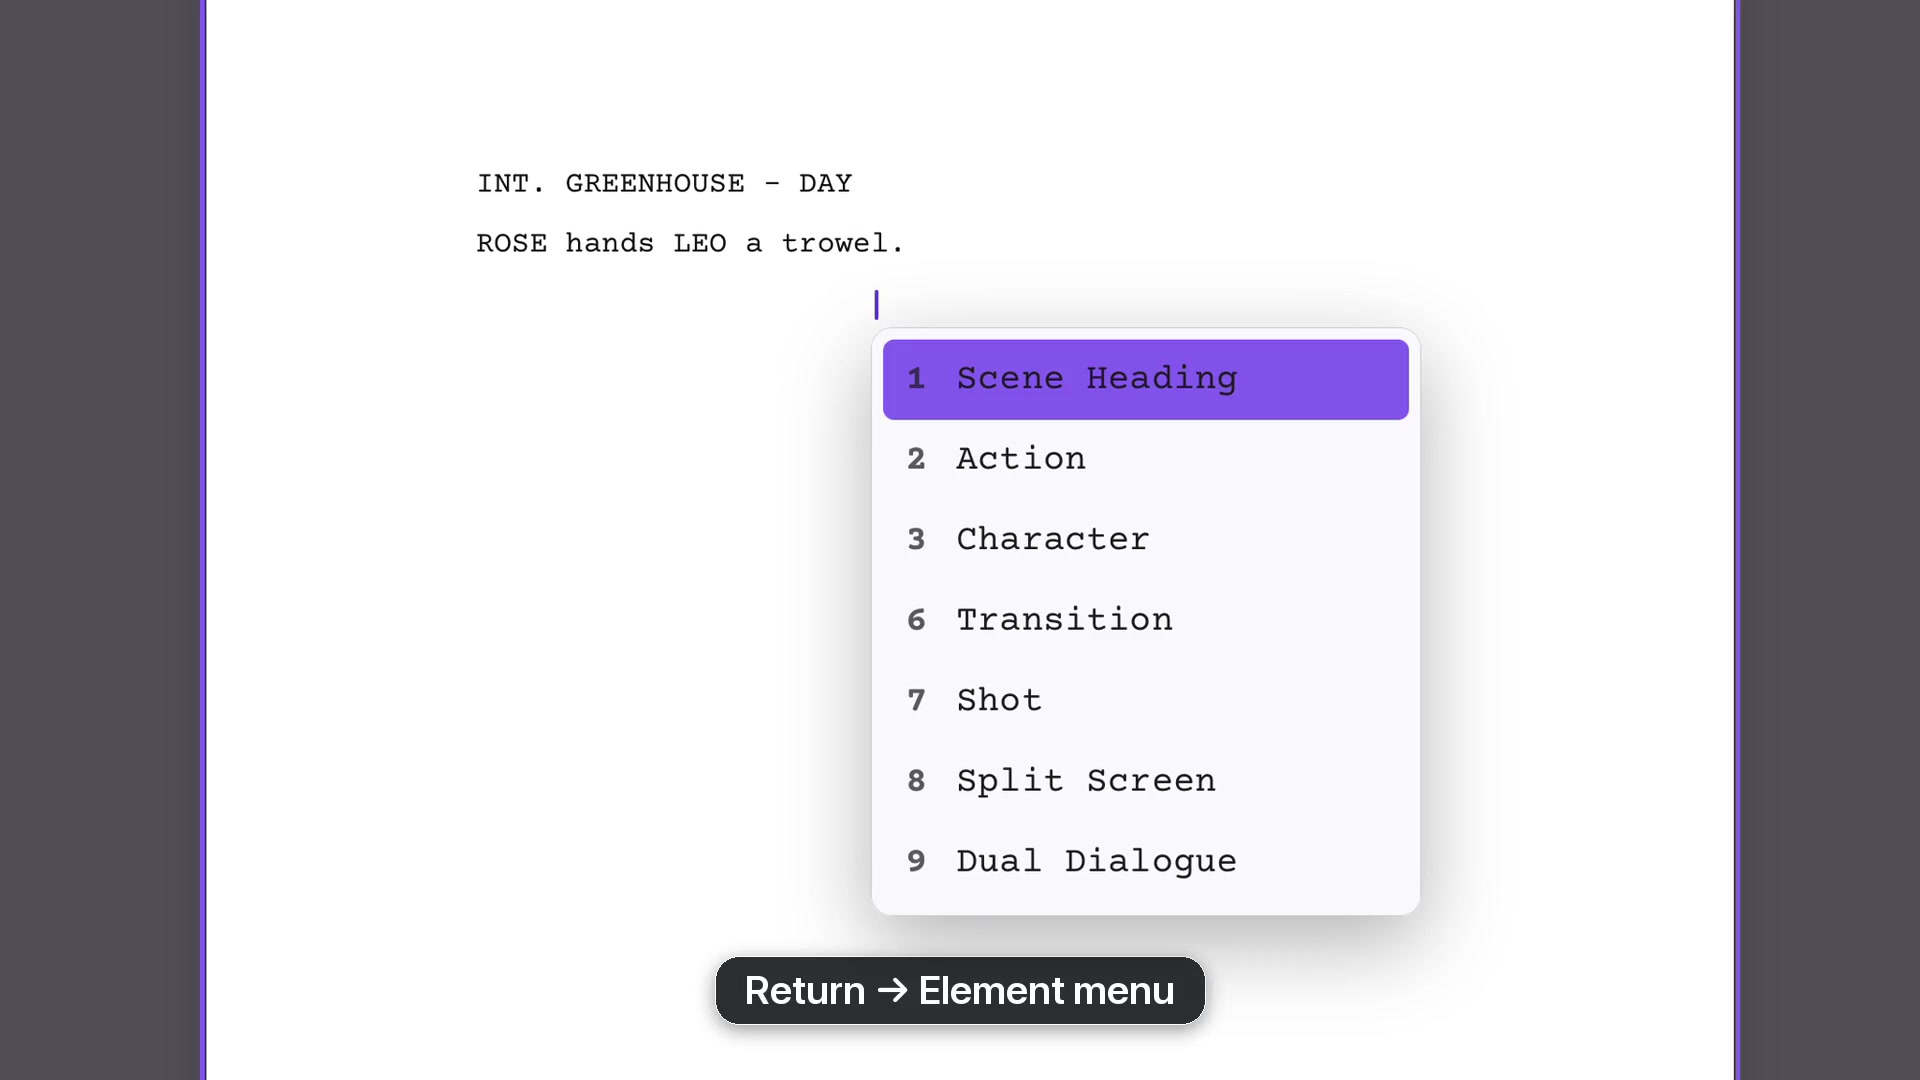
On an empty element, Tab changes its type. Return opens the element menu: click a choice, press its number, or start typing its name. The list is contextual. After a Character, Parenthetical and Dialogue are the relevant choices.
Use Transition for CUT TO:, then Tab into the next Scene Heading. Existing locations appear as suggestions as you begin typing.
The empty-line menu offers the elements appropriate to this position.From lesson 03, 1:53 · Select the image to enlarge.
Read a format flag
Hover over a flagged line to see the explanation. A first introduction may need capitals in an Action line; correct the text and the flag clears. If a choice is deliberate, Format Review offers Ignore without rewriting your words.
CHAPTER 04
The top menu
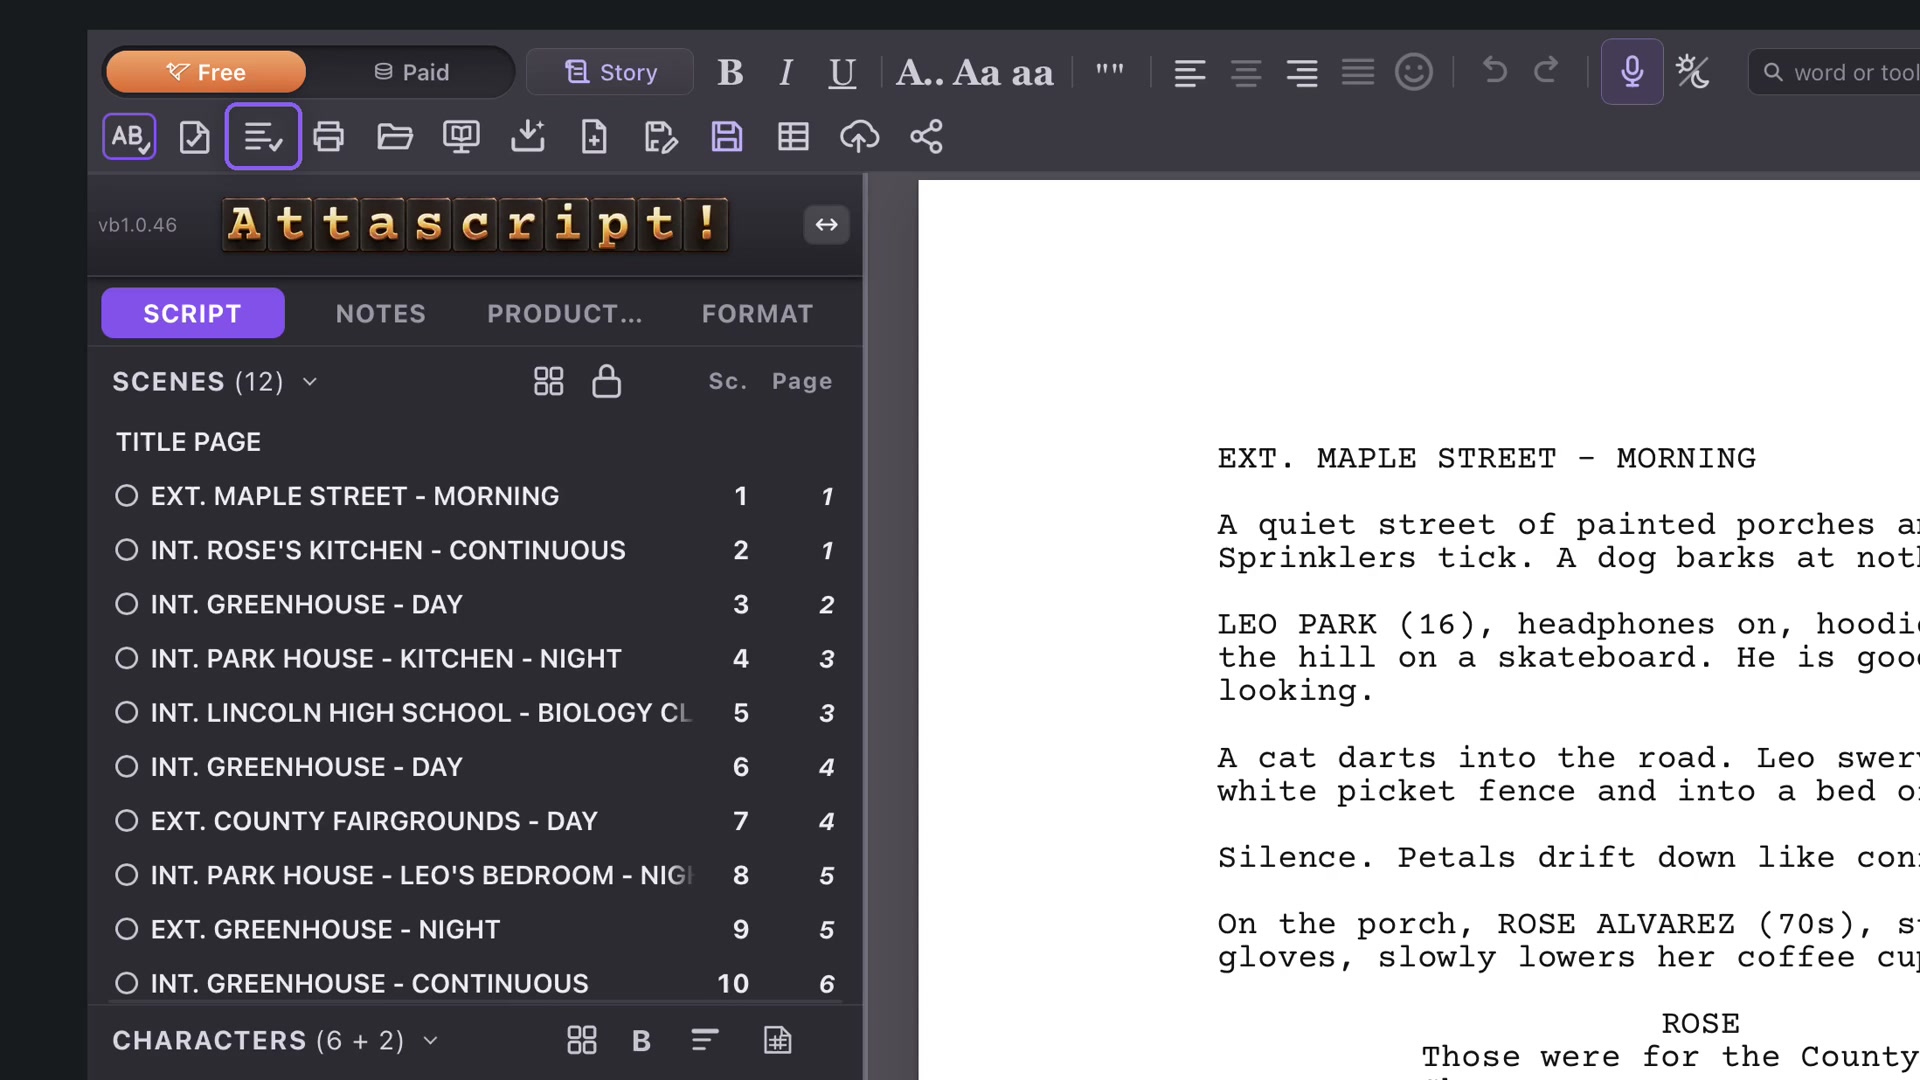
The two rows at the top bring writing, AI, review and delivery tools together. Use this chapter as a map.
Writing and development
The AI mode control is orange for Free and teal for Paid. Story opens the development pages, from Logline through Pitch Deck. Bold, Italic and Underline style selected text; case controls change selected wording in an Action line.
Quotation-mark style follows your language’s choices. Alignment is useful on title and Story pages. Undo and Redo step through editing changes.
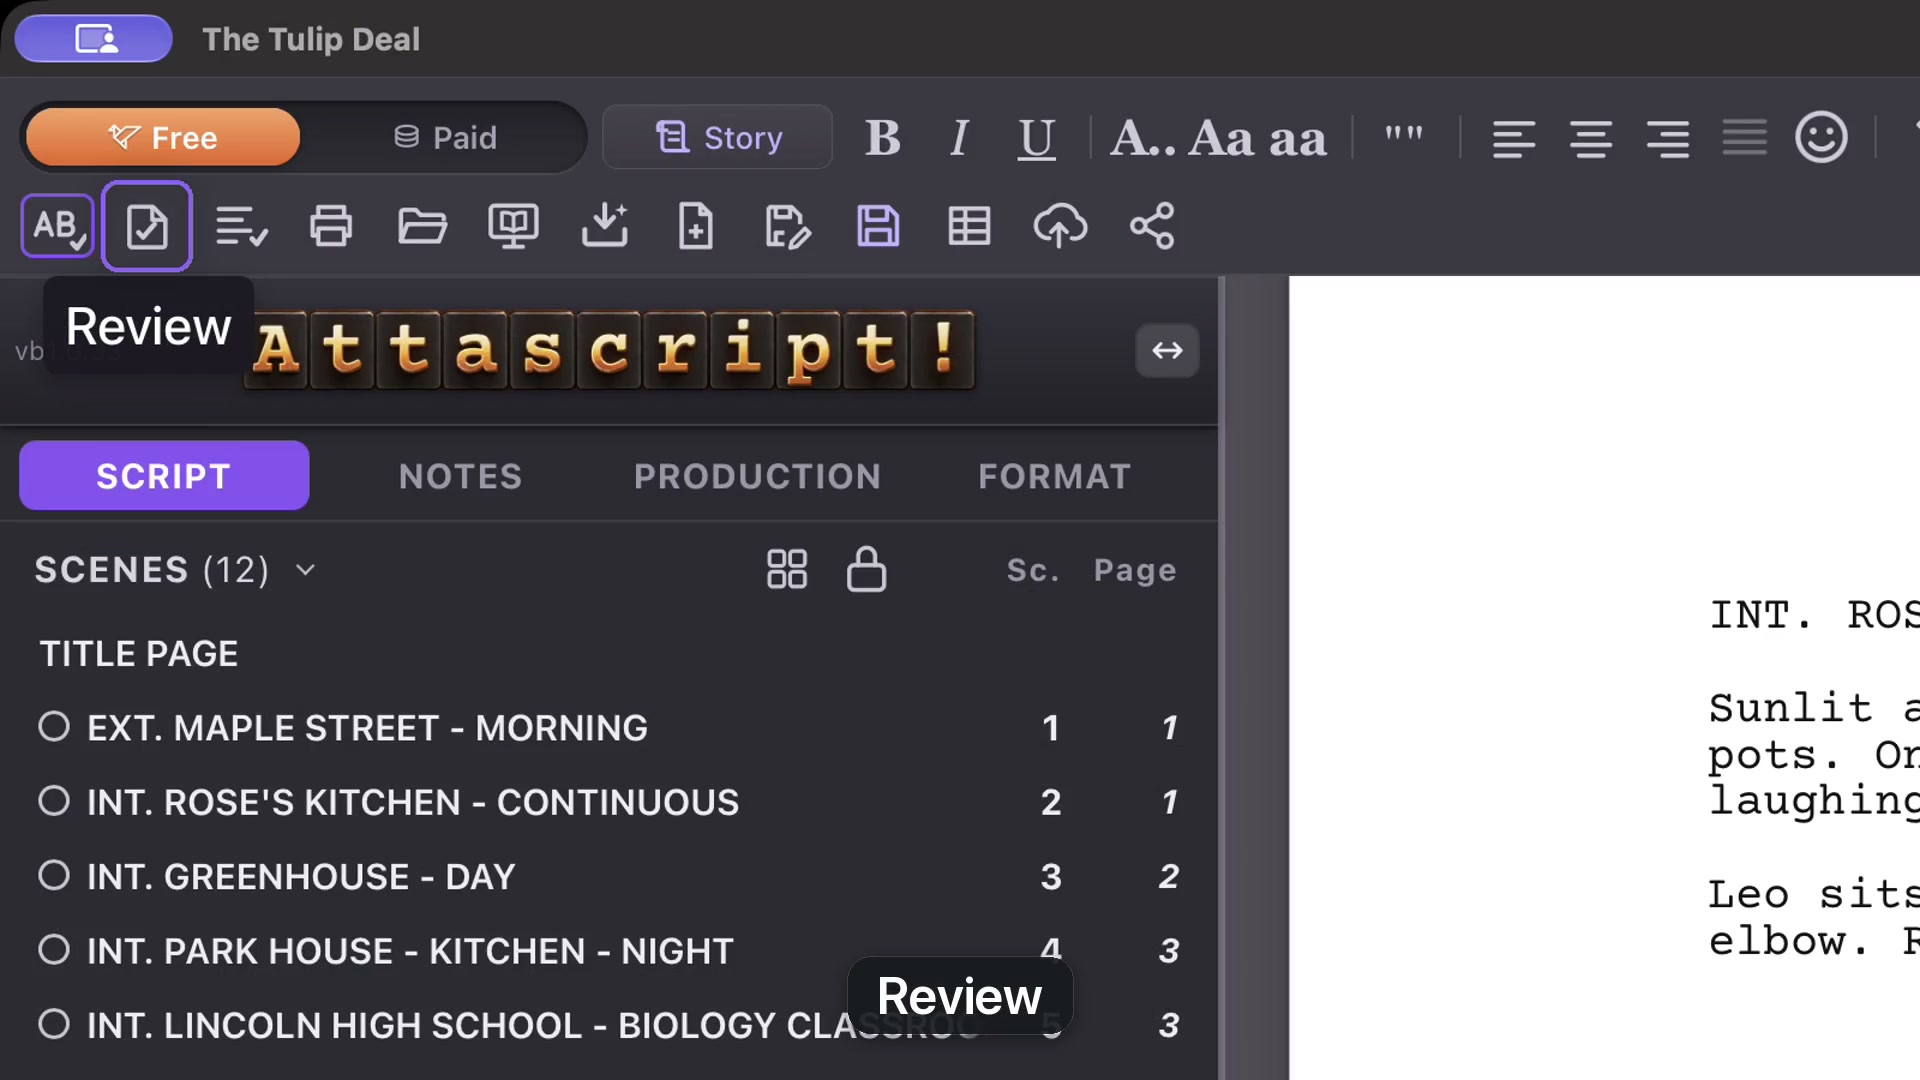
The second row holds review and file tools.From lesson 04, 1:24 · Select the image to enlarge.
Voice, appearance and search
The microphone opens Voice Draft. The appearance control cycles Day, Mixed and Night. The search field finds words and, when Suggest tools is enabled, controls.
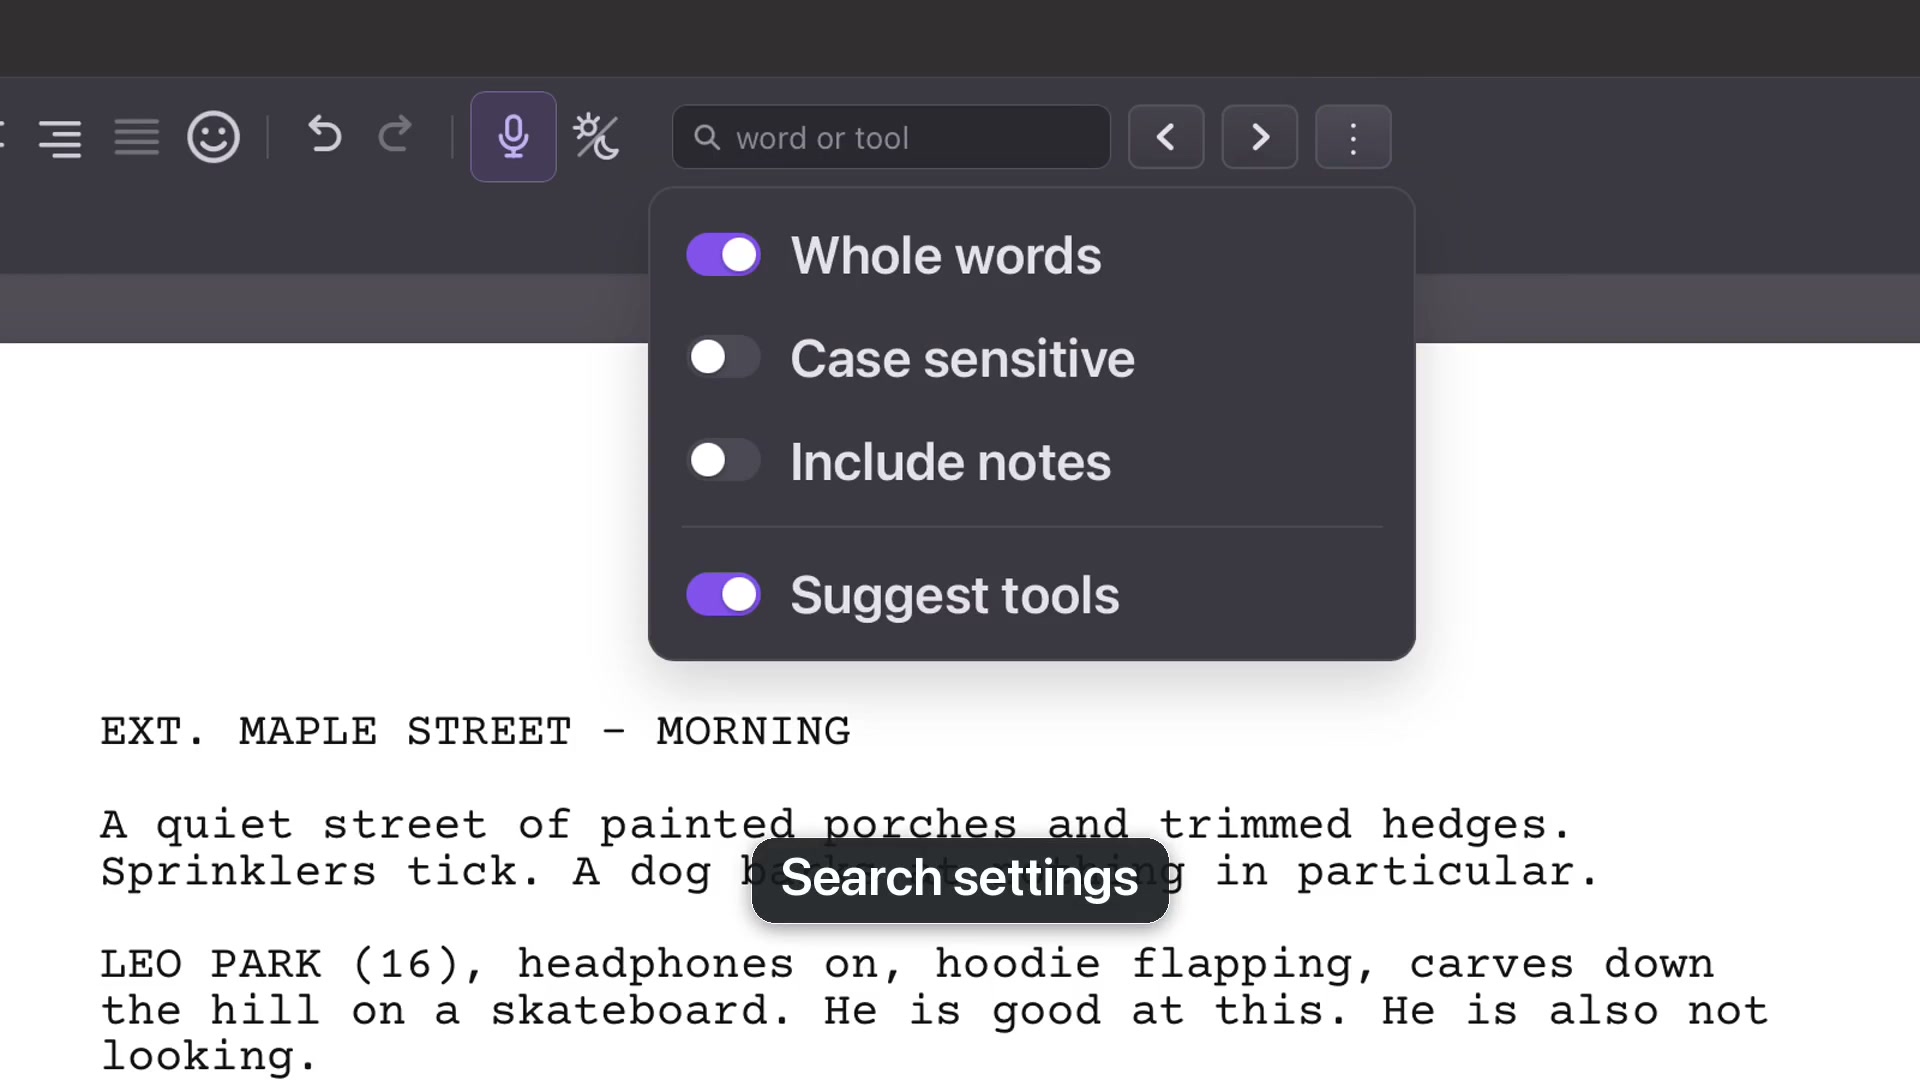
Open the three-dot Search settings to choose whole-word matching, case sensitivity and whether notes are included. A tool suggestion can take you straight to a control whose location you have forgotten.
Review and files
Spelling handles local flags and spelling review. Review tracks wording changes; Format Review checks screenplay conventions. They serve different purposes.
Print prepares a paper or PDF layout. Open loads an editable project or Final Draft script. Adapt develops material from another source; Import reads PDF or Word. New starts a screenplay. Save keeps the working project, while Save As creates another copy or an export.
Search settings controls text matching and tool suggestions.From lesson 04, 1:12 · Select the image to enlarge.
Sharing and production
Export CSV produces script tables, with an option to collect them in an Excel workbook. Cloud backup copies the project into a synced folder you choose. Share prepares the delivery formats you select. Each has a later chapter with a complete example.
CHAPTER 05
The bottom menu
The bottom bar tells you where you are in the script and controls how much of the page you can see.
Element and line controls
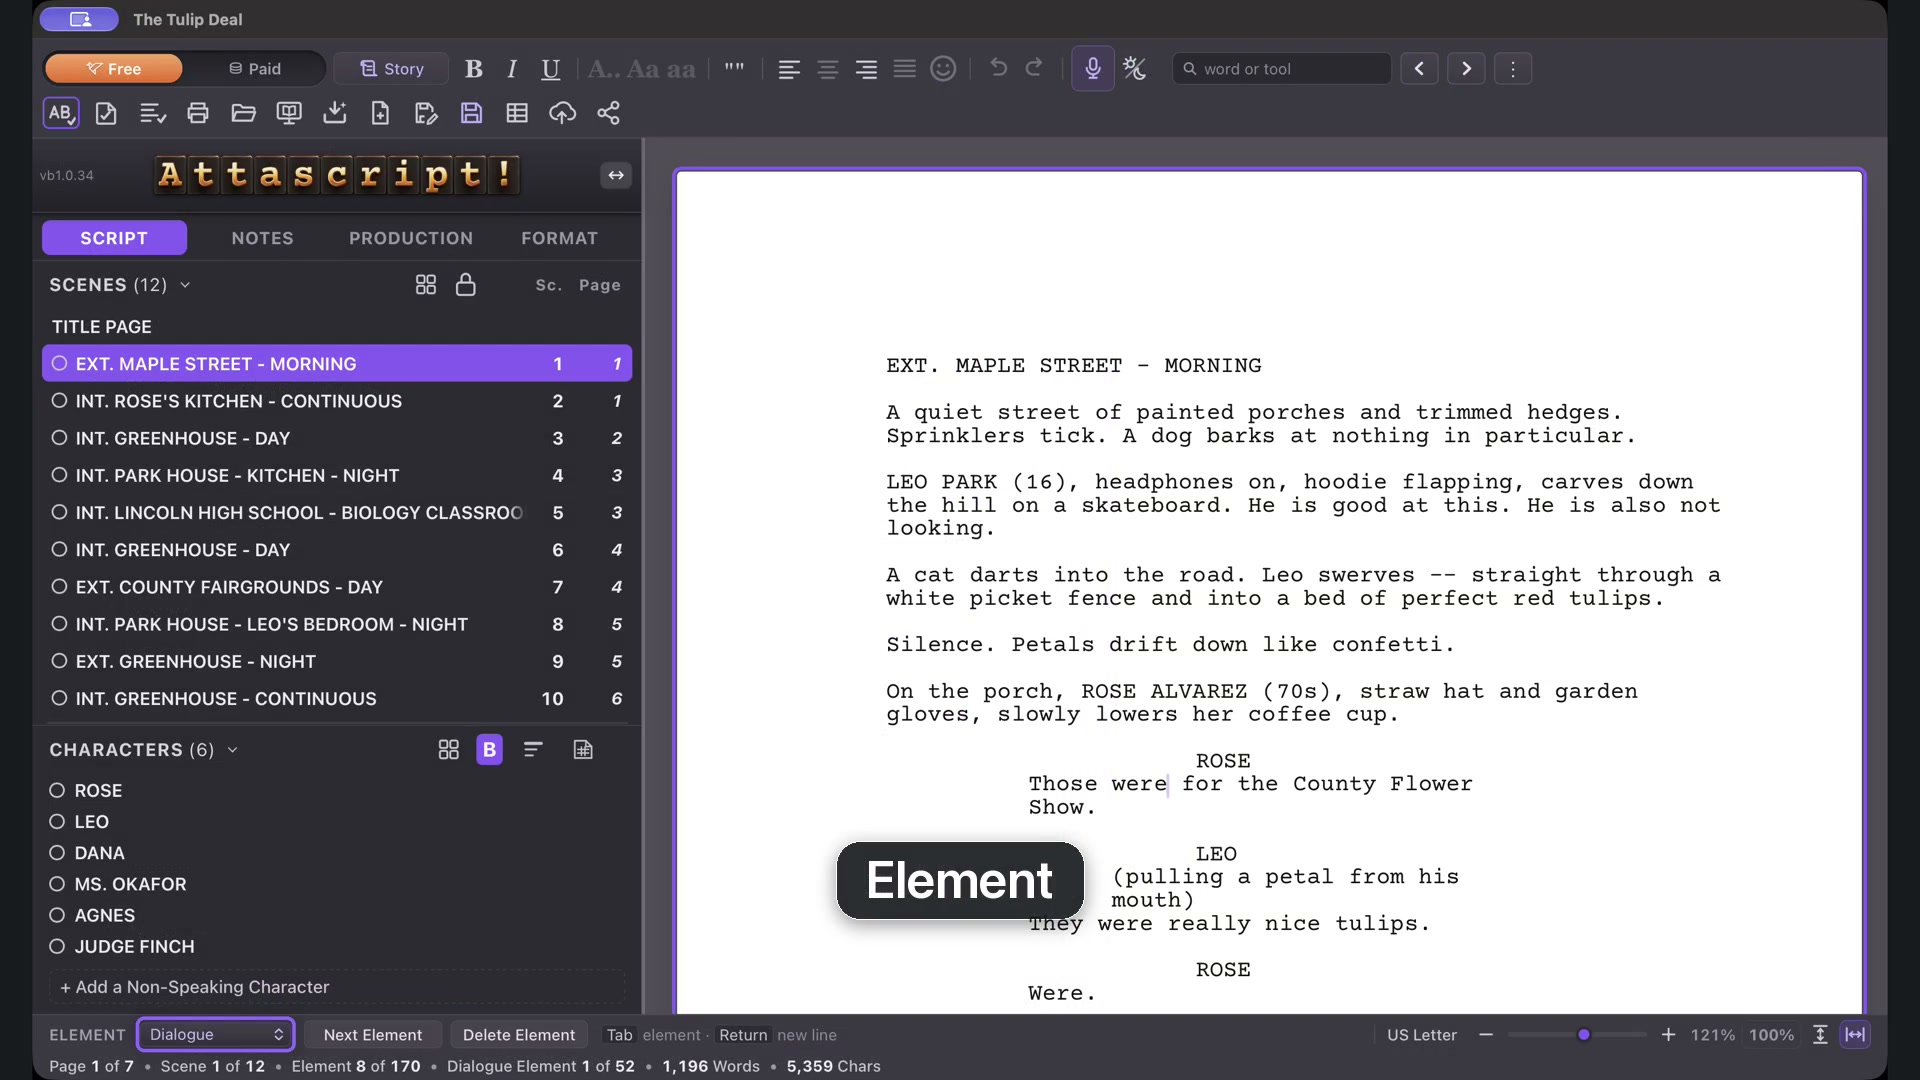
The Element box follows the caret: click in Dialogue, then Action, and its label changes. Choose a different type to change the current element.
Next Element adds the type that naturally follows. Delete Element removes the whole element, rather than a single character. Use that command deliberately and Undo if you remove the wrong line.
The Element control follows the caret.From lesson 05, 0:10 · Select the image to enlarge.
Counts that follow your selection
The footer shows page, scene and element information, plus word and character counts. Selecting text narrows the word and character totals to that selection. The paper-size label tells you the current page format, such as US Letter.
Find a comfortable view
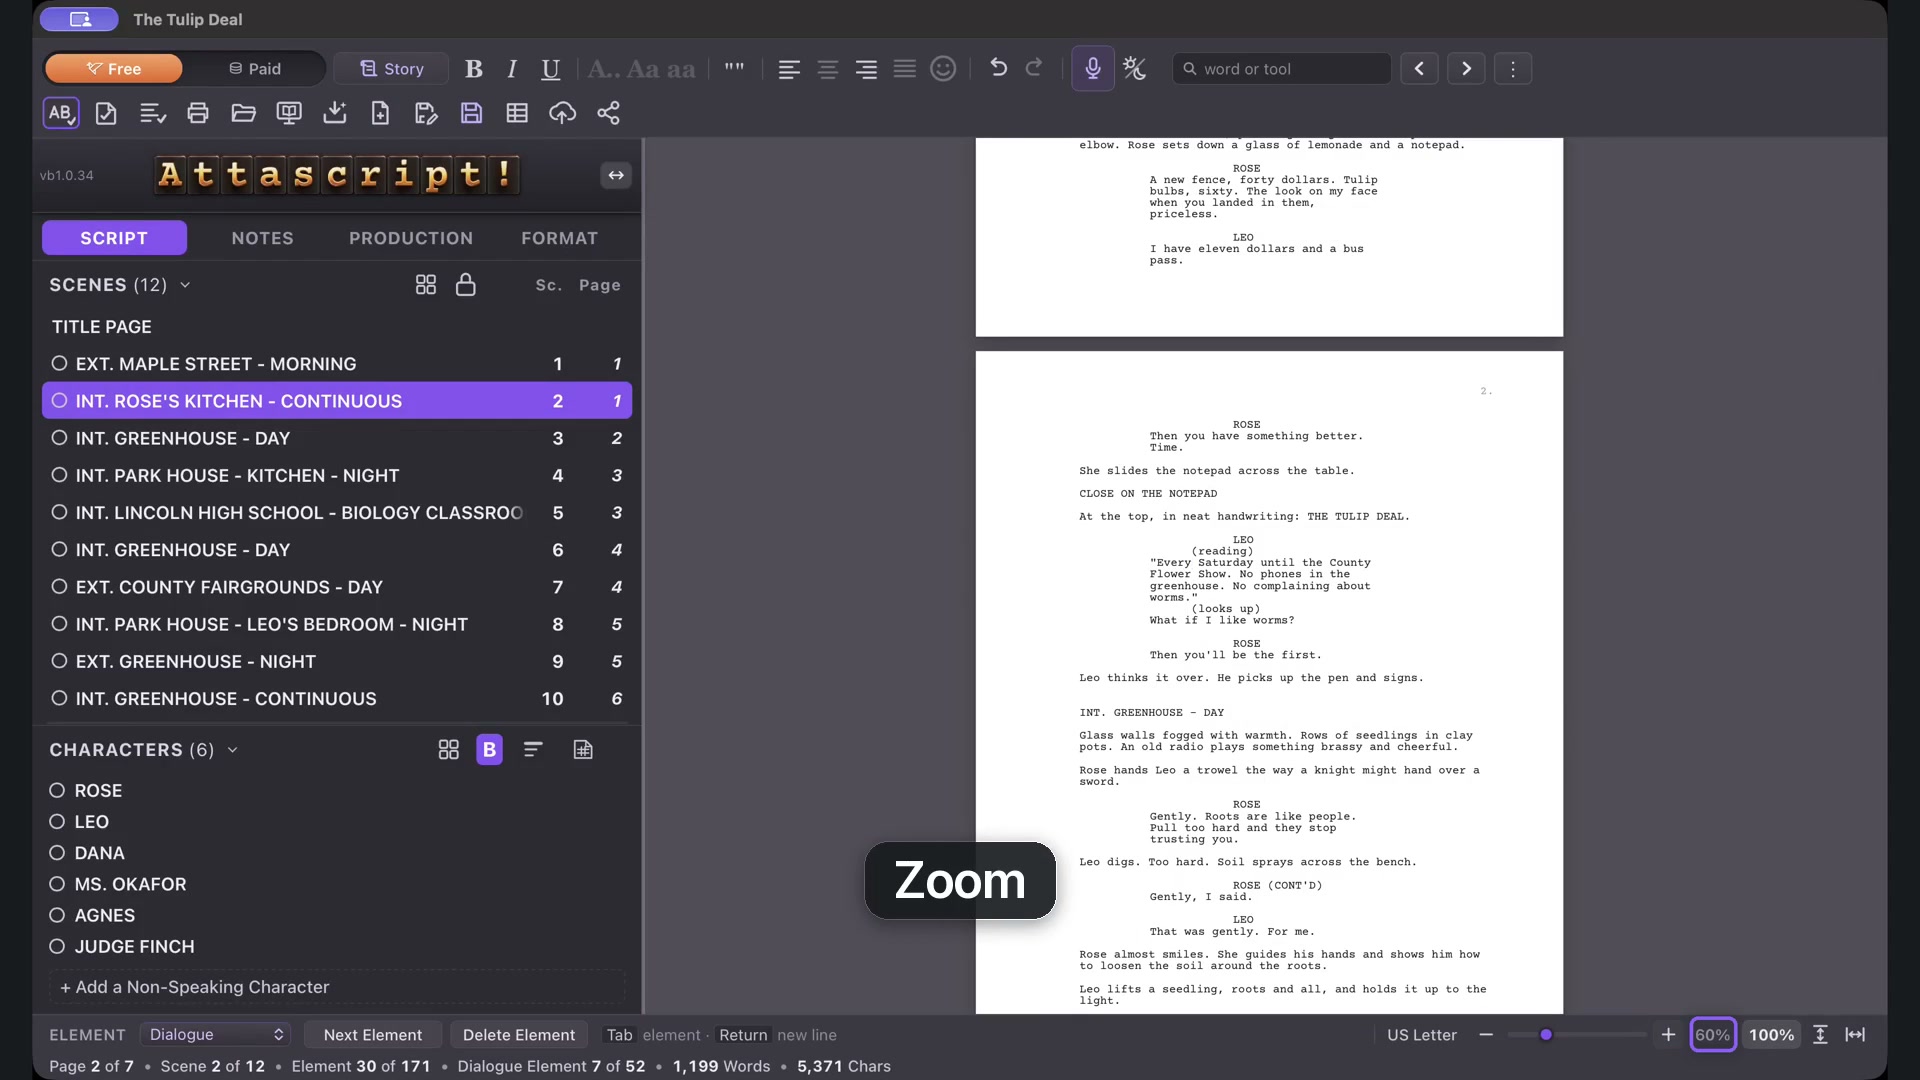
Drag the zoom slider or use minus and plus. The dedicated view controls are 100%, Fit to Length for a whole page, and Fit to Width for larger text across the available space. Changing the view does not rewrite the screenplay.
Zoom and fit controls change your view of the page.From lesson 05, 1:03 · Select the image to enlarge.
Mac and Windows shortcuts
Next Element: Command+Return on Mac; Ctrl+Enter on Windows.
Delete Element: Command+Backspace on Mac; Ctrl+Backspace on Windows.
100%: Command+0 / Ctrl+0. Fit to Length: Command+1 / Ctrl+1. Fit to Width: Command+2 / Ctrl+2. Use the visible buttons if you prefer.
CHAPTER 06
The Scenes panel
Navigate, organize and review your screenplay scene by scene from the Script sidebar.
Find a scene
Open the Script tab. The Scenes panel lists headings with scene and page numbers. Click a row to jump to its pages. Title Page appears above the scenes.
A scene’s color ring opens swatches. Color a storyline, a location or the scenes you want to revise; use a consistent meaning for your own reminders.
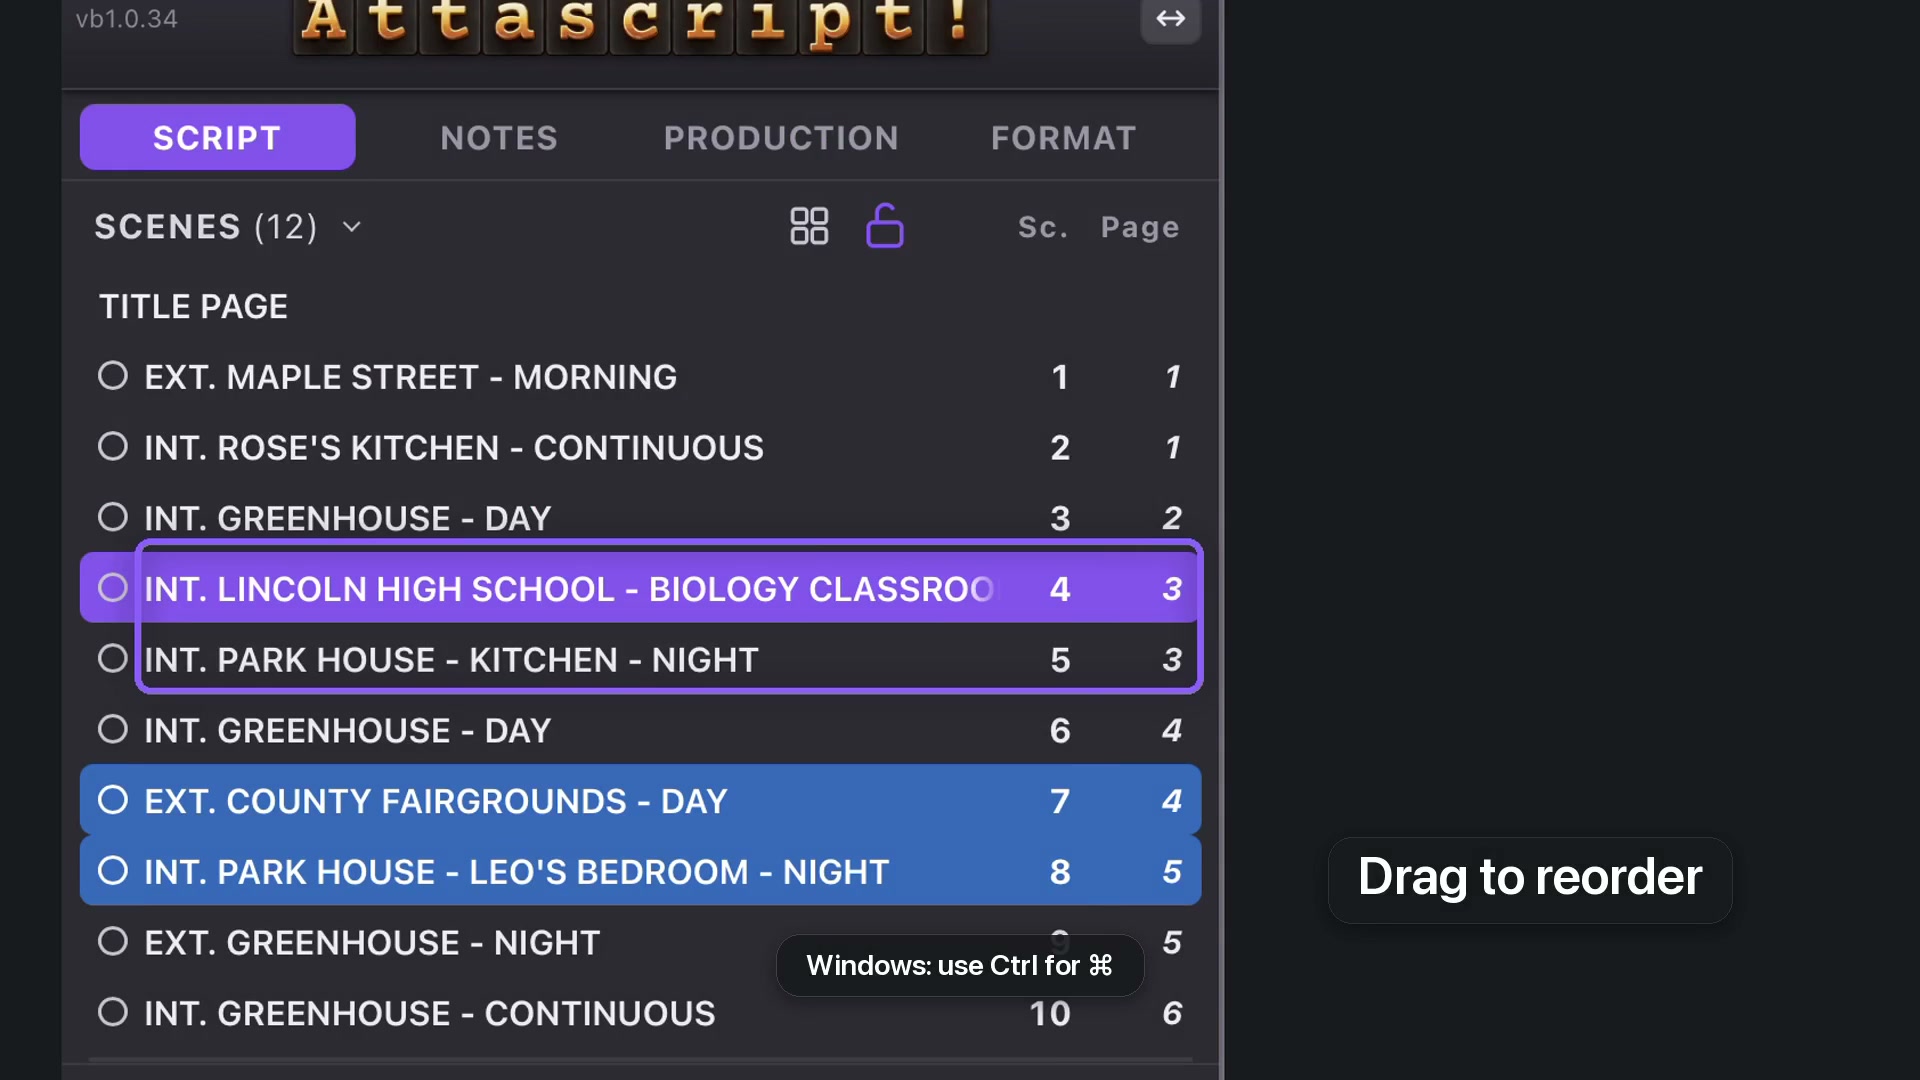
Unlock before rearranging the scene order.From lesson 06, 0:31 · Select the image to enlarge.
Move scenes safely
Unlock scene order before dragging. Move a scene to its new position in the list; its screenplay content follows. Read the surrounding scenes to check the new transition, then lock the order again to avoid accidental movement.
Use the scene menu
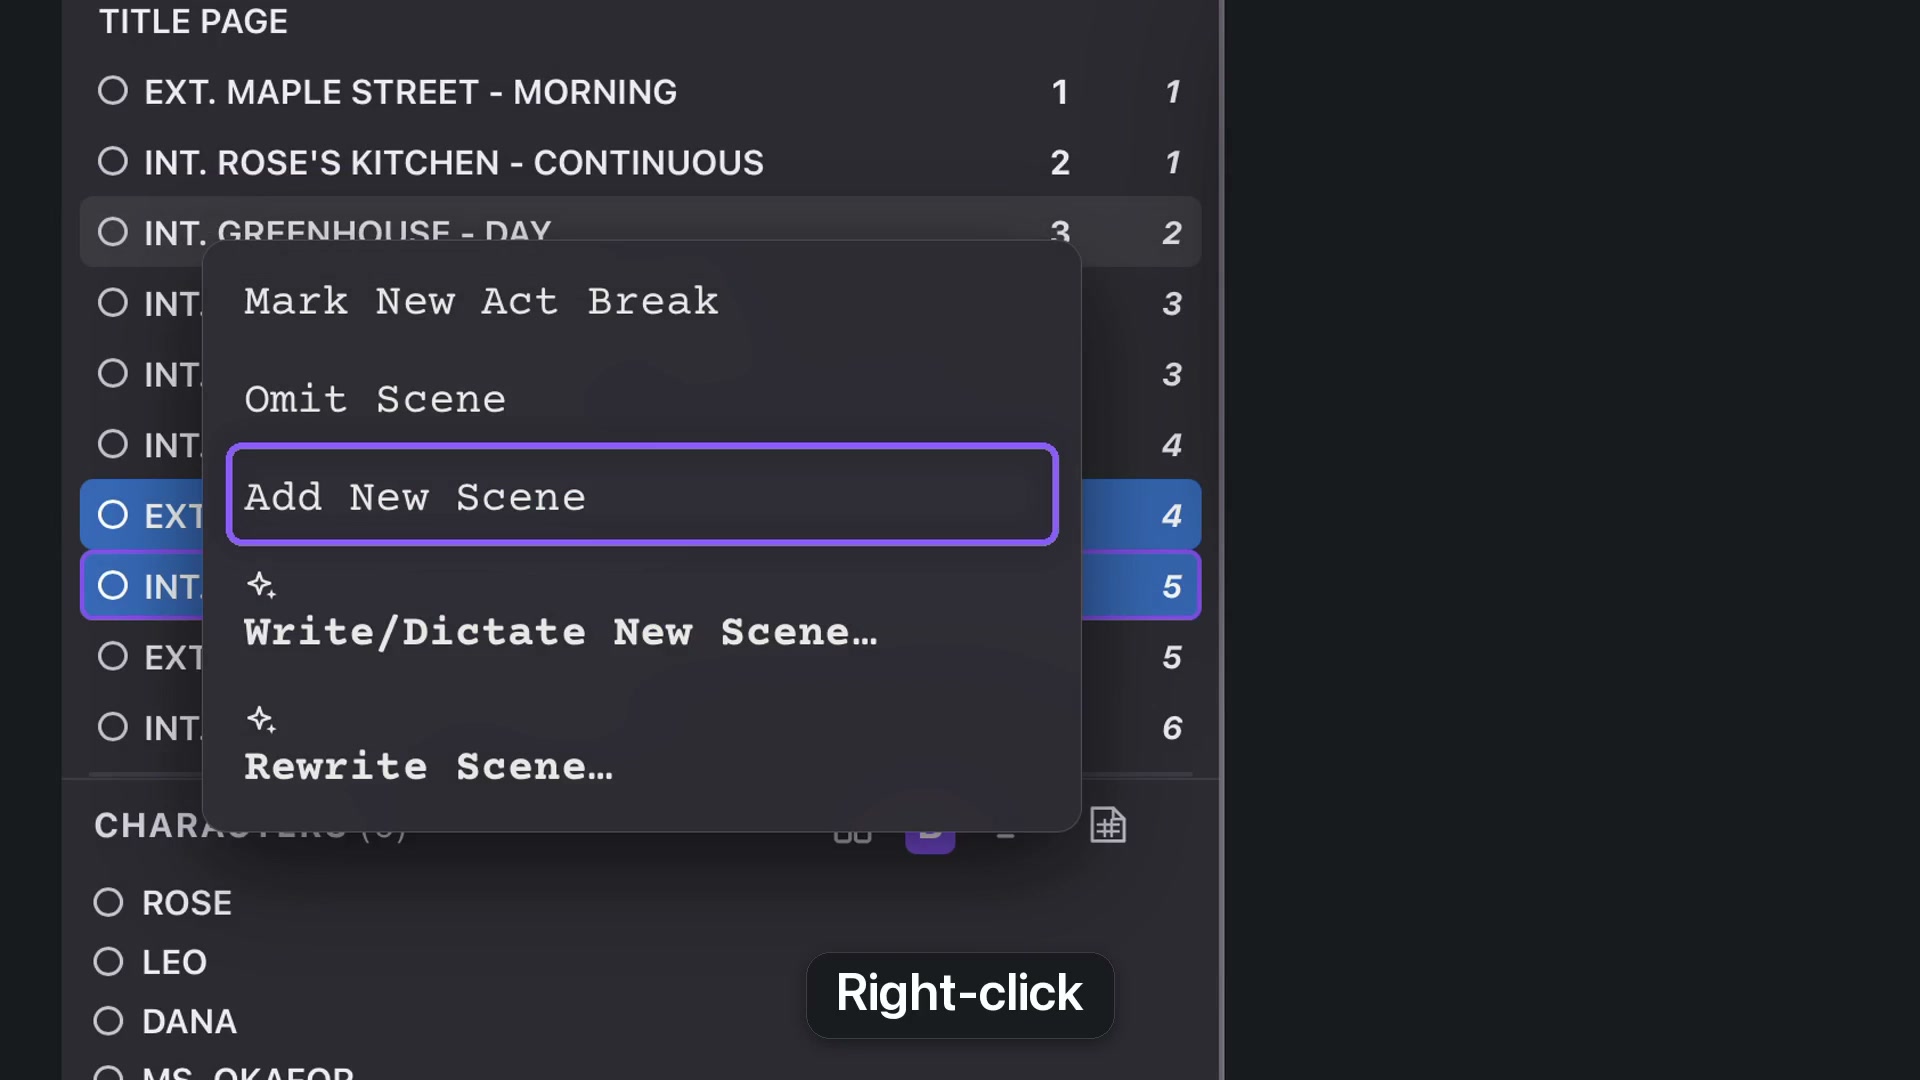
Right-click a scene for contextual commands. Add a scene immediately after it, omit a scene without discarding it, or restore an omitted scene. AI Write and Rewrite commands can develop a scene from your direction.
Choose the right scene before using a command. Instructions such as “keep the argument, but make the action quieter” give a rewrite a useful focus.
Right-click a scene to open its contextual actions.From lesson 06, 0:41 · Select the image to enlarge.
Switch to cards
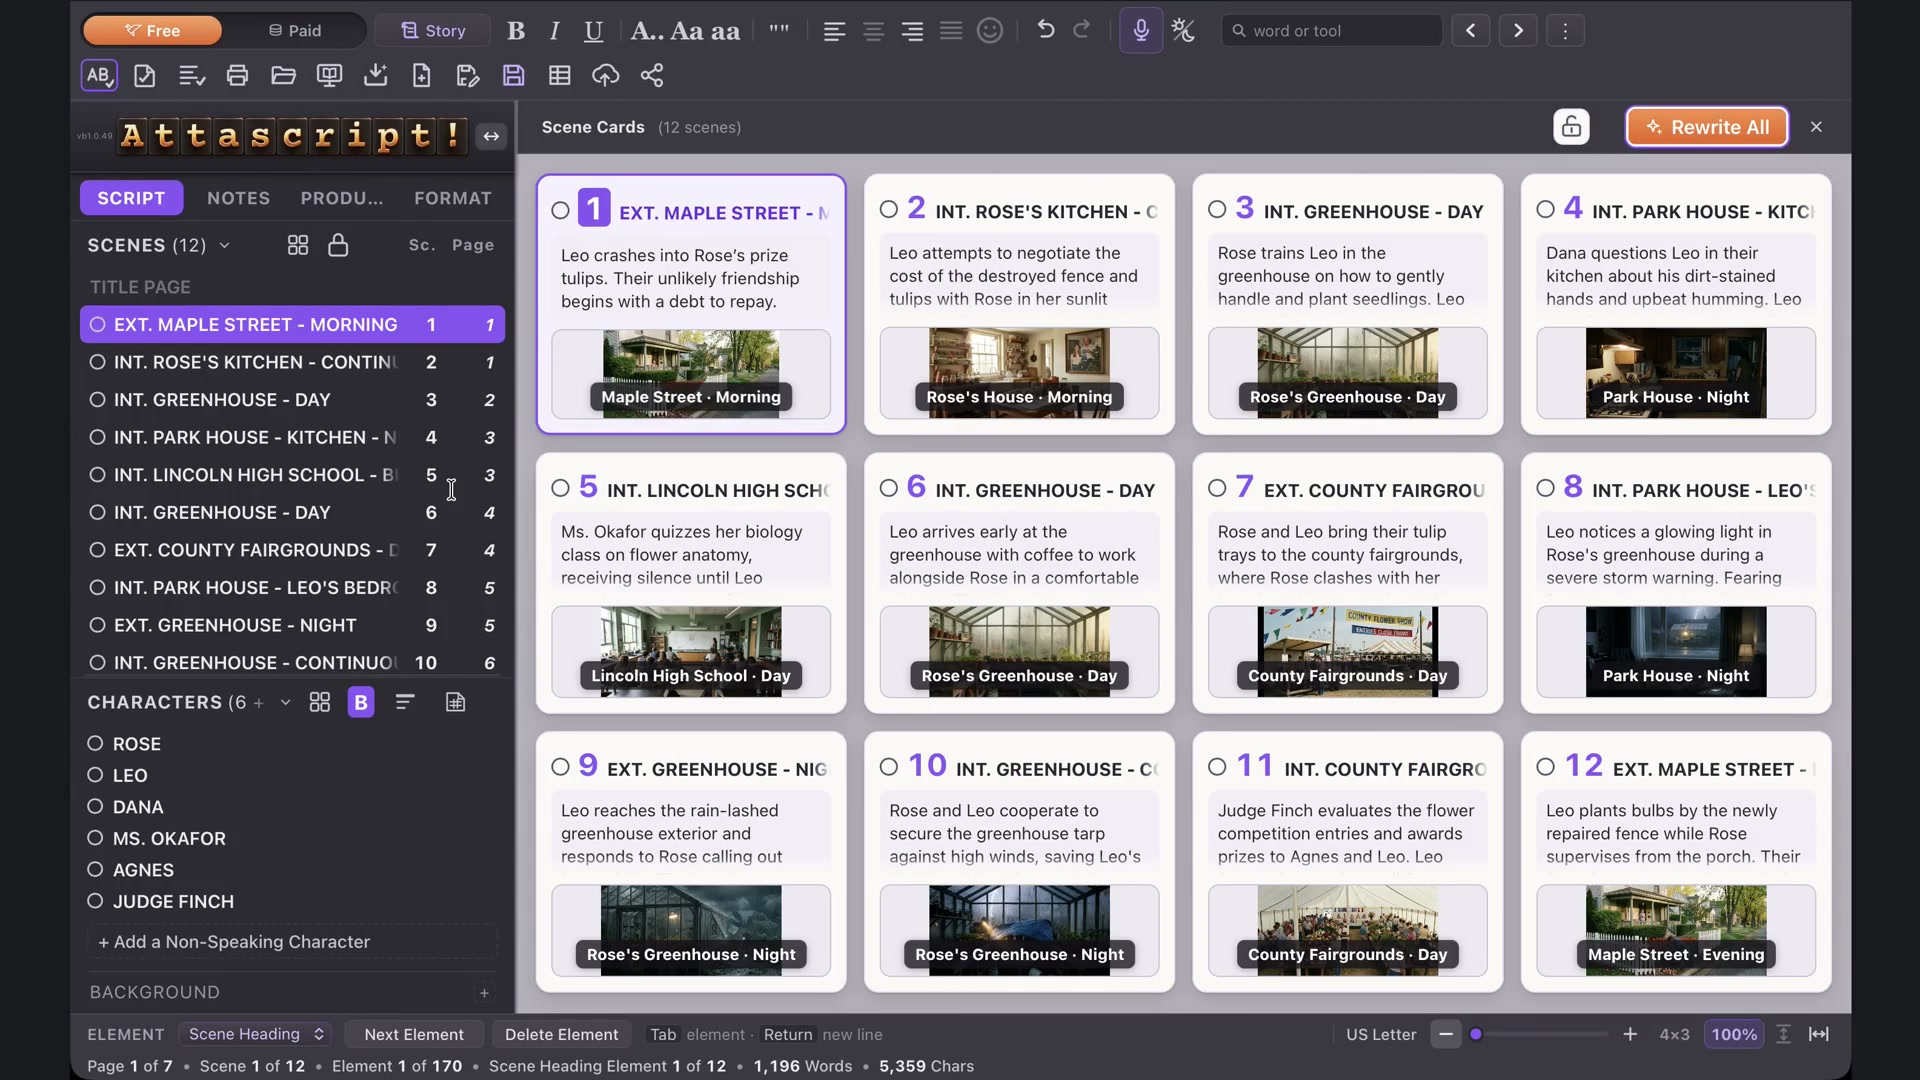
The four-squares control opens Scene Cards. The list is useful for navigation; the cards give descriptions and a wider view of the story. Drag the panel divider when you want more room for either Scenes or Characters.
CHAPTER 07
The Characters panel
The Characters panel gathers the people who speak, while also letting you account for silent characters and background groups.
Read the list
Sort by dialogue, number of scenes, estimated screen time, alphabet or first appearance. These are different ways of seeing a character’s place in the story, not interchangeable measures.
The color ring tints a character’s dialogue on the page and in exports. For a table read, use colors to organize readers. Bold Color Elements adds bold styling to those colored lines; switching it off keeps their color.
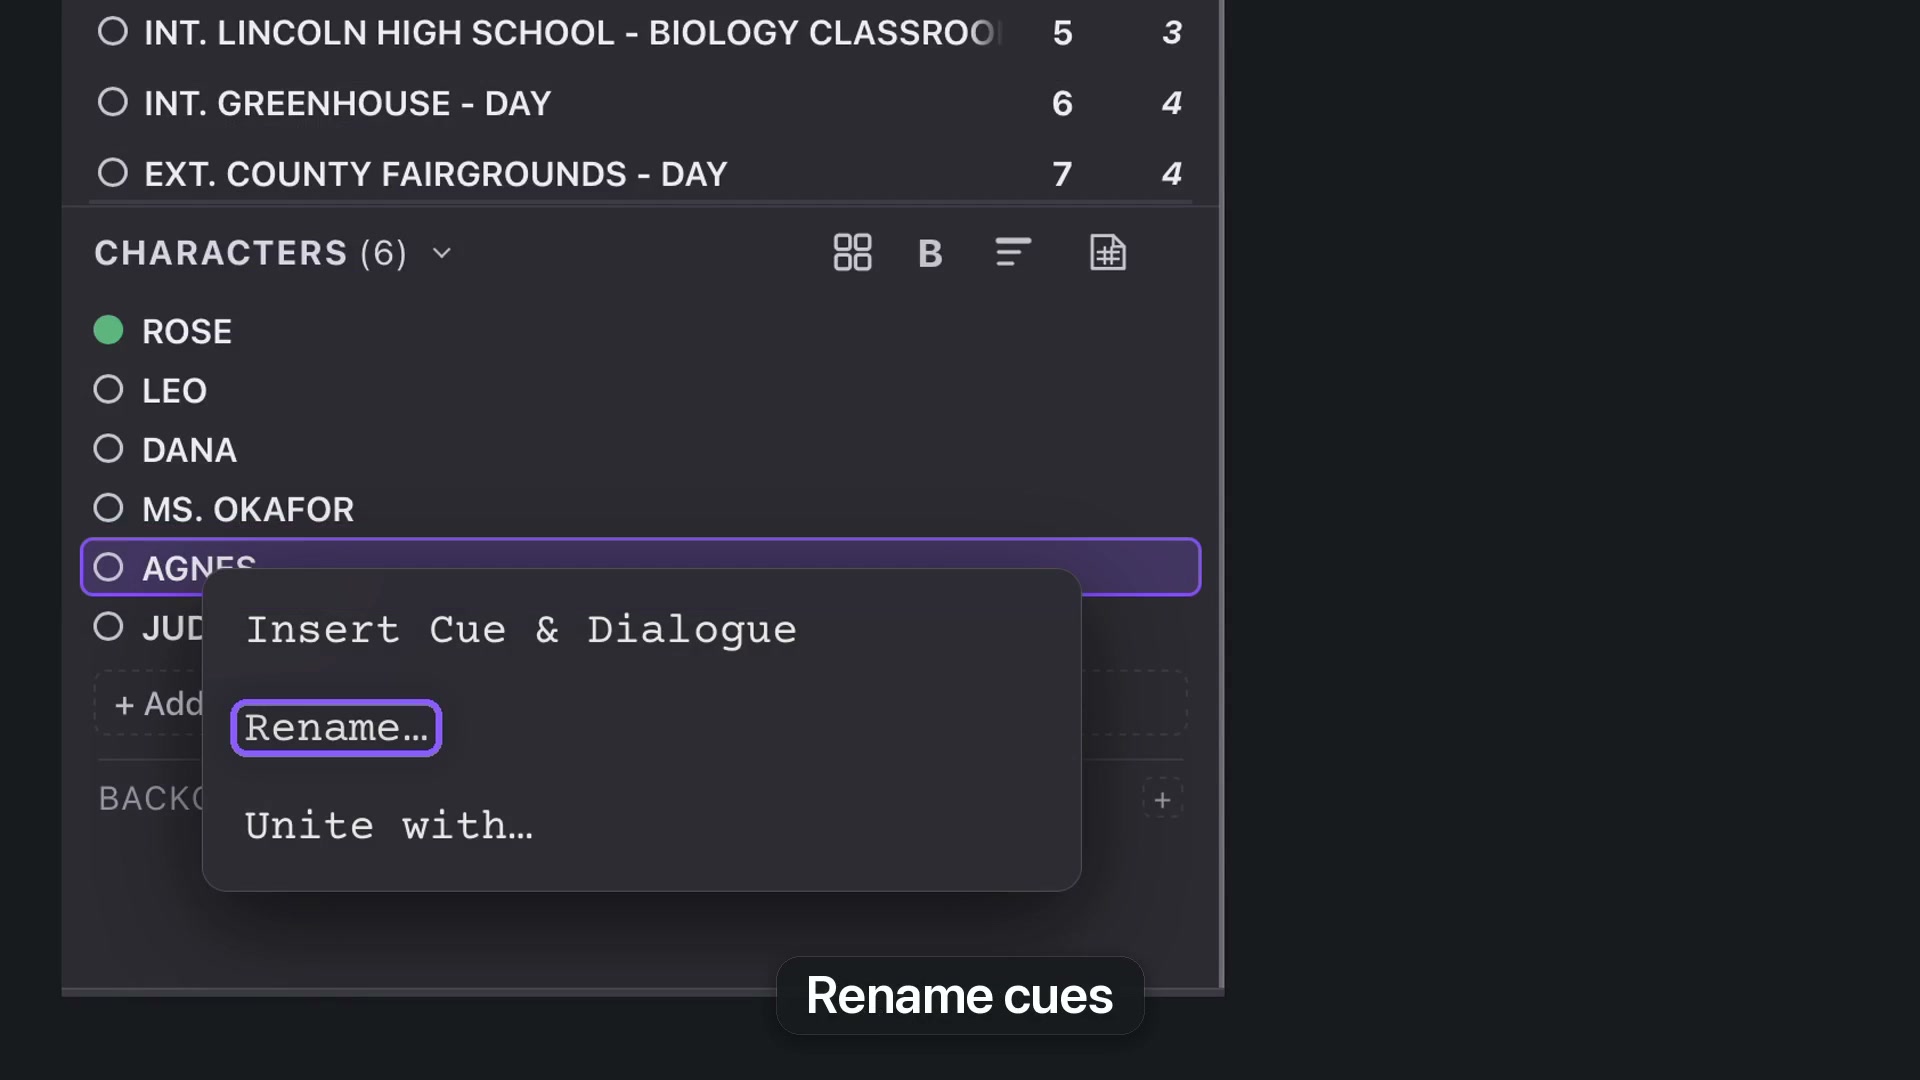
Rename changes matching cues; Unite groups names without rewriting them.From lesson 07, 0:46 · Select the image to enlarge.
Rename or unite
Right-click a name. Rename updates matching character cues throughout the screenplay. Unite groups alternate names in the panel and Character Cards without rewriting the cues. Choose the command according to whether the text itself should change.
Include people who do not speak
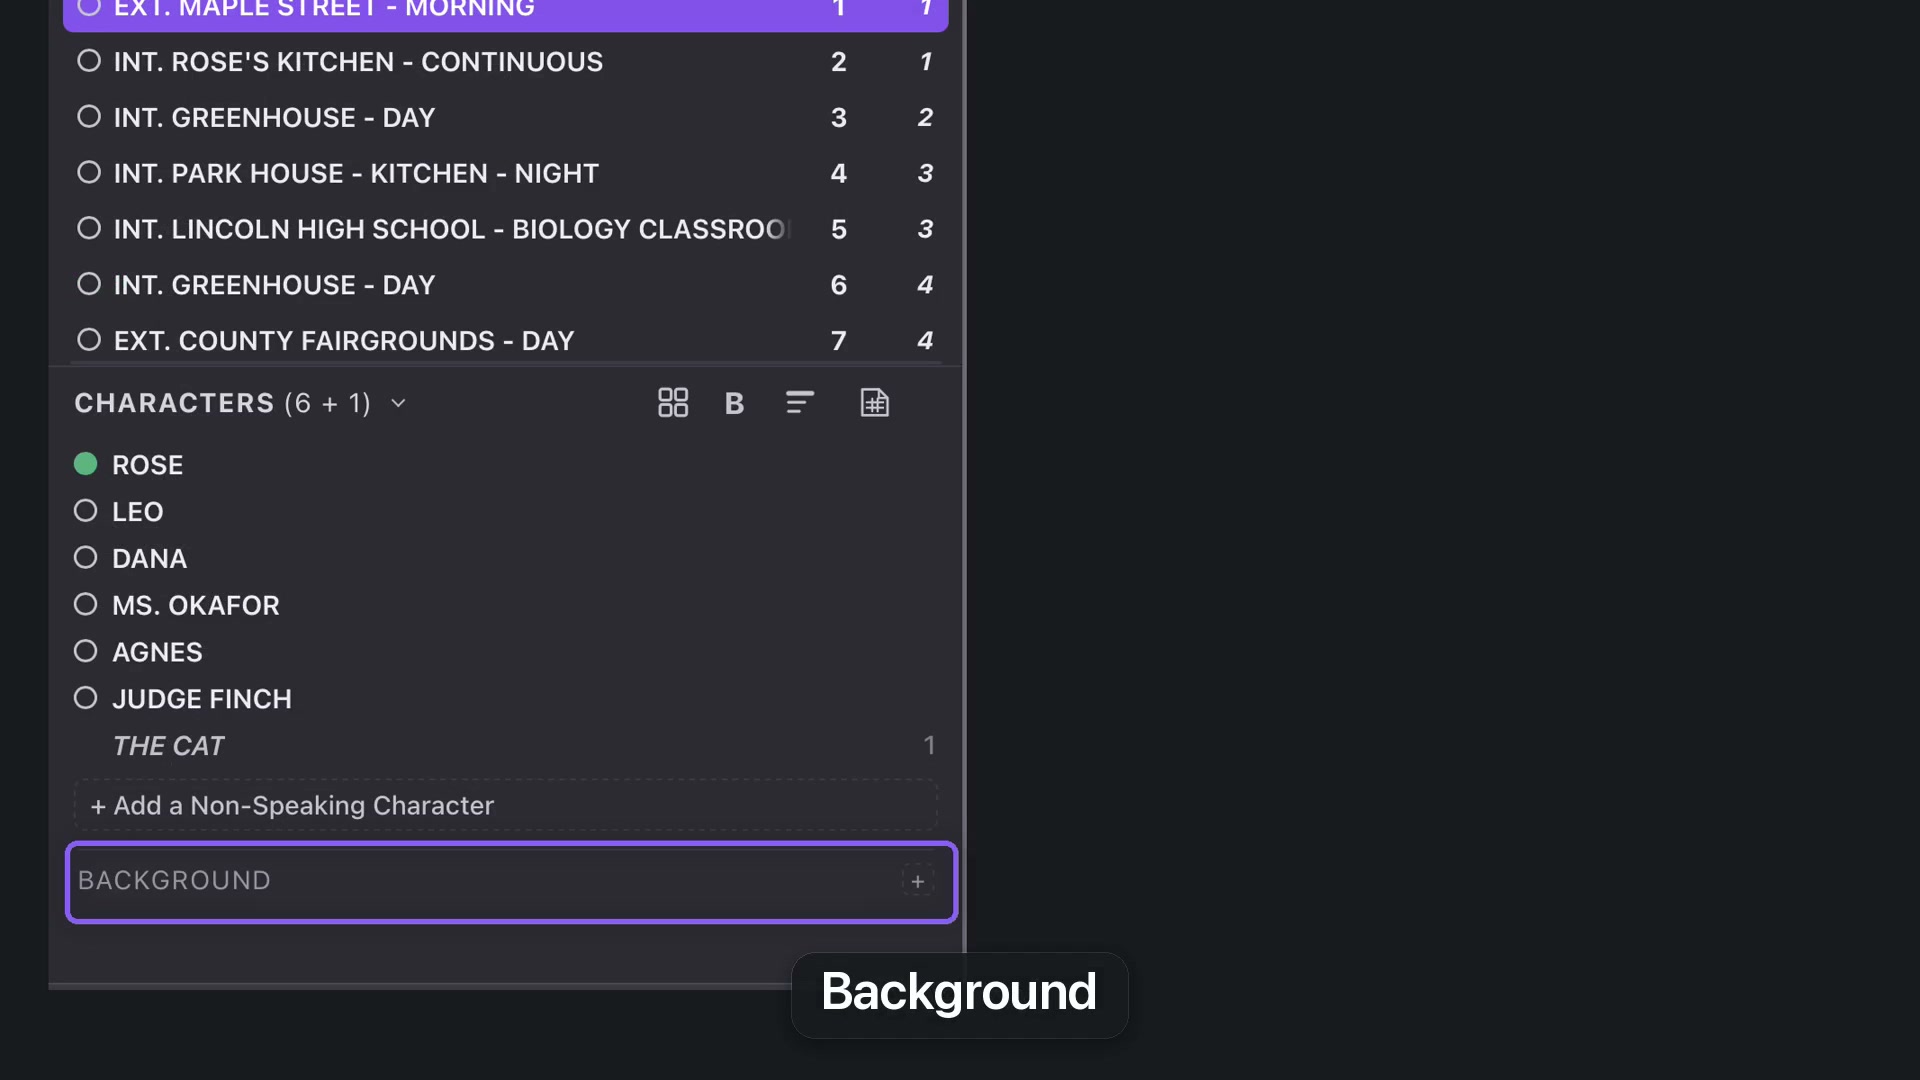
Select the scene where the person appears, then add a non-speaking character. Use Background for extras such as fairgoers. Background groups remain separate from individual cast members.
When a script specifies a crowd size, record that quantity for the scene. A missing quantity should not become an invented exact count.
Background groups are kept separate from the individual cast.From lesson 07, 1:09 · Select the image to enlarge.
Cards and reports
The four-squares control opens Character Cards. A character report provides a separate overview for a production team. Save the working project so the cast organization stays with the screenplay.
CHAPTER 08
Ask The 🐵
Ask the Monkey about the screenplay, explore alternatives, and review proposed changes before applying them.
Start a focused conversation
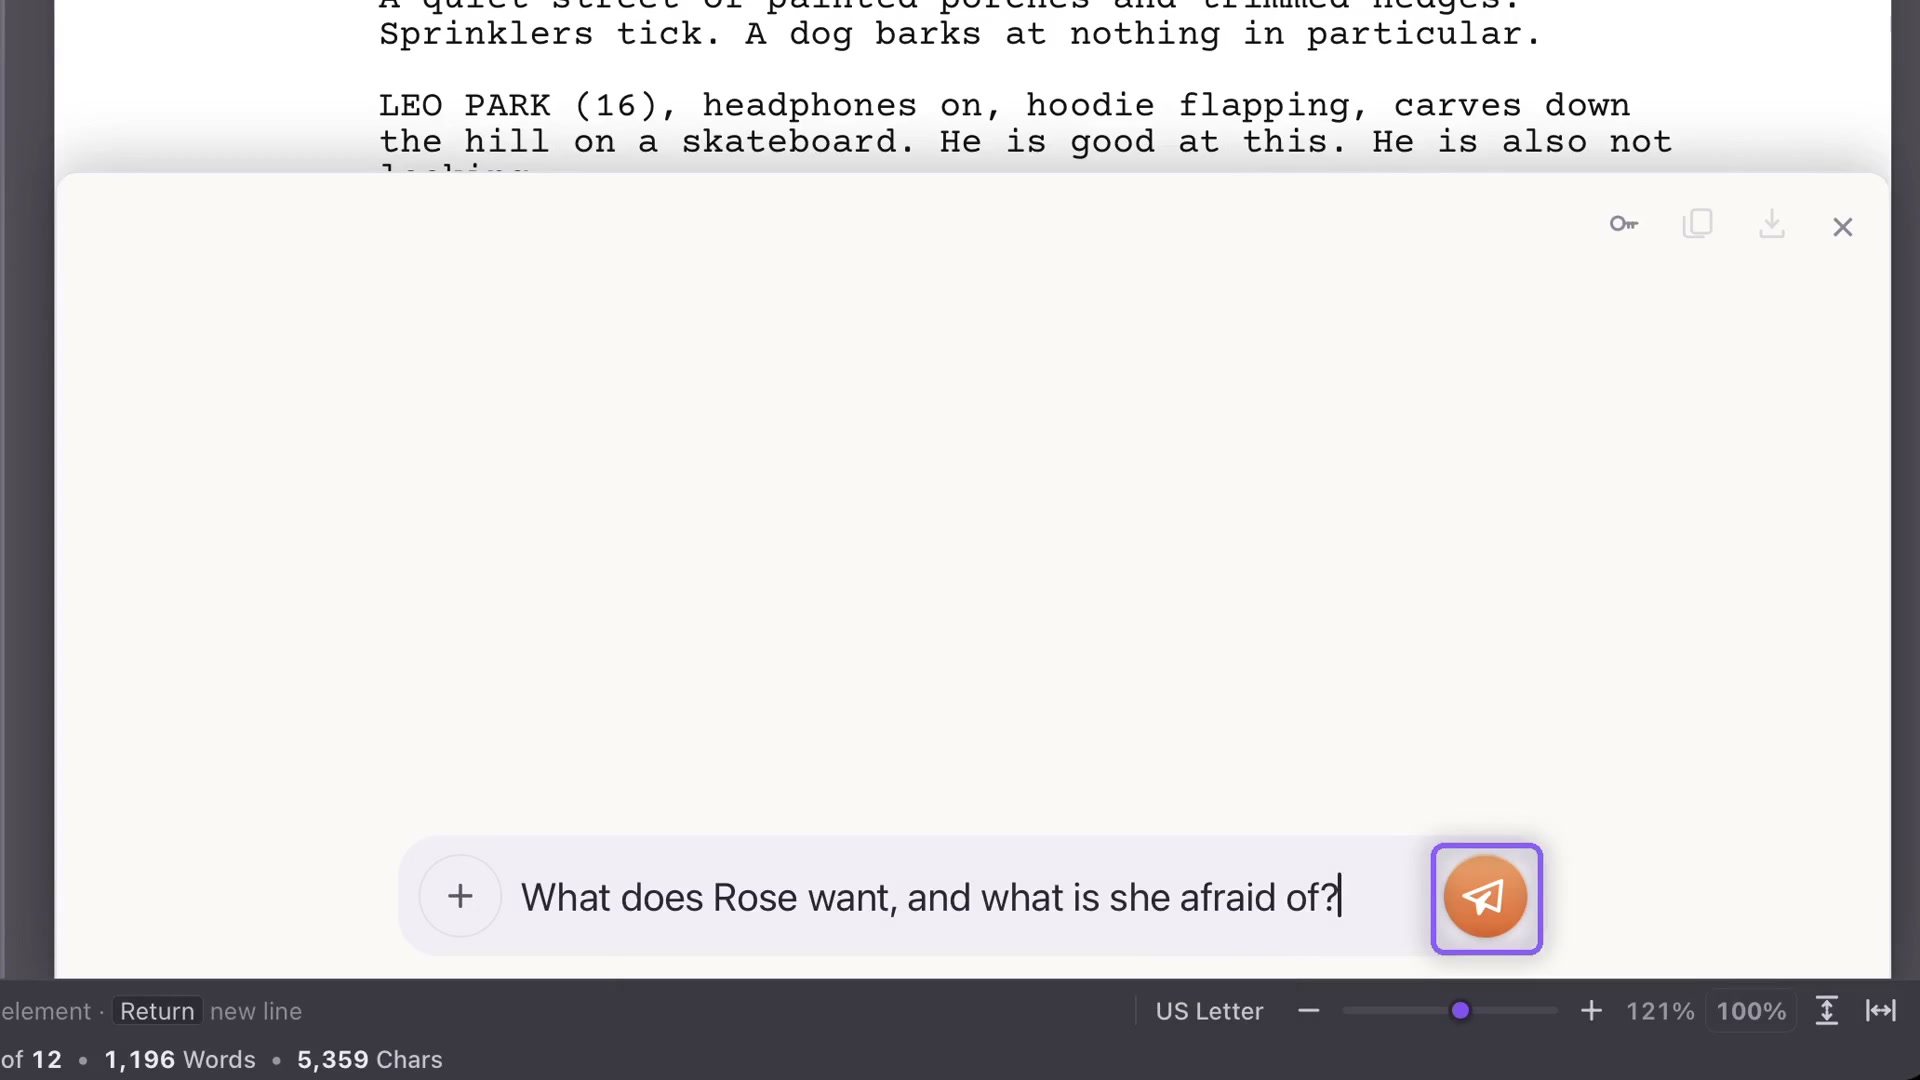
Open Notes, then New Chat. The shortcut is Shift+Command+W on Mac or Ctrl+Shift+W on Windows. Ask a specific question about your screenplay: “What does Rose want, and what is she afraid of?” is more useful than an instruction to improve everything.
Ask a specific question about a character or scene.From lesson 08, 0:21 · Select the image to enlarge.
Explore before changing
Ask for alternative dialogue, a structural reading or a different approach to a scene. You can compare ideas in the conversation while leaving the screenplay as it is.
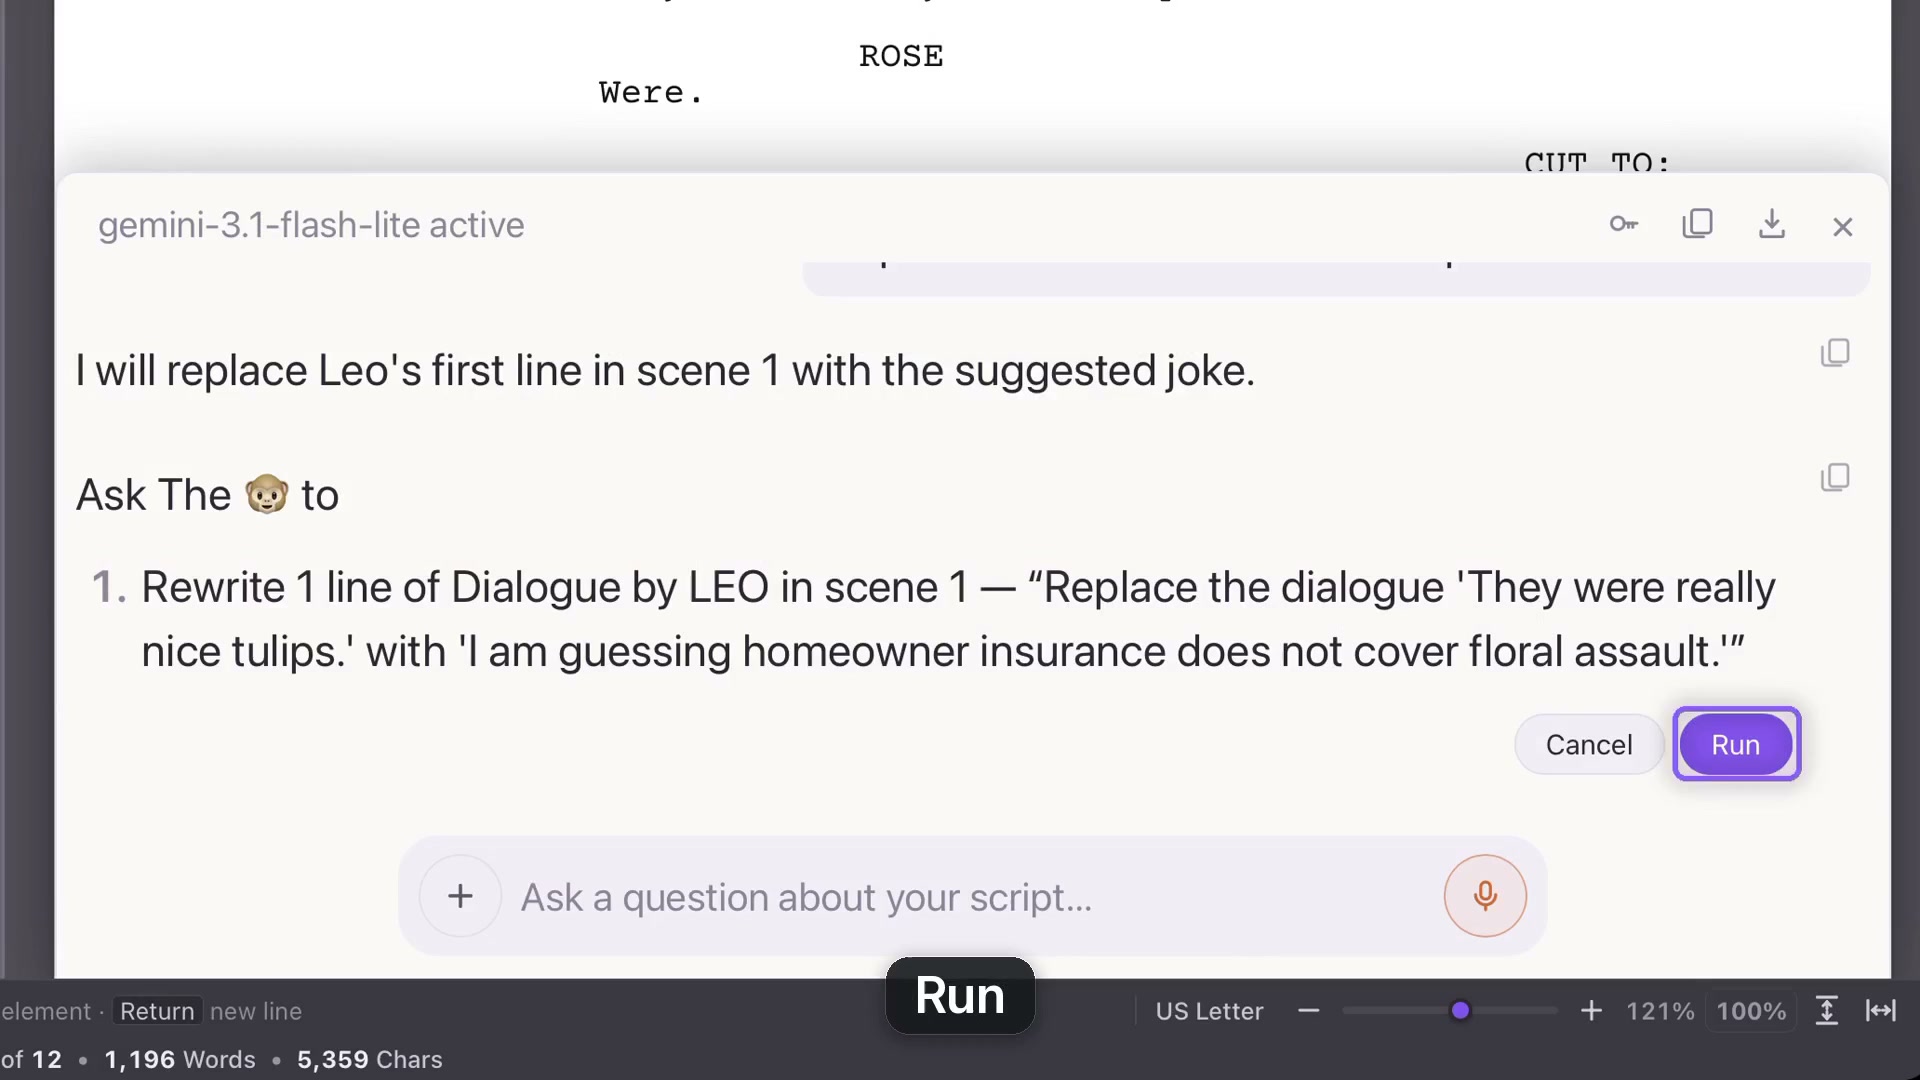
If you want the change applied, ask explicitly. For example: replace Leo’s first line with a funnier one while preserving its meaning. Review the proposed action, then choose Run when it reflects what you want.
Keep useful exchanges
Copy one reply, copy the whole conversation, or export the chat. Closing a conversation after a reply leaves it in this project’s chat list, so you can return to it. Save your project as you continue working.
Review a proposed action before running it.From lesson 08, 0:43 · Select the image to enlarge.
Manage the connection
The key icon provides a route to replace the selected mode’s Gemini key. If you have not connected Gemini yet, follow the key-setup chapter first. Free and Paid have their own project and key setup.
CHAPTER 09
The Notes panel
Keep notes attached to the relevant screenplay element, then turn selected feedback into a scene revision.
Write and revisit your own notes
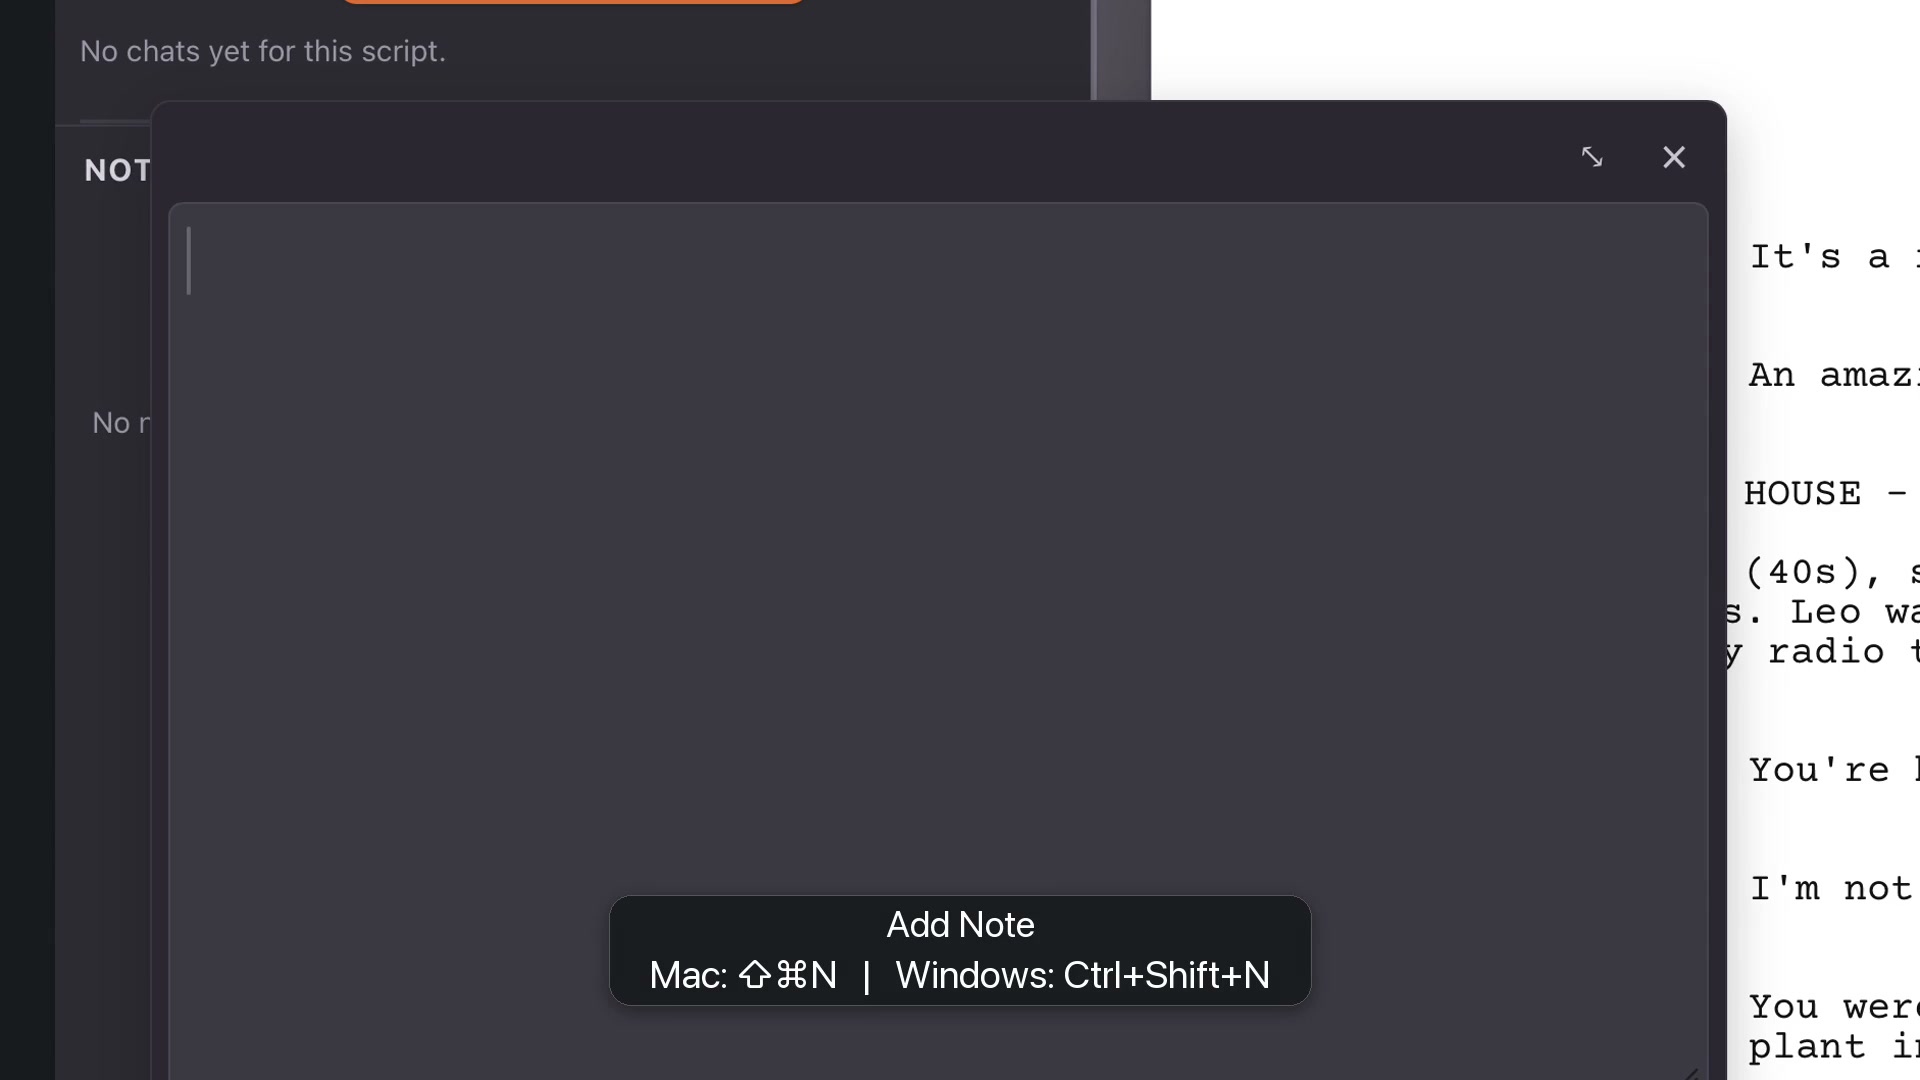
Put the caret on the relevant line. Choose Add Note, or Shift+Command+N on Mac / Ctrl+Shift+N on Windows. Write the note and close its card to save it. The note keeps its scene and page reference. Click the row later to return to that part of the script.
Attach a note to the element you want to revisit.From lesson 09, 0:11 · Select the image to enlarge.
Ask for a scene-by-scene reading
Auto Scene Notes reads the screenplay and supplies a development note for each scene. Red flags issues, yellow identifies scenes needing treatment, and green marks strengths. Read the actual feedback rather than judging a scene only by its color.
Write Remaining Notes covers headings without notes. Rewrite Scene Notes refreshes AI notes you have not edited while preserving your own notes and edited AI feedback.
Apply a useful note
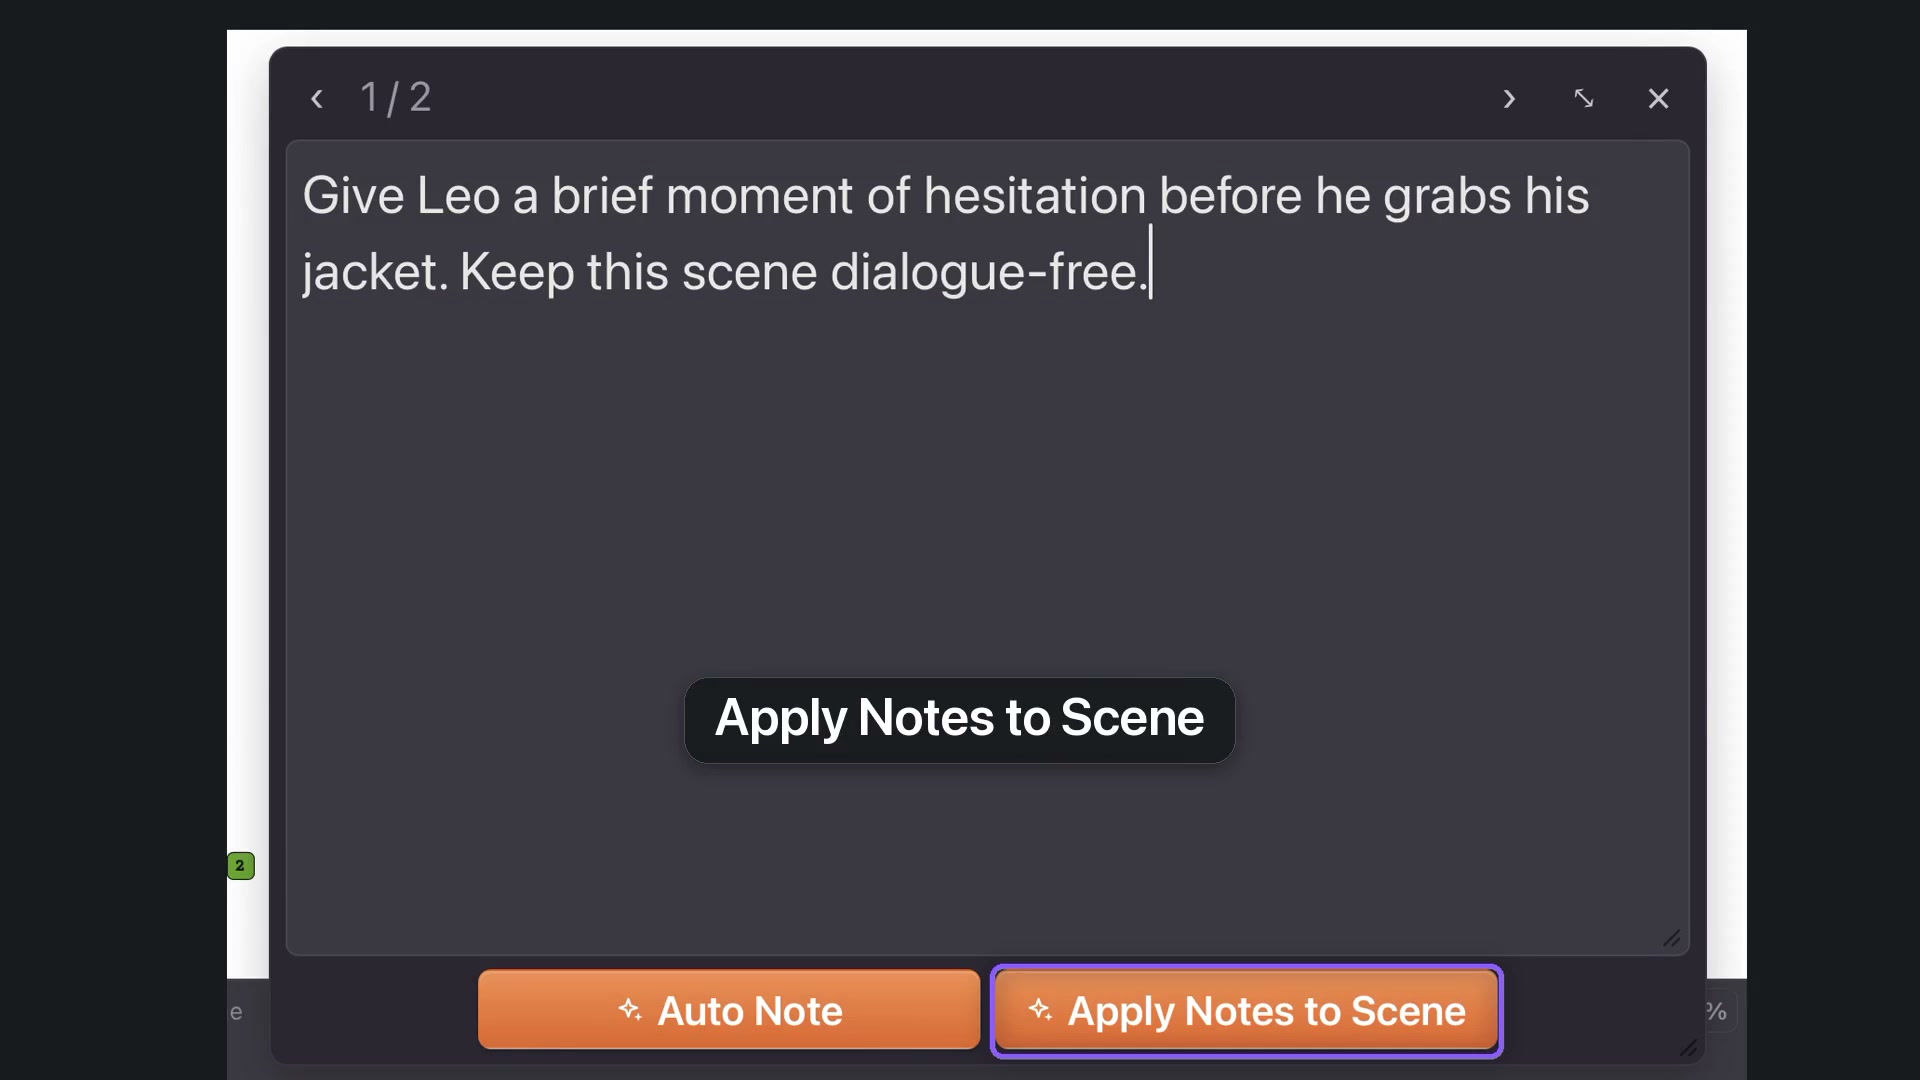
Double-click a note to edit it. Make its direction specific before choosing Apply Notes to Scene. In the example, the instruction asks for a hesitation expressed through action. Review the rewritten scene. Undo restores the preceding state if the result is not right.
Edit the instruction before applying it to the scene.From lesson 09, 1:17 · Select the image to enlarge.
Remove a note
Hover over a note’s row and use the trash icon. That removes the note, not the screenplay wording. Undo can bring the note back. Save the project to retain the notes you want to keep.
CHAPTER 10
The Tagging panel
Mark the cast, props, wardrobe and other production needs, then export a breakdown your team can use.
Tag a requirement
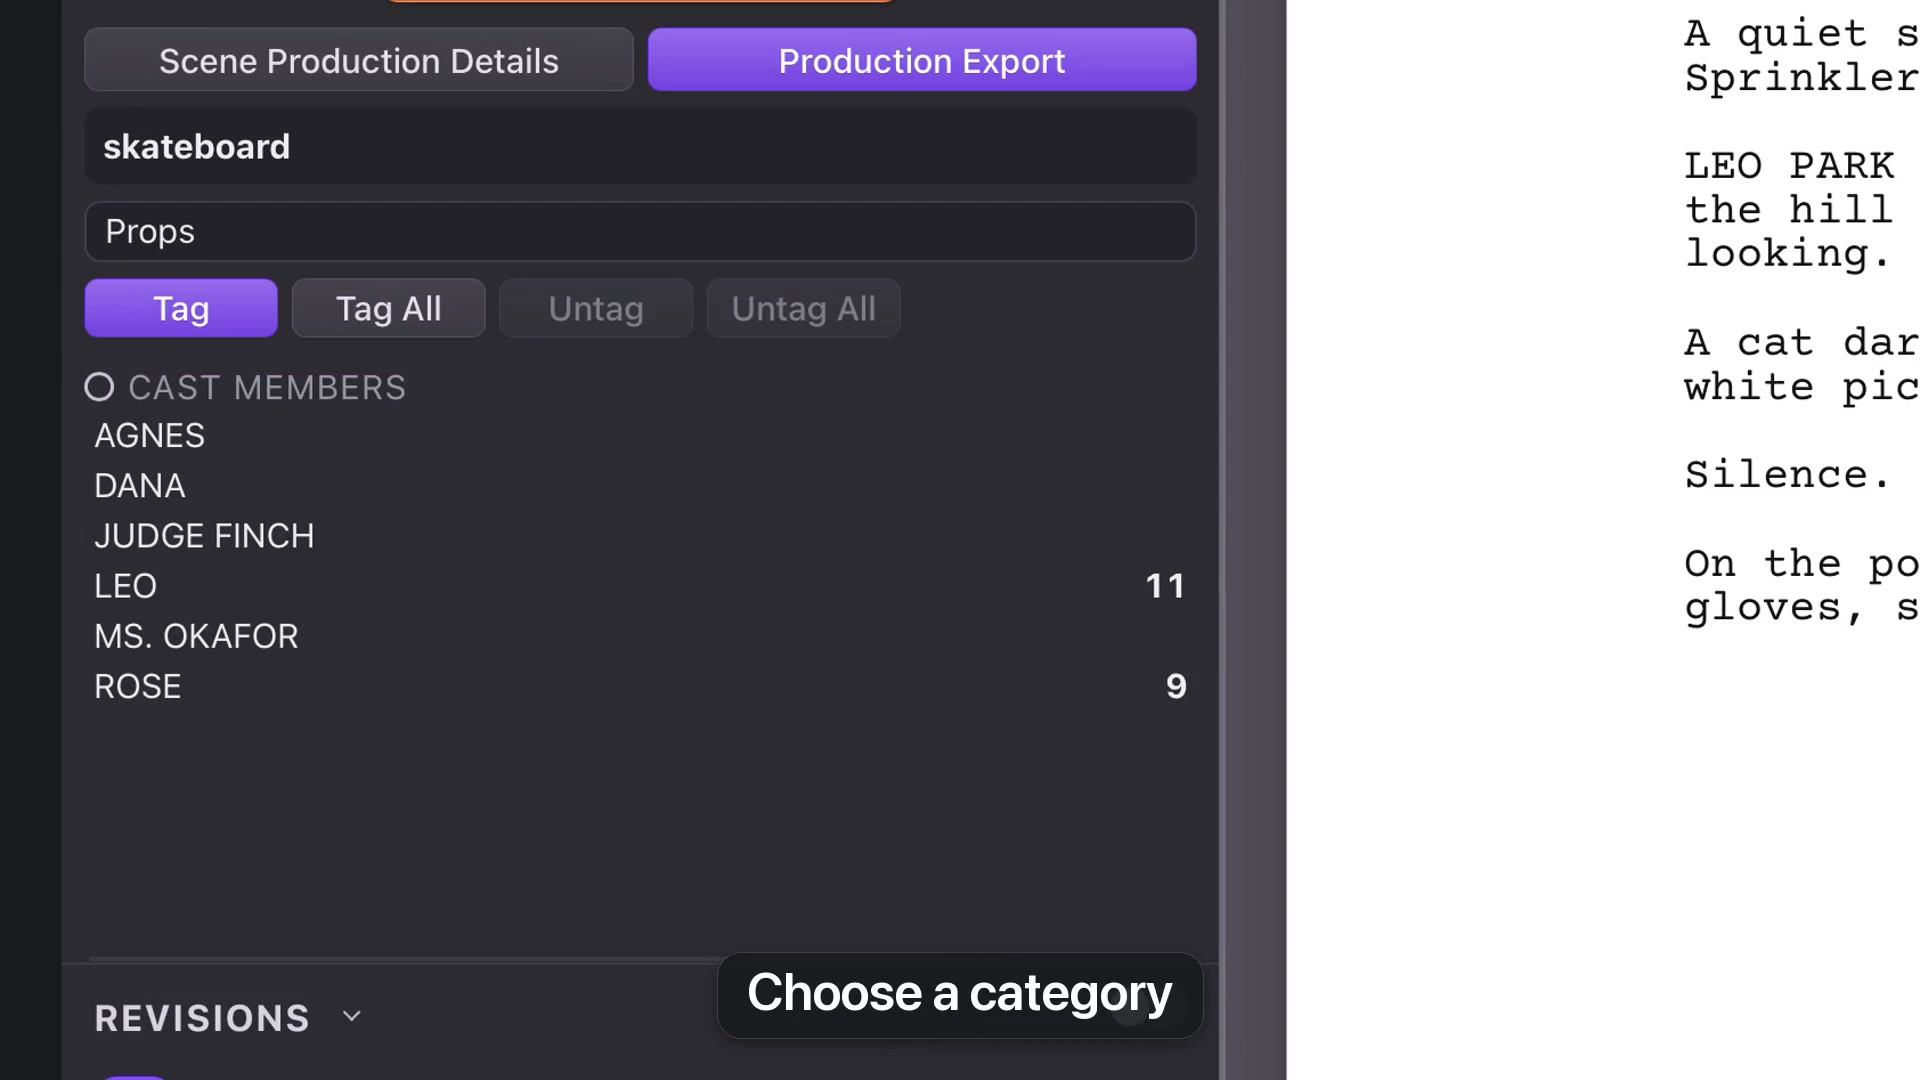
Open Production and enable Tagging Mode. Speaking characters are tagged as cast automatically. Select wording on the page, choose a category such as Props, Wardrobe or Vehicles, then click Tag.
Tag All applies the same tag to matching lines across the screenplay. Untag removes it from the current line; Untag All removes matching tags throughout the script. Check the scope before using an “All” command.
Select text, choose a category, then tag it.From lesson 10, 0:14 · Select the image to enlarge.
Review automatic suggestions
Auto-Tag examines Action lines for production requirements such as props, wardrobe and animals. Review its results against the actual text. An automated suggestion is a starting point for a breakdown, not a substitute for reading the scene.
Set scene production details
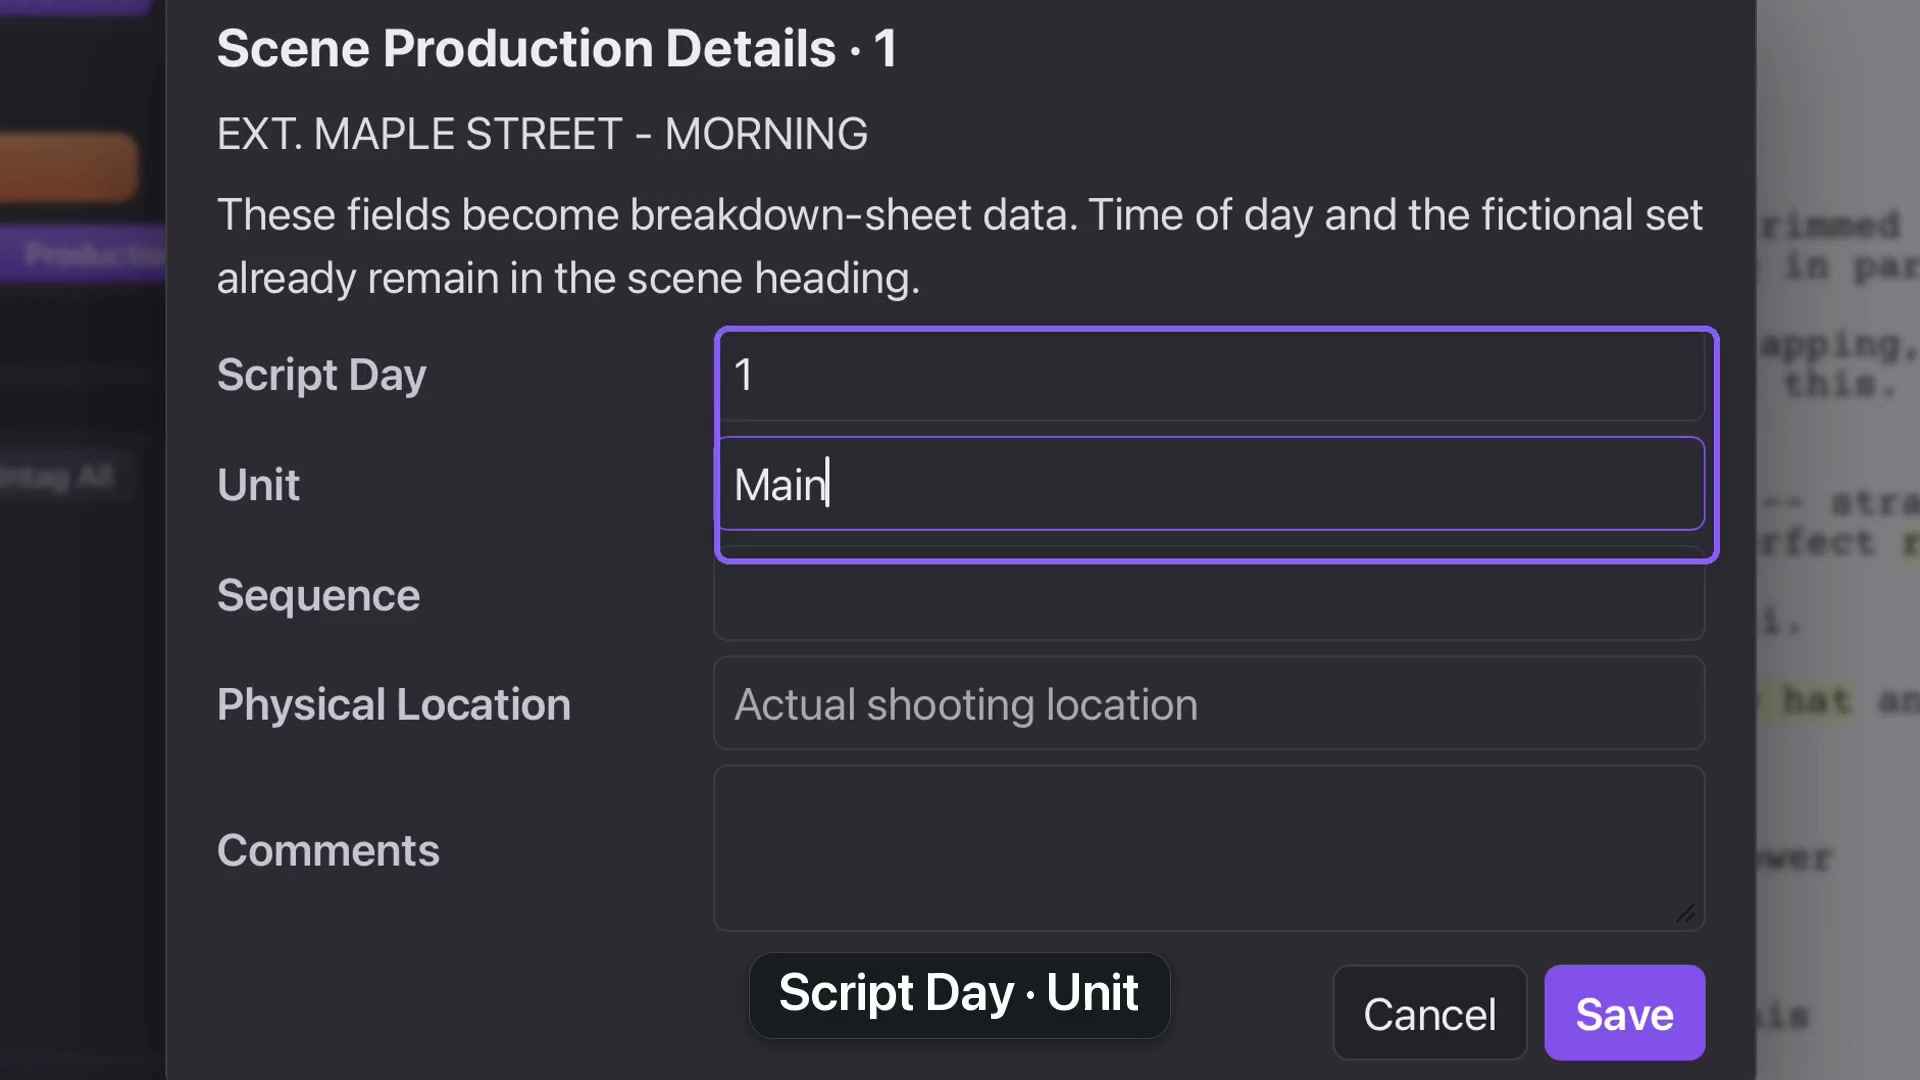
Open Scene Production Details for the current scene. Set its Script Day and Unit, save, and repeat where needed. These fields describe production information that should be consistent across related scenes.
Scene Production Details records Script Day and Unit.From lesson 10, 0:45 · Select the image to enlarge.
Export the breakdown
Production Export prepares a Movie Magic Scheduling import and a CSV ledger. Choose the script range, review the preflight and choose an output folder. The grid control also exports the tagging breakdown as CSV for a spreadsheet.
Keep the editable project as your master; the report is the copy you give to the team.
CHAPTER 11
The Revisions panel
Make changes easy to identify once a screenplay enters production, using revision sets and stable numbering.
Start a revision set
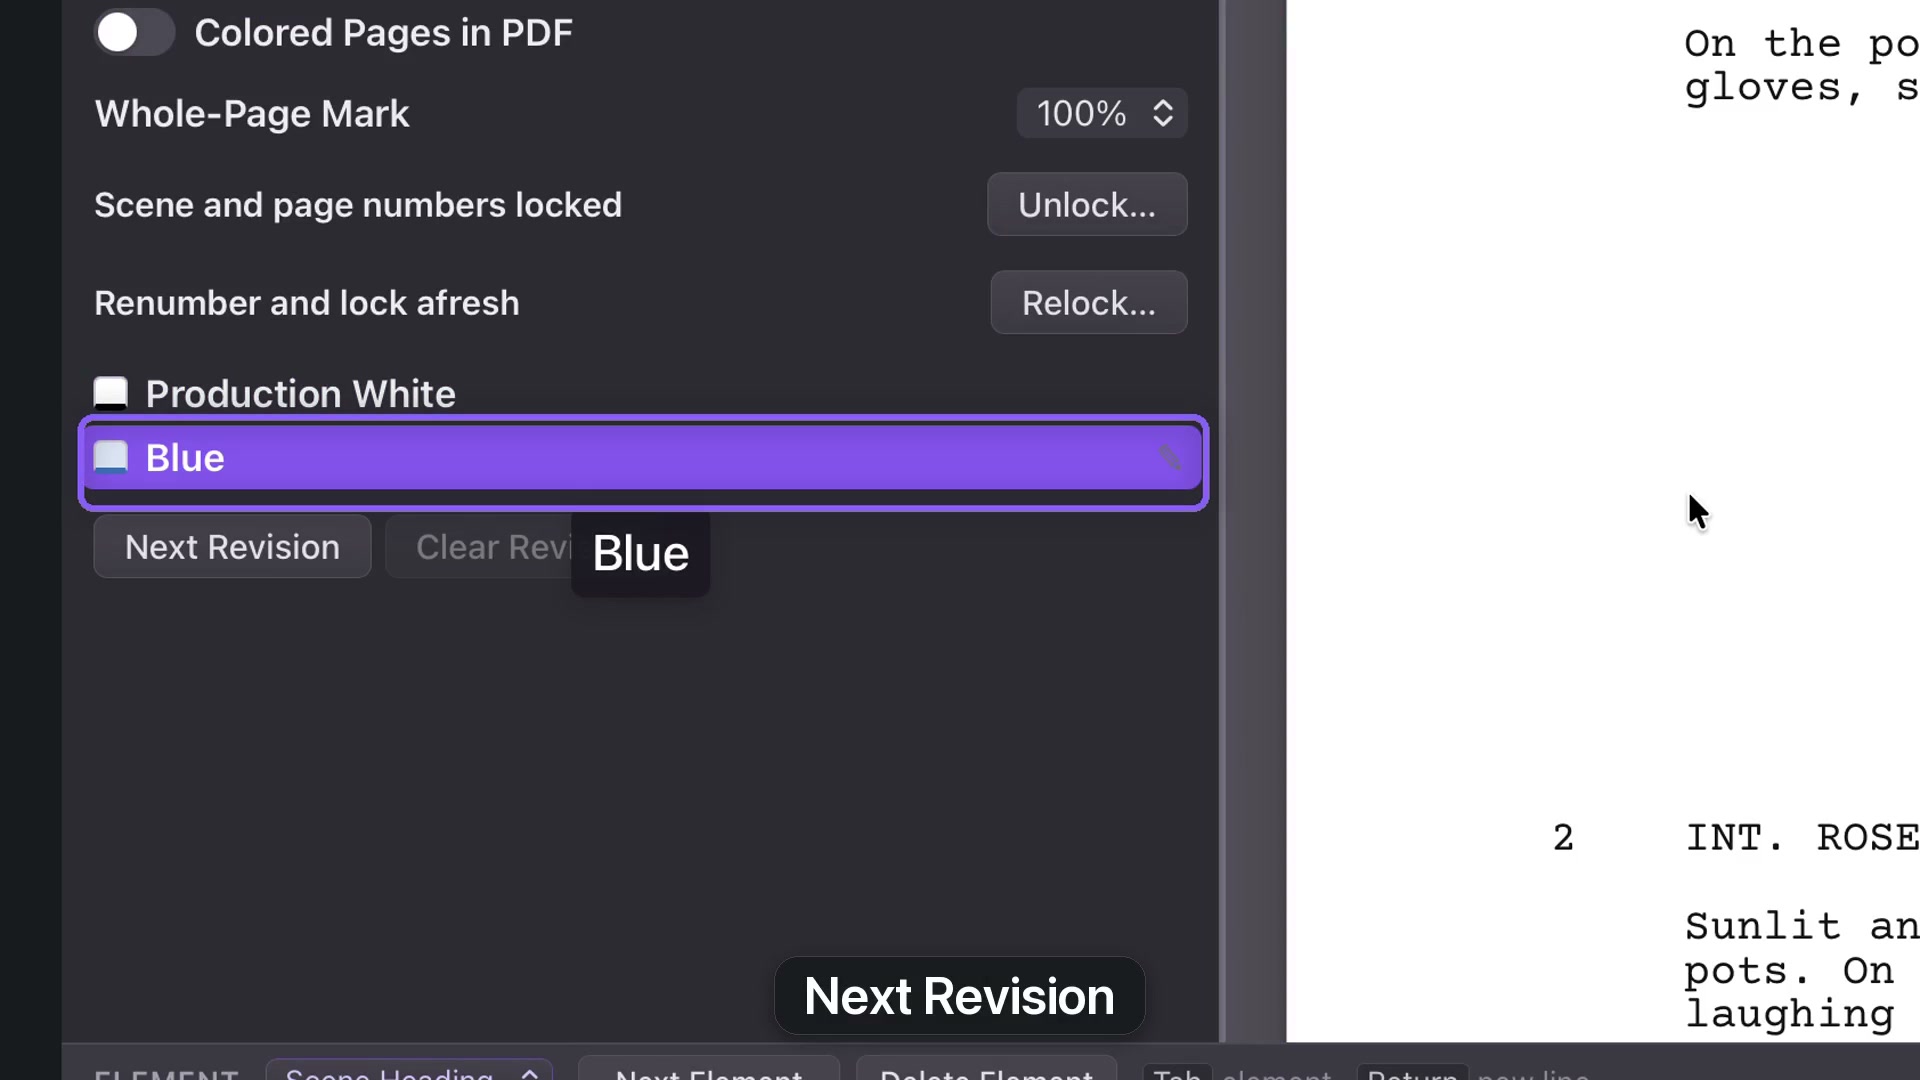
Open Production and enable Revision Mode. Scene and page numbers are locked for production, with Production White as the starting draft. Choose Next Revision to begin Blue. Further rounds use Pink, Yellow, Green and subsequent sets.
This is different from Review Mode, which tracks changes for acceptance or rejection. Production revisions identify what has changed in a distributed draft.
Next Revision starts the next production revision set.From lesson 11, 0:23 · Select the image to enlarge.
Choose marks and page color
Edits made in Revision Mode receive revision marks. Colored Pages tints revised pages in the workspace. Colored Pages in PDF controls whether those tints appear in the export; leave it off when the delivery should use white paper.
Whole-Page Mark sets how much change makes a page count as fully revised. Choose a threshold, or Never, according to the production’s requirements.
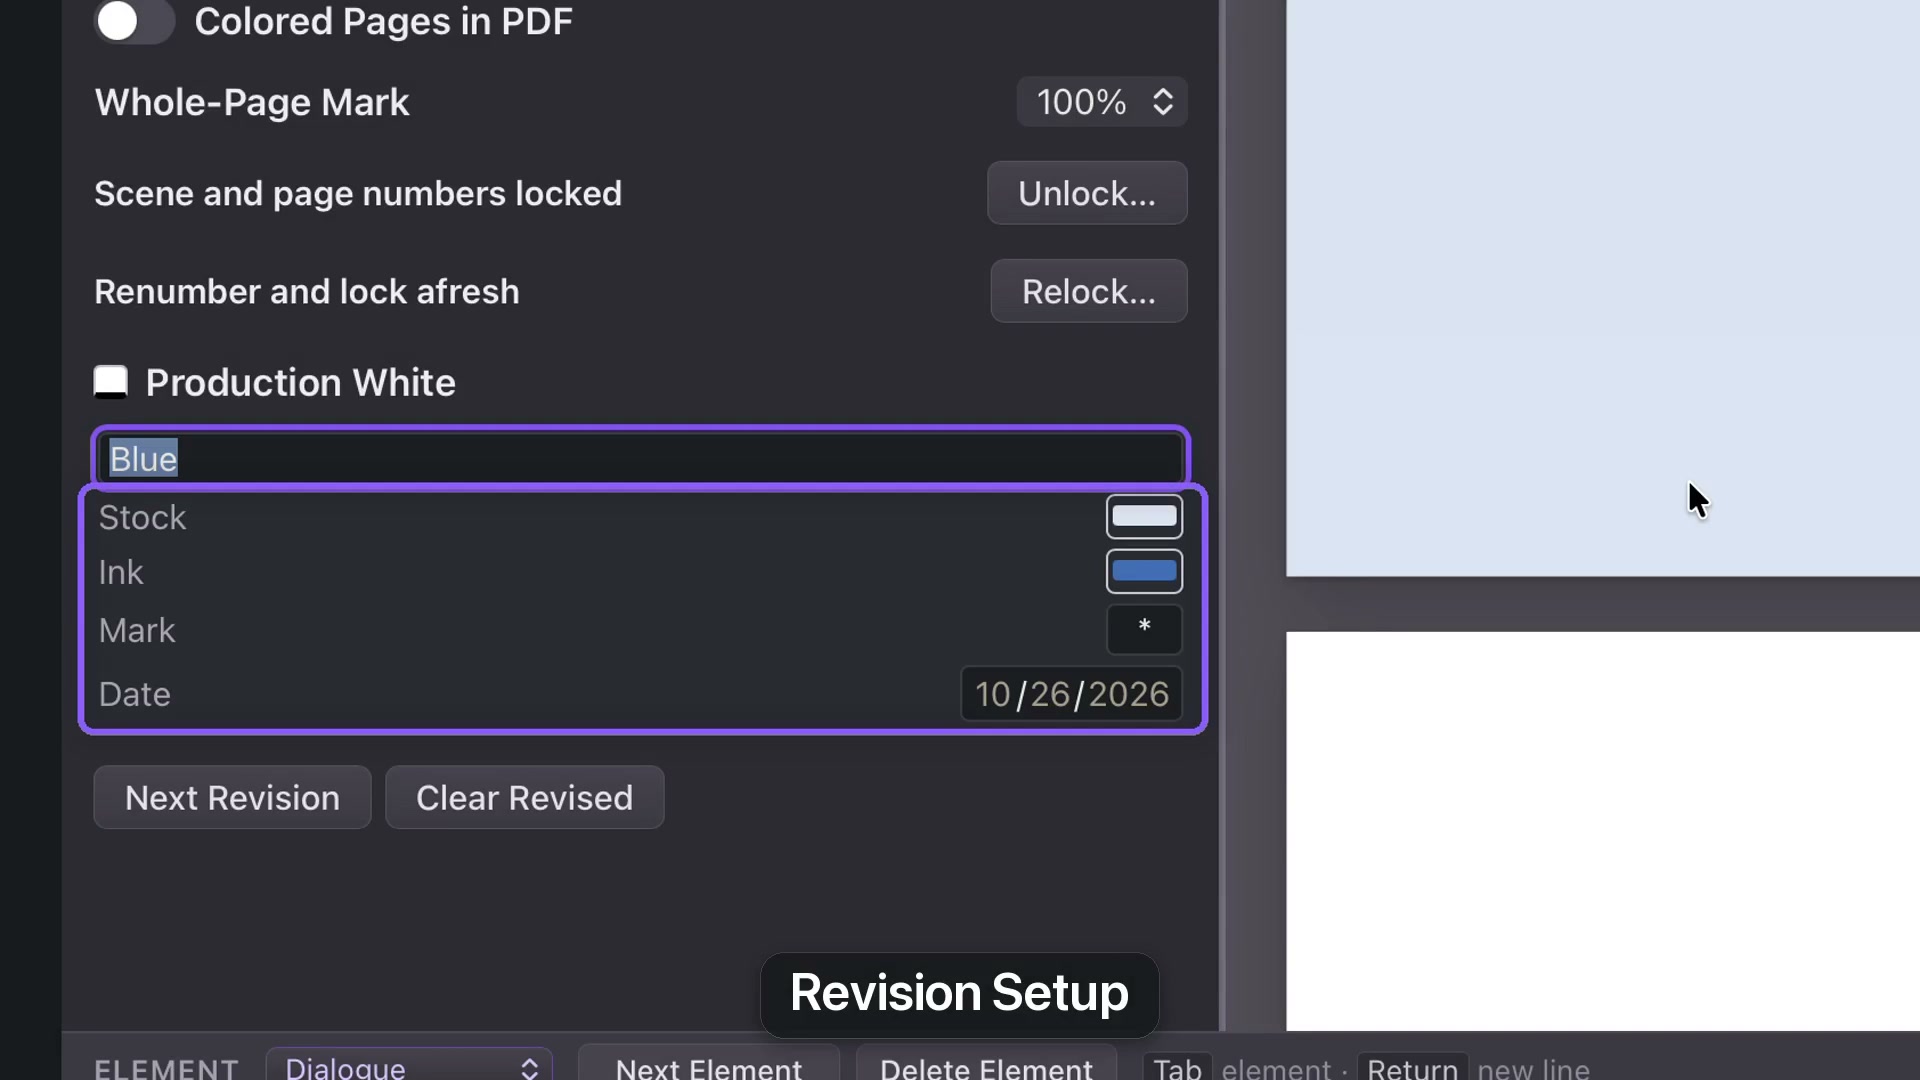
Revision Setup controls the set’s color, mark and date.From lesson 11, 1:07 · Select the image to enlarge.
Configure and clear
Choose Final Draft or numeric styles for inserted-page numbering. Revision Setup lets you adjust the active set’s color, mark and date.
Clear Revised removes revision marks from the current or selected elements. It does not undo the edited wording. Save a clearly named draft before preparing your production delivery.
CHAPTER 12
The Format panel
Choose the screenplay’s language, page conventions and element styling without manually rebuilding its layout.
Style screenplay elements
The Scene Heading row offers Bold and Underline, plus heading-spacing choices. In the English example, Wide places two blank lines above a heading and one below; Medium uses one above and one below. Other profiles may follow different conventions.
The 1-2-3 control shows or hides scene numbers. Other element rows have their own bold, italic or underline controls. For an ordinary English spec script, scene numbers can remain hidden; production and some language conventions use them.
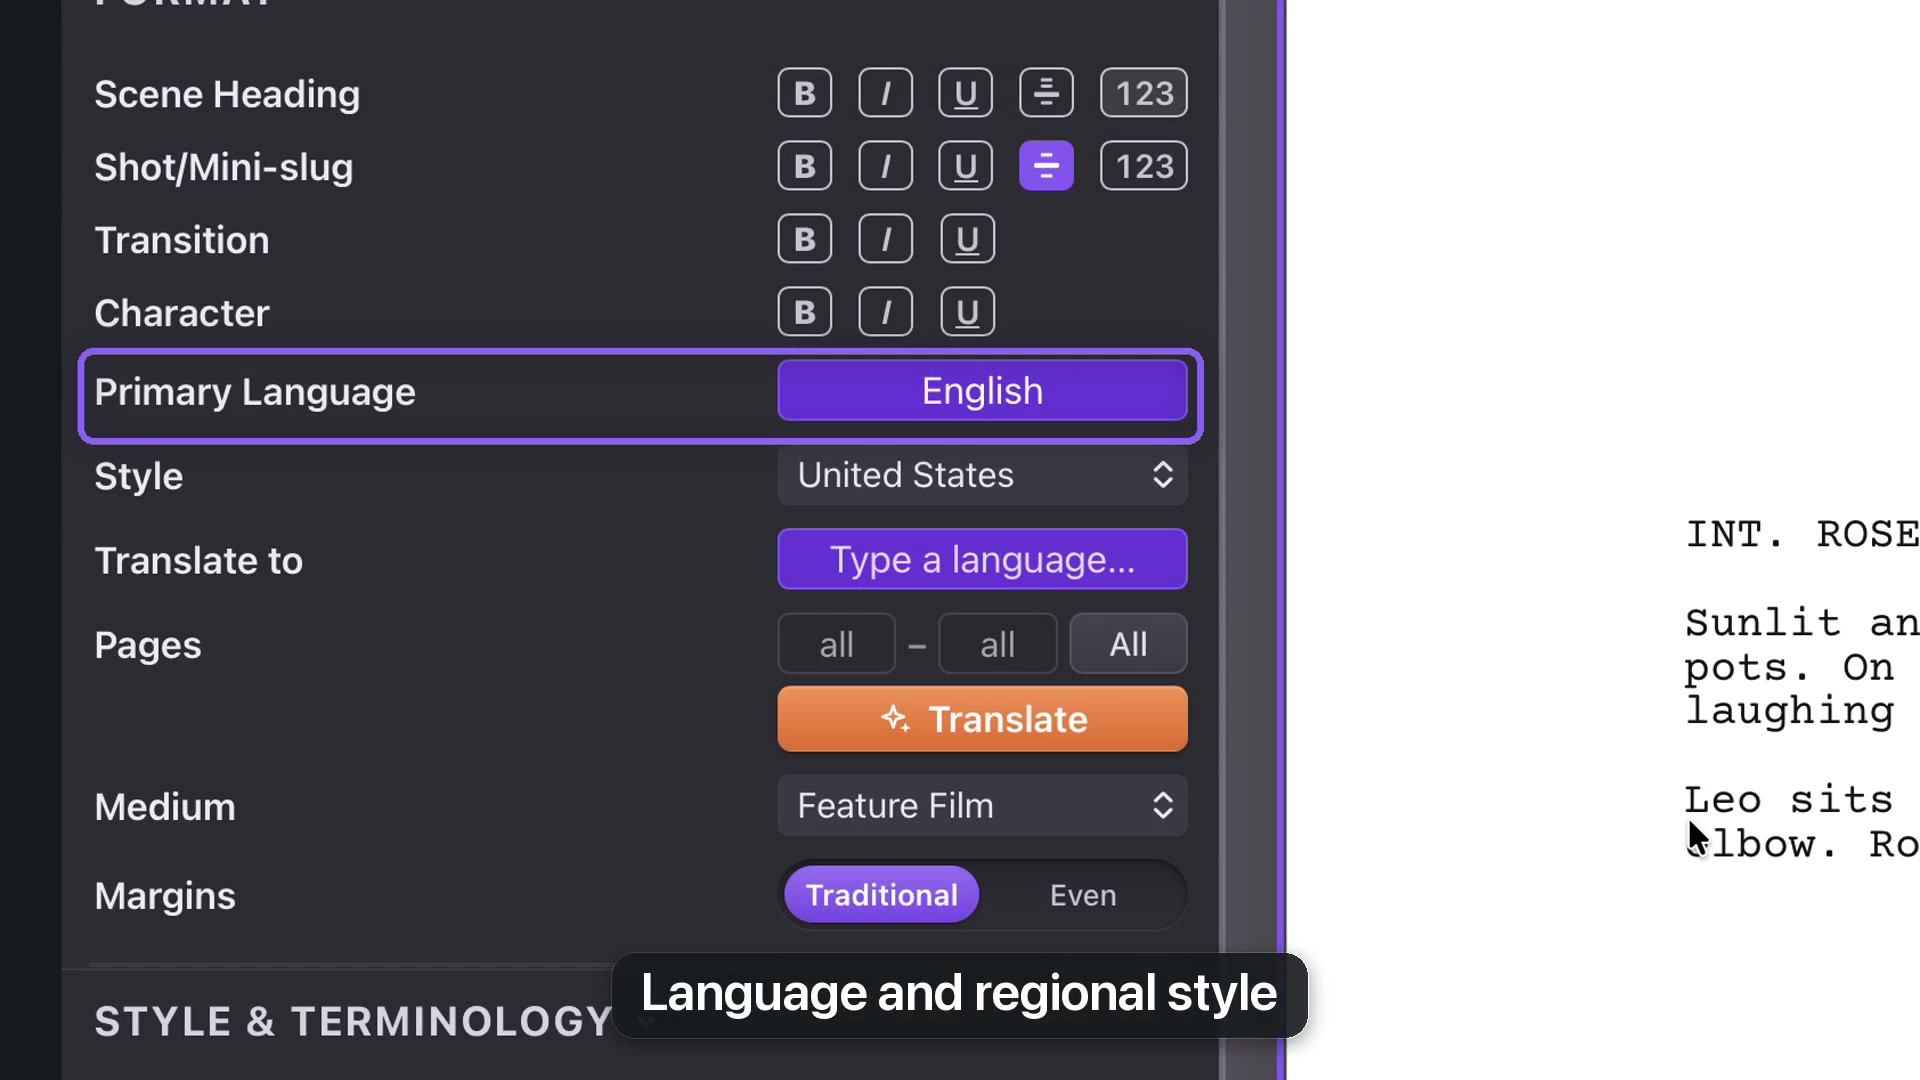
Primary Language and Style define the current document’s conventions.From lesson 12, 0:50 · Select the image to enlarge.
Language and regional style
Primary Language selects the writing profile. Style selects its regional conventions. Switching the example from United States to United Kingdom changes paper and layout while leaving the words intact.
Translation is different: use Translate to when you want the words rewritten in another language. The translation chapter explains how to produce a separate document.
Profile-specific controls
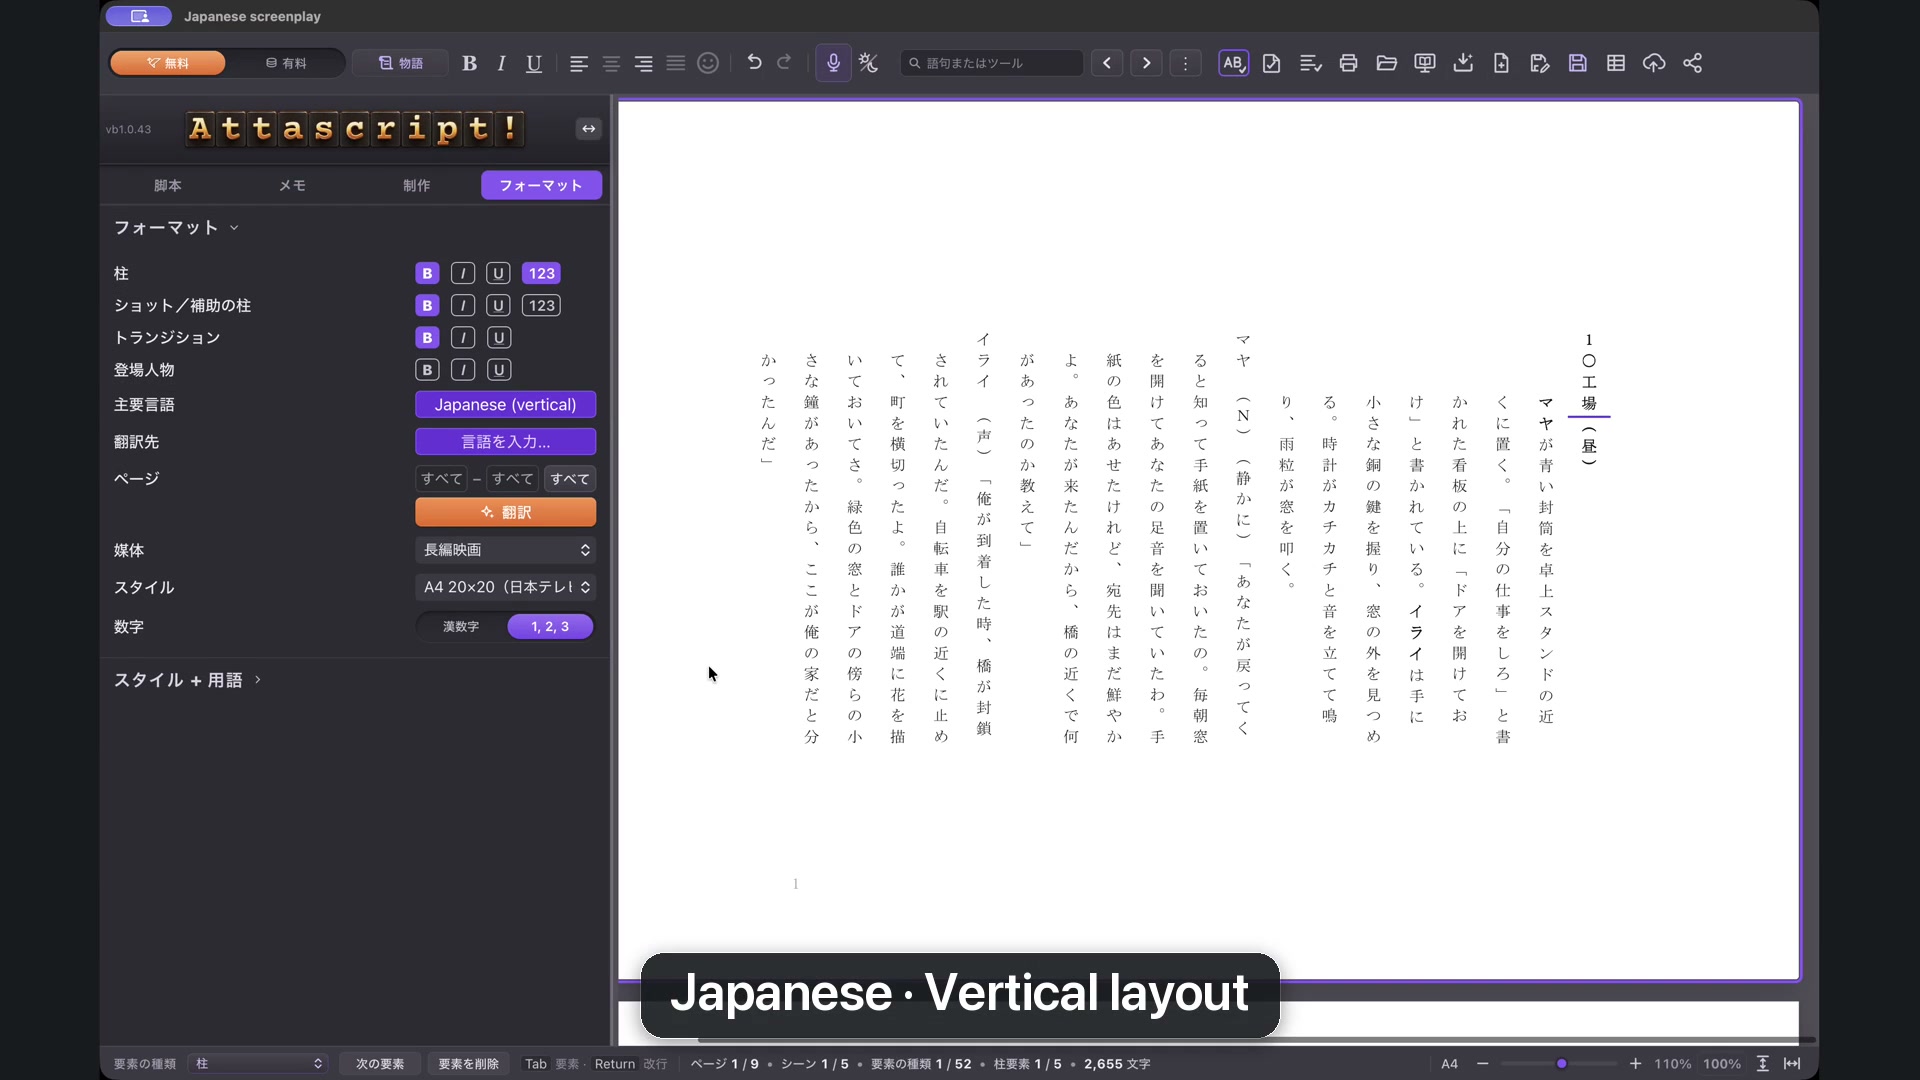
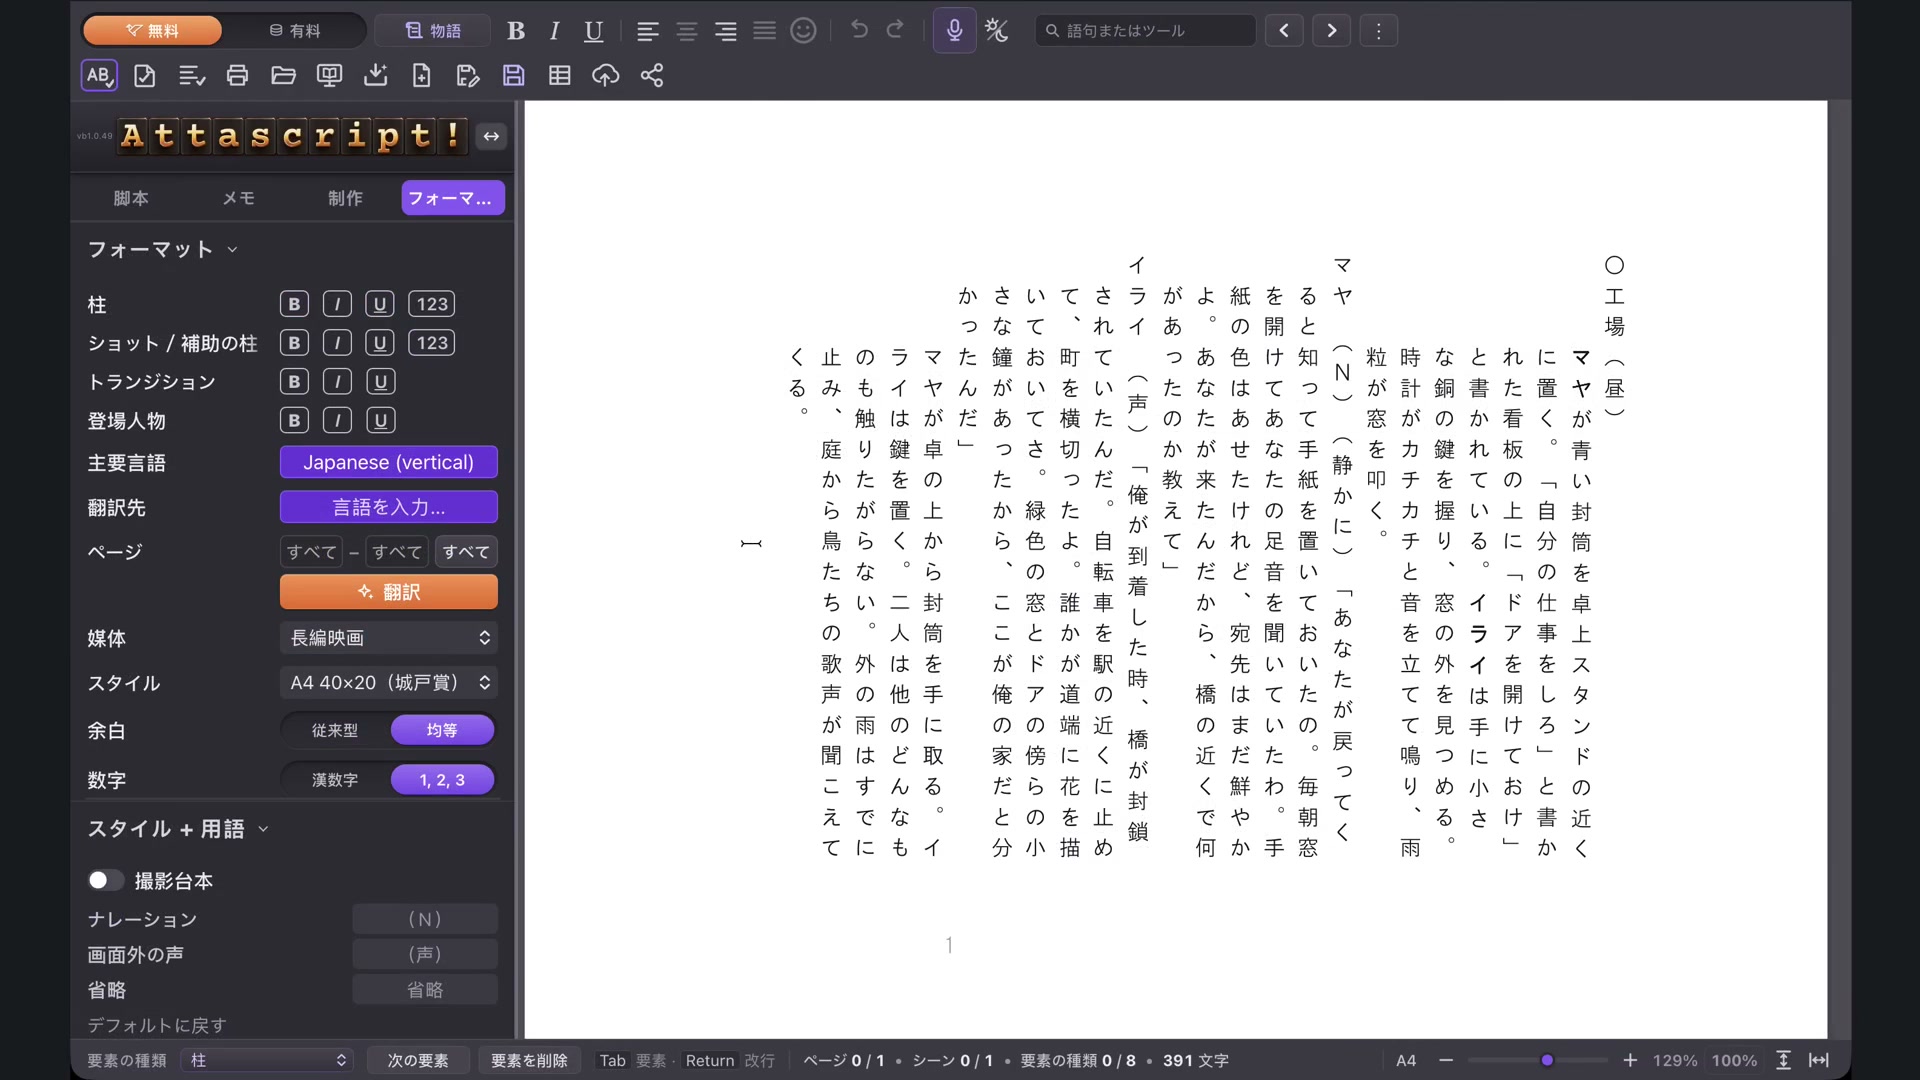
Japanese profiles offer vertical screenplay layouts and choices such as the Kido competition or Fuji TV style. Use Fit to Width to inspect the page. A numeral switch selects traditional Japanese numerals or standard digits. Similar numeral choices exist in supported Arabic-script profiles.
Choose the convention requested by the intended reader or production, rather than assuming every language uses the same layout.
Japanese profiles include vertical layouts and numeral controls.From lesson 12, 1:17 · Select the image to enlarge.
Medium and margins
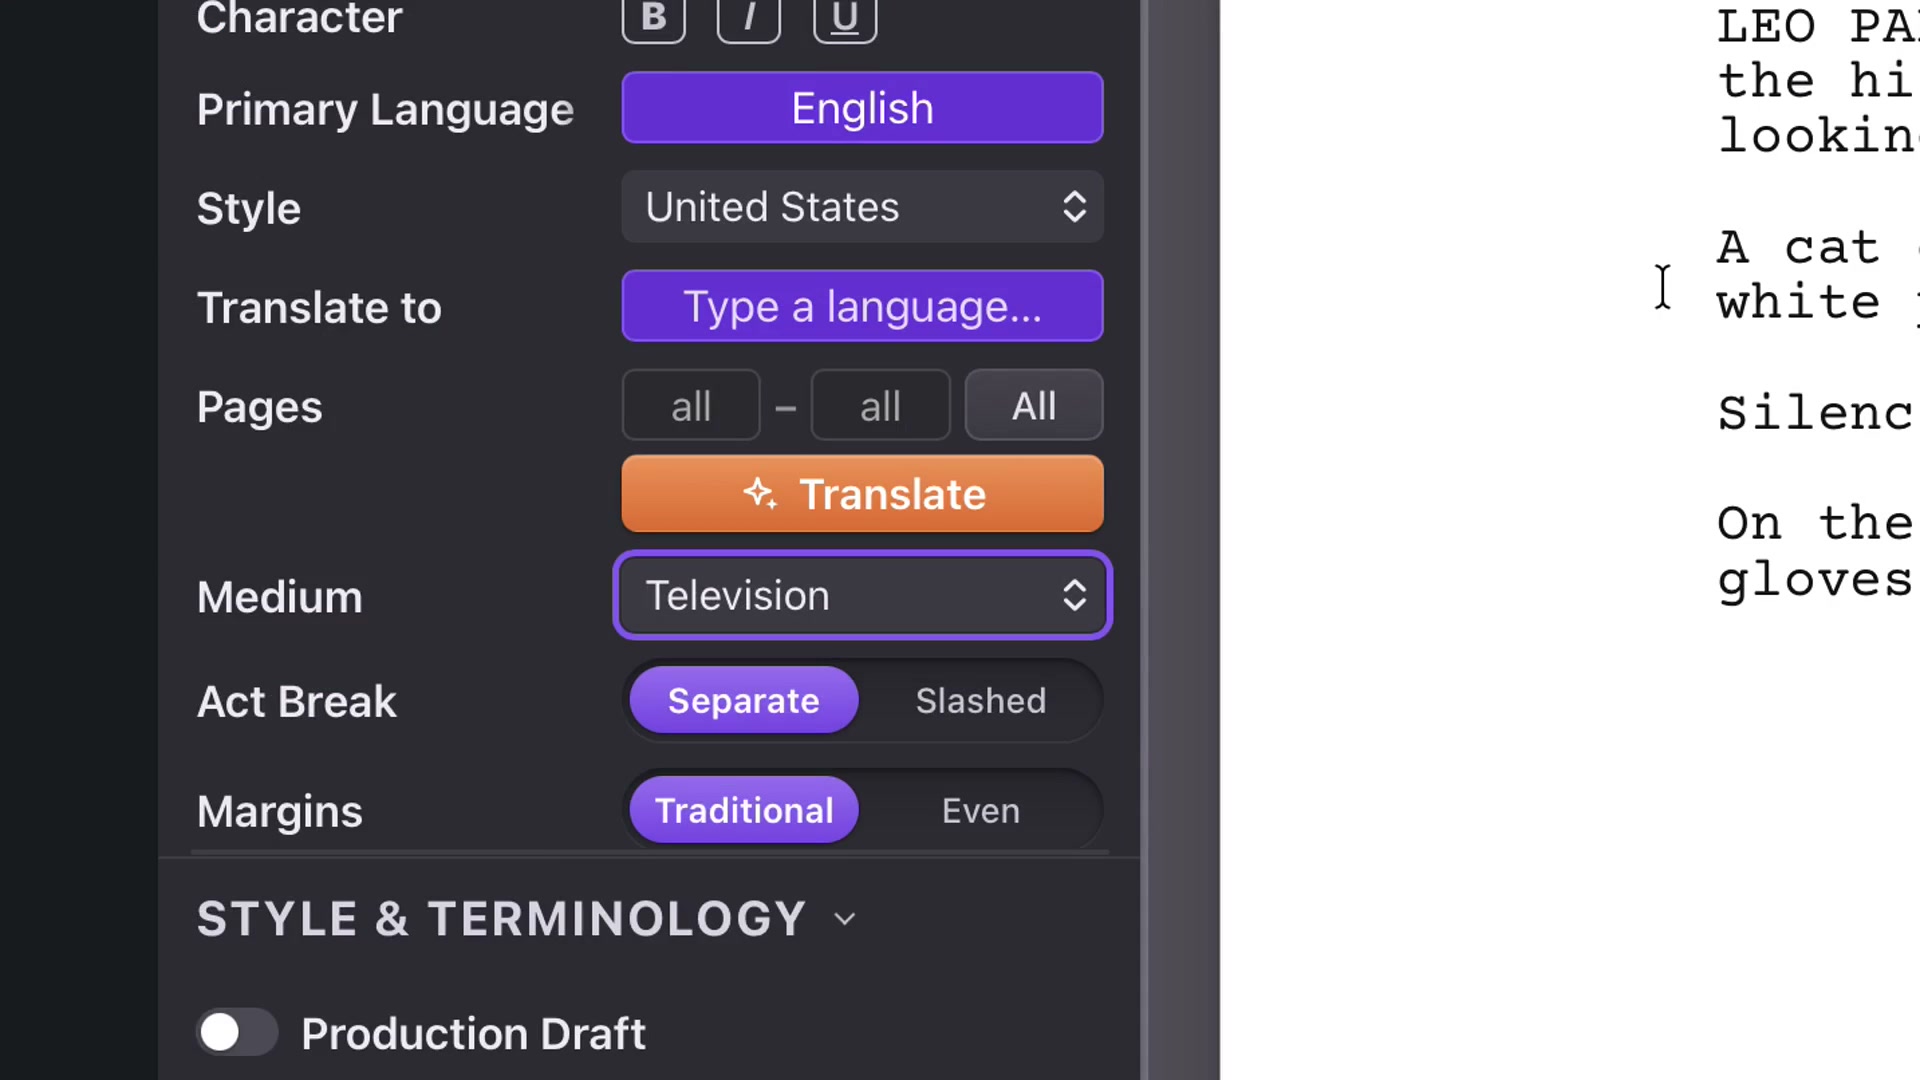
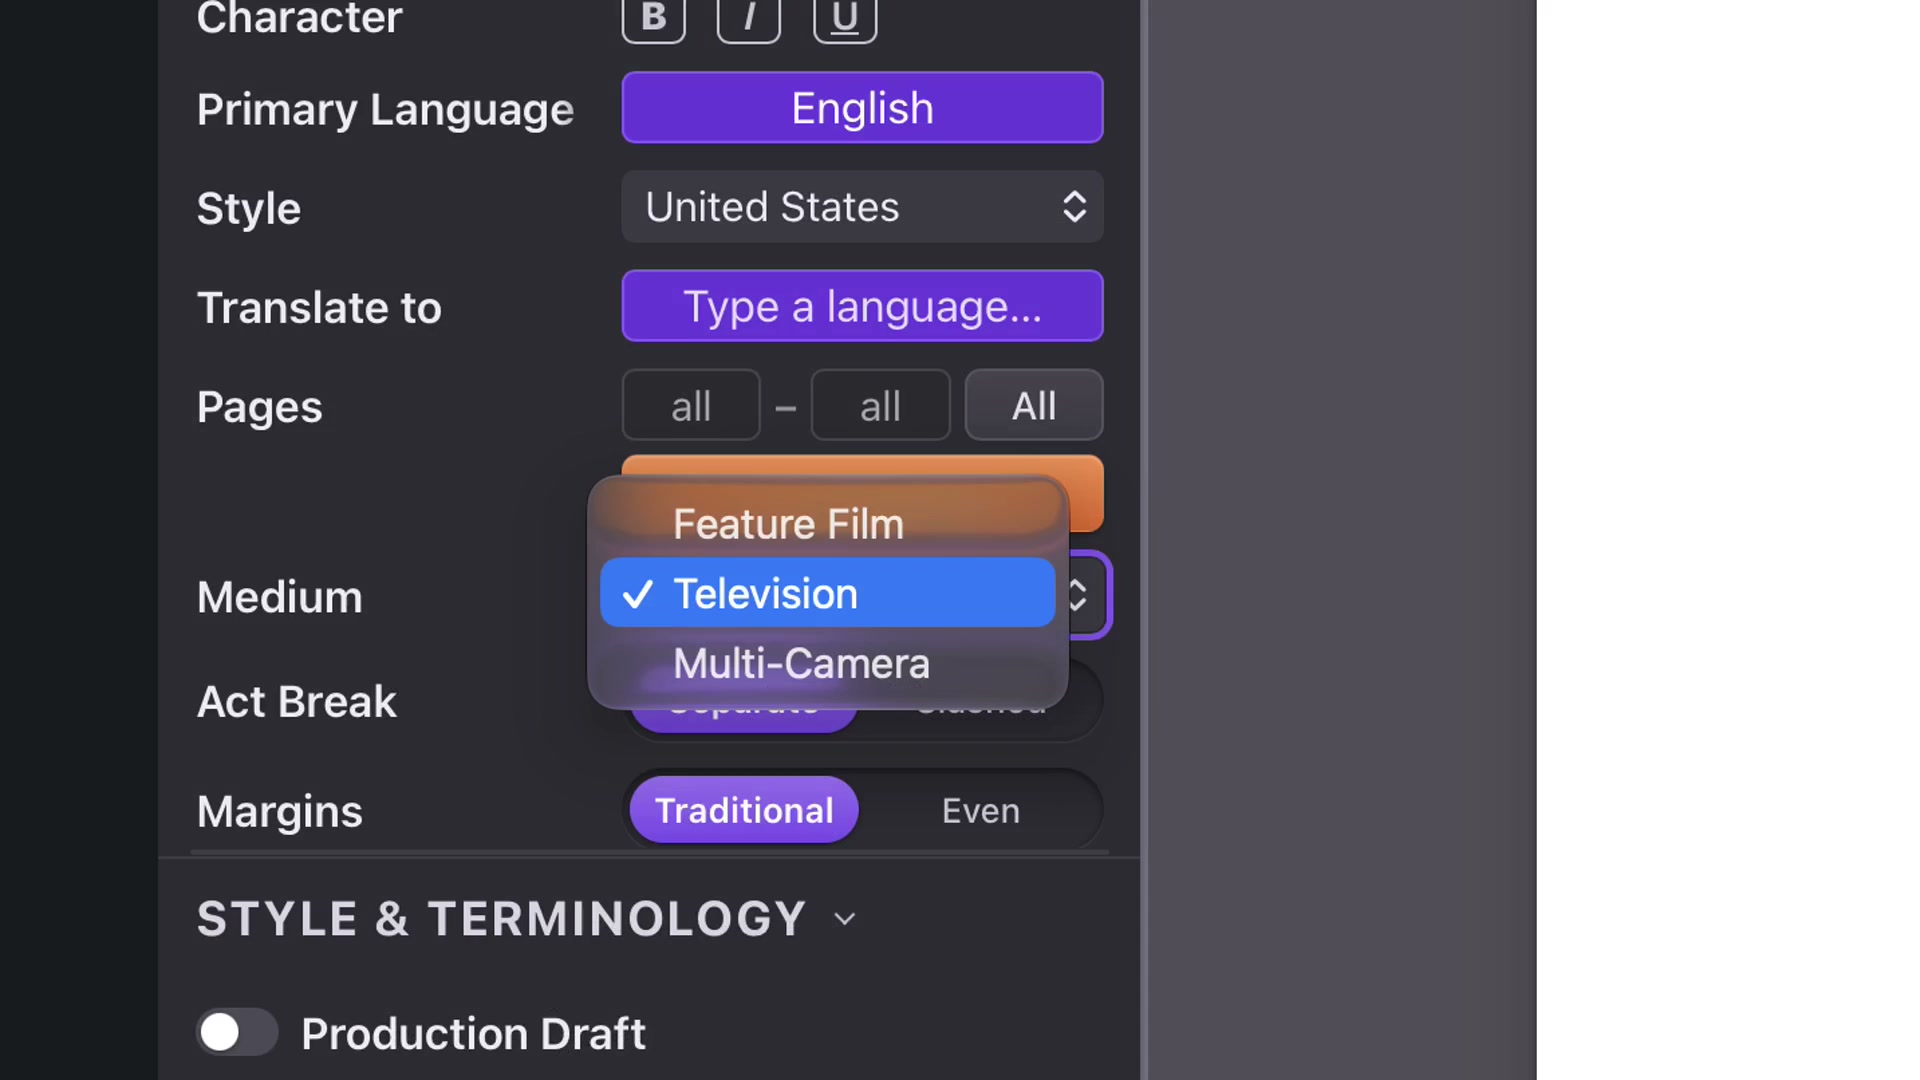
Medium selects Feature Film, Television or Multi-Camera. Margins offers Traditional or Even spacing. Television and Multi-Camera expose further controls covered in their own chapter.
For view shortcuts, use Command+2 on Mac or Ctrl+2 on Windows for Fit to Width. A view setting changes magnification; a format setting changes the page.
CHAPTER 13
Style & Terminology
Control the standard terms that appear in screenplay cues, page continuations and optional footers.
Continued dialogue and standard words
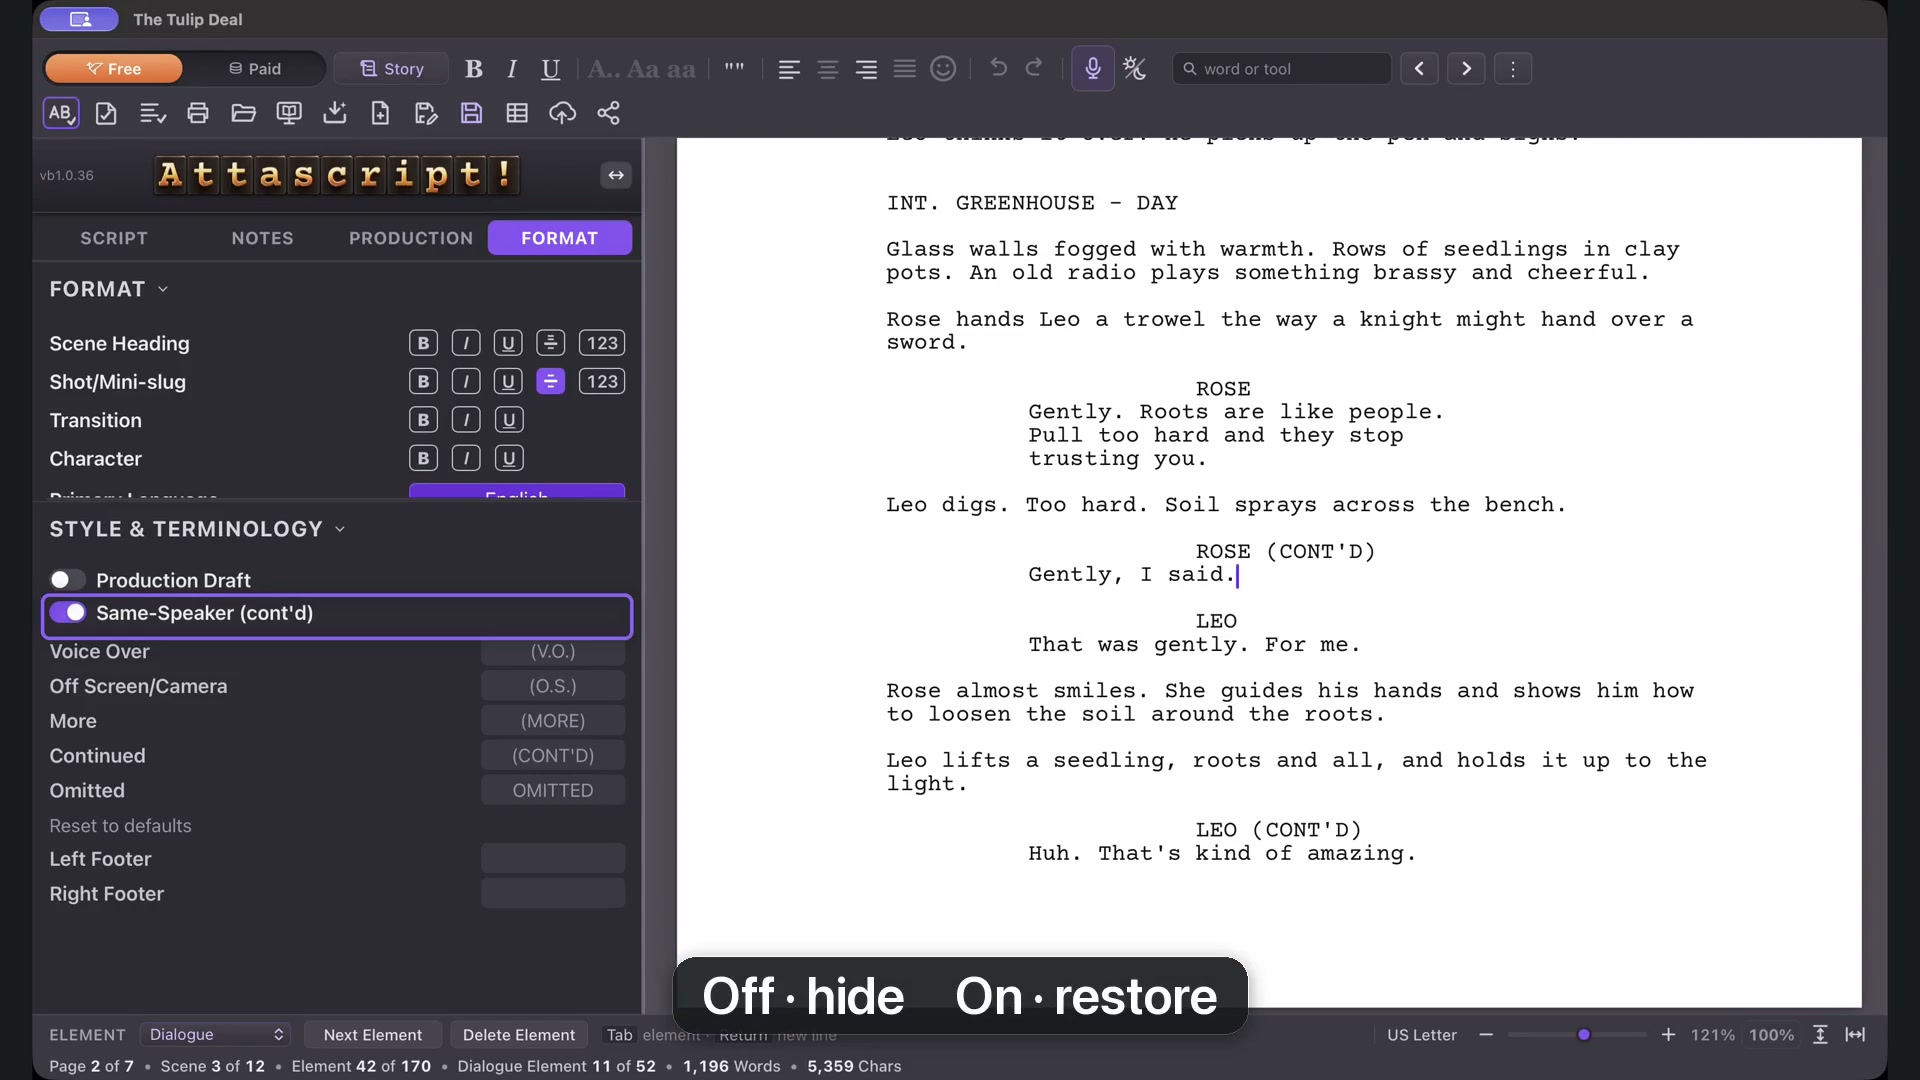
Same-Speaker Continued adds a continued cue when a character speaks again after Action. Turn it off or on to match the style you want.
Edit standard terms when your preferred wording differs from the default—for example, an off-camera abbreviation instead of off-screen. Reset to defaults restores the profile’s standard terms.
Same-Speaker Continued controls the repeated-speaker cue.From lesson 13, 0:21 · Select the image to enlarge.
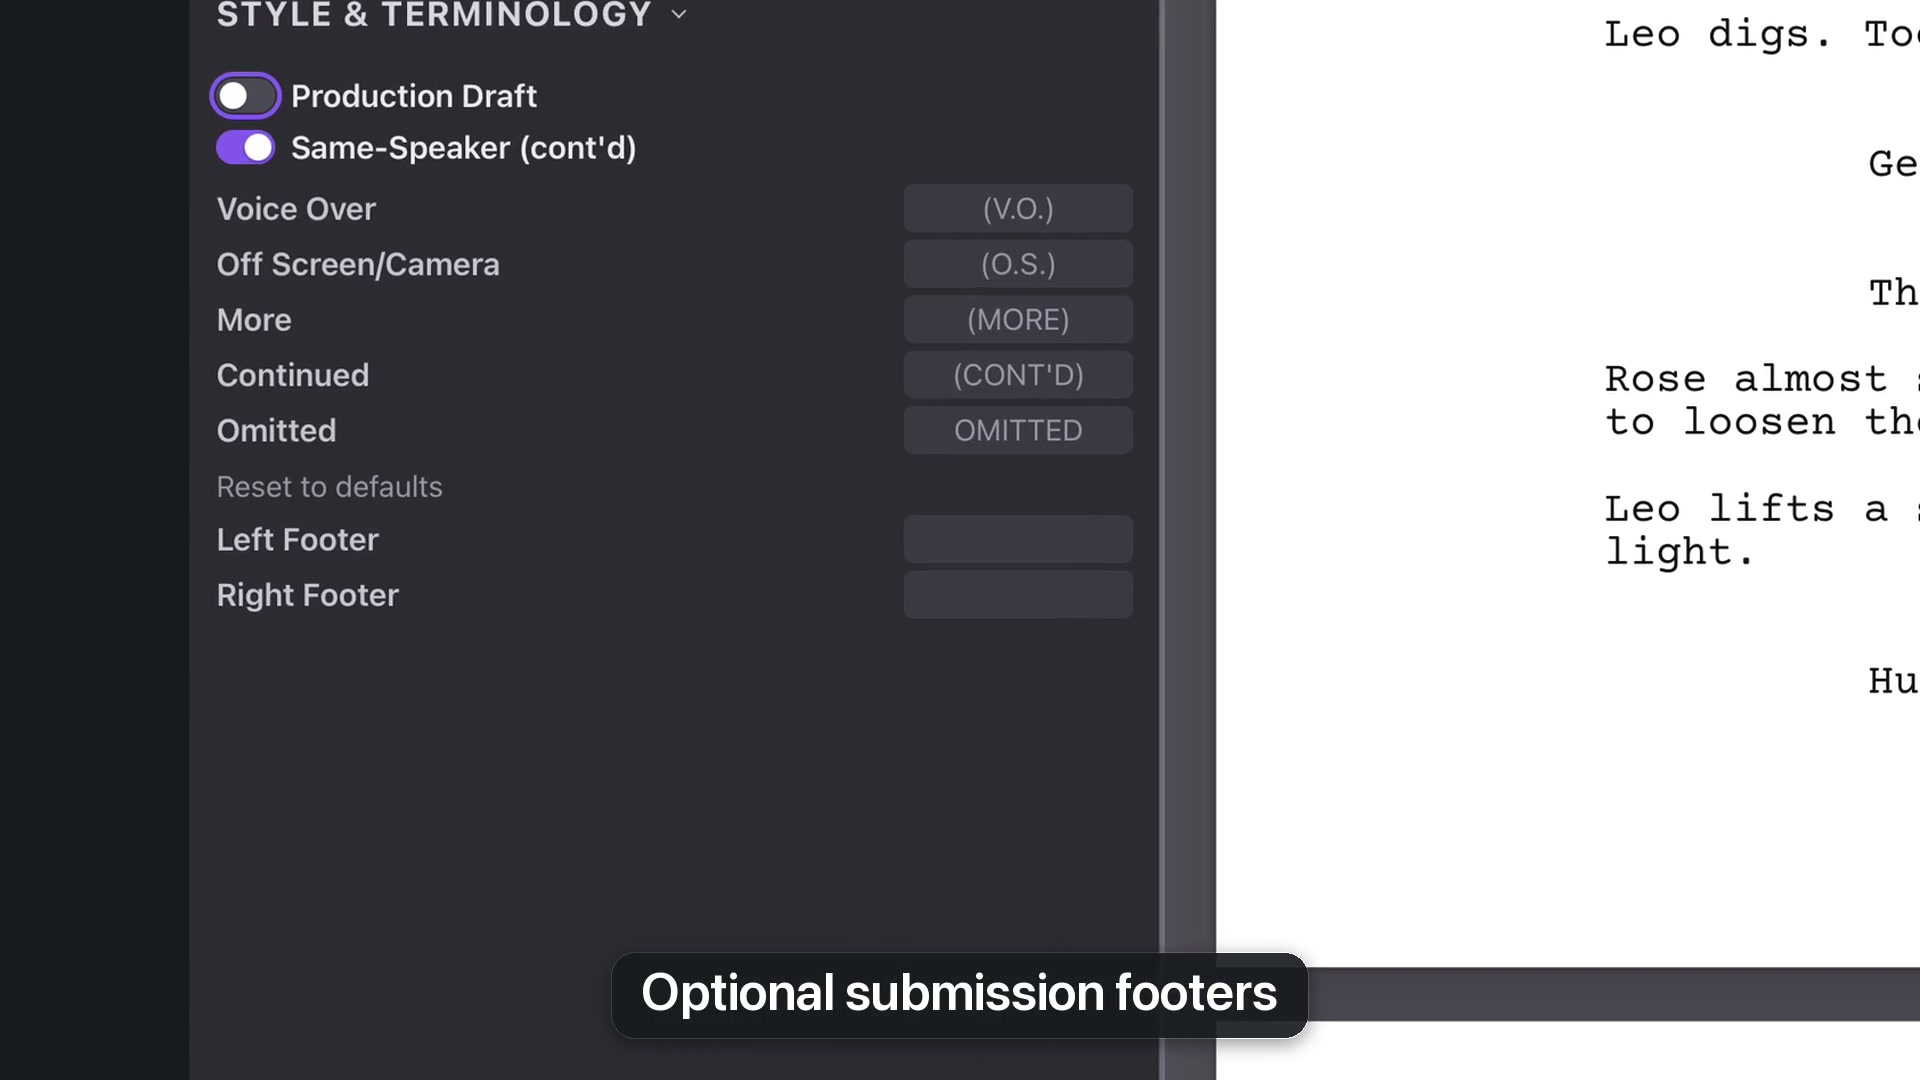
Production Draft
Enable Production Draft to keep scene numbers visible. While it is active, the scene-number control stays on; turn Production Draft off before hiding scene numbers again.
Scene Continued Bottom and Top control the markers where a scene crosses a page boundary. They are distinct from the More and Continued terms used when a speech crosses pages. Check the intended marker before editing its wording.
Footer text is printed exactly as entered.From lesson 13, 1:22 · Select the image to enlarge.
Optional footers
A competition may require a submission date or entry identifier. Left Footer and Right Footer print exactly what you type. These fields are not automatically translated with the screenplay, so review them when preparing another-language delivery.
Clear a footer when the requirement no longer applies. Routine spec-script pages generally need less extra material than an administrative submission.
CHAPTER 14
Title page & added pages
Create the screenplay’s title page and add a dedication or note without disturbing the script’s page numbering.
Fill in the title page
In the Scenes panel, choose Title Page. Click the title, byline and author fields to edit them. Use the credit line for an adaptation credit when appropriate, or leave it empty.
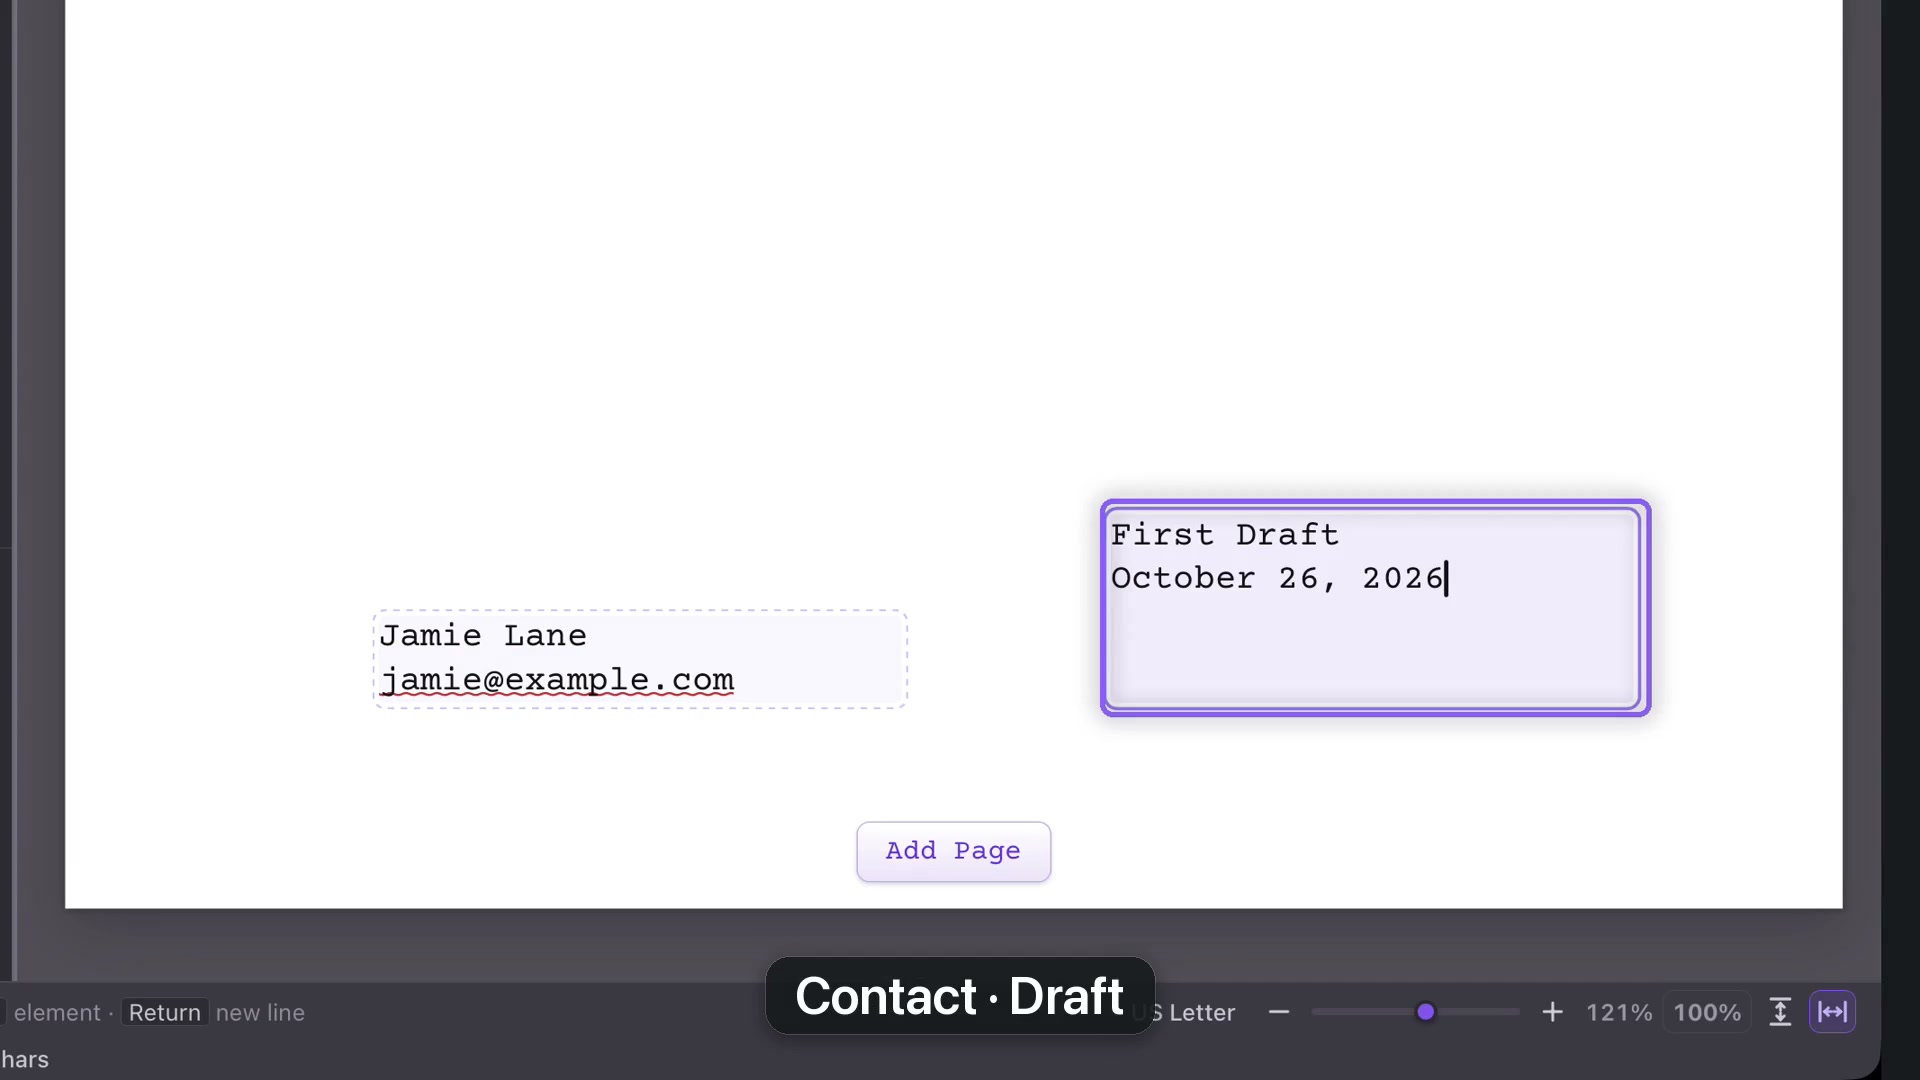
Contact information belongs at the lower left; the draft and date go at the lower right. Use details you actually intend to share. The course uses fictional contact information.
Contact and draft details have their own areas on the title page.From lesson 14, 0:29 · Select the image to enlarge.
Additional wording
If a copyright notice is required, put the caret on its own line beneath the title and credits and use the copyright control. Avoid crowding the title page with information the recipient has not requested.
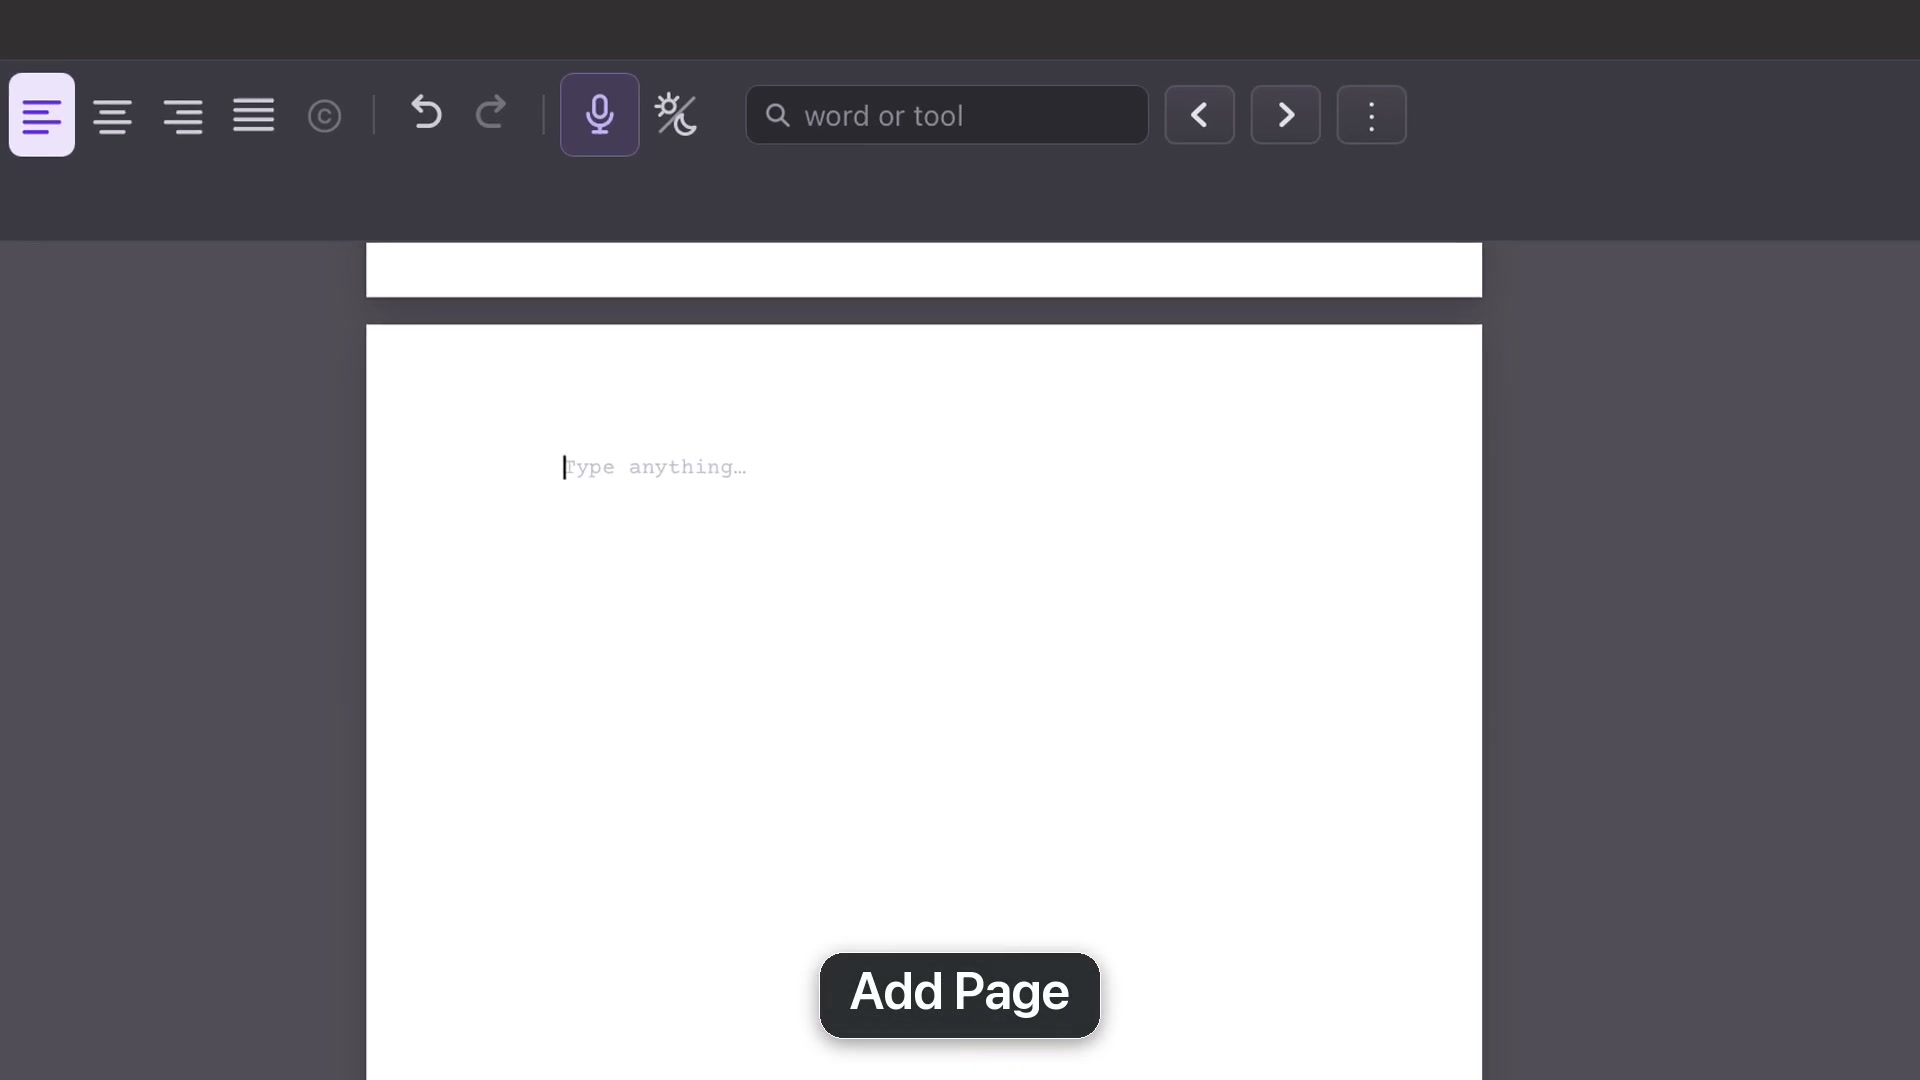
Added pages stay with the title-page bundle.From lesson 14, 0:50 · Select the image to enlarge.
Add a page
Choose Add Page for a free page after the title. Use it for a dedication, quotation or note to the reader. Select text and use the top-menu alignment, Bold, Italic or Underline controls.
Click a scene in the navigator to return to the screenplay. When the title-page bundle is included in a print or export, its added pages travel with it.
CHAPTER 15
Scene cards & character cards
See the screenplay as a wall of scene cards or character cards, with shared descriptions and production context.
Open Scene Cards
Click the four-squares control in Scenes. Before a summary exists, a scene card uses the first Action line. Write All creates descriptions from the scenes. You can edit any description directly.
When descriptions already exist, Rewrite All warns that it will replace them. Cancel if you want to preserve the current wording. The descriptions are shared with the Outline page, so an edit in one view appears in the other.
Card layouts let you switch between a broad overview and readable detail.From lesson 15, 0:50 · Select the image to enlarge.
Read and arrange the cards
Each scene card combines its number, heading, description and characters. Saved matching location images appear too. Choose one large card, two by two, three by three or four by three using the layout controls.
Italic character names identify silent appearances. Background groups are separate. A tilde before a quantity marks an estimate; a number explicitly stated by the script can be recorded as a definite count. How many, in this scene changes only that scene’s quantity. Clearing it keeps the group.
Open Character Cards
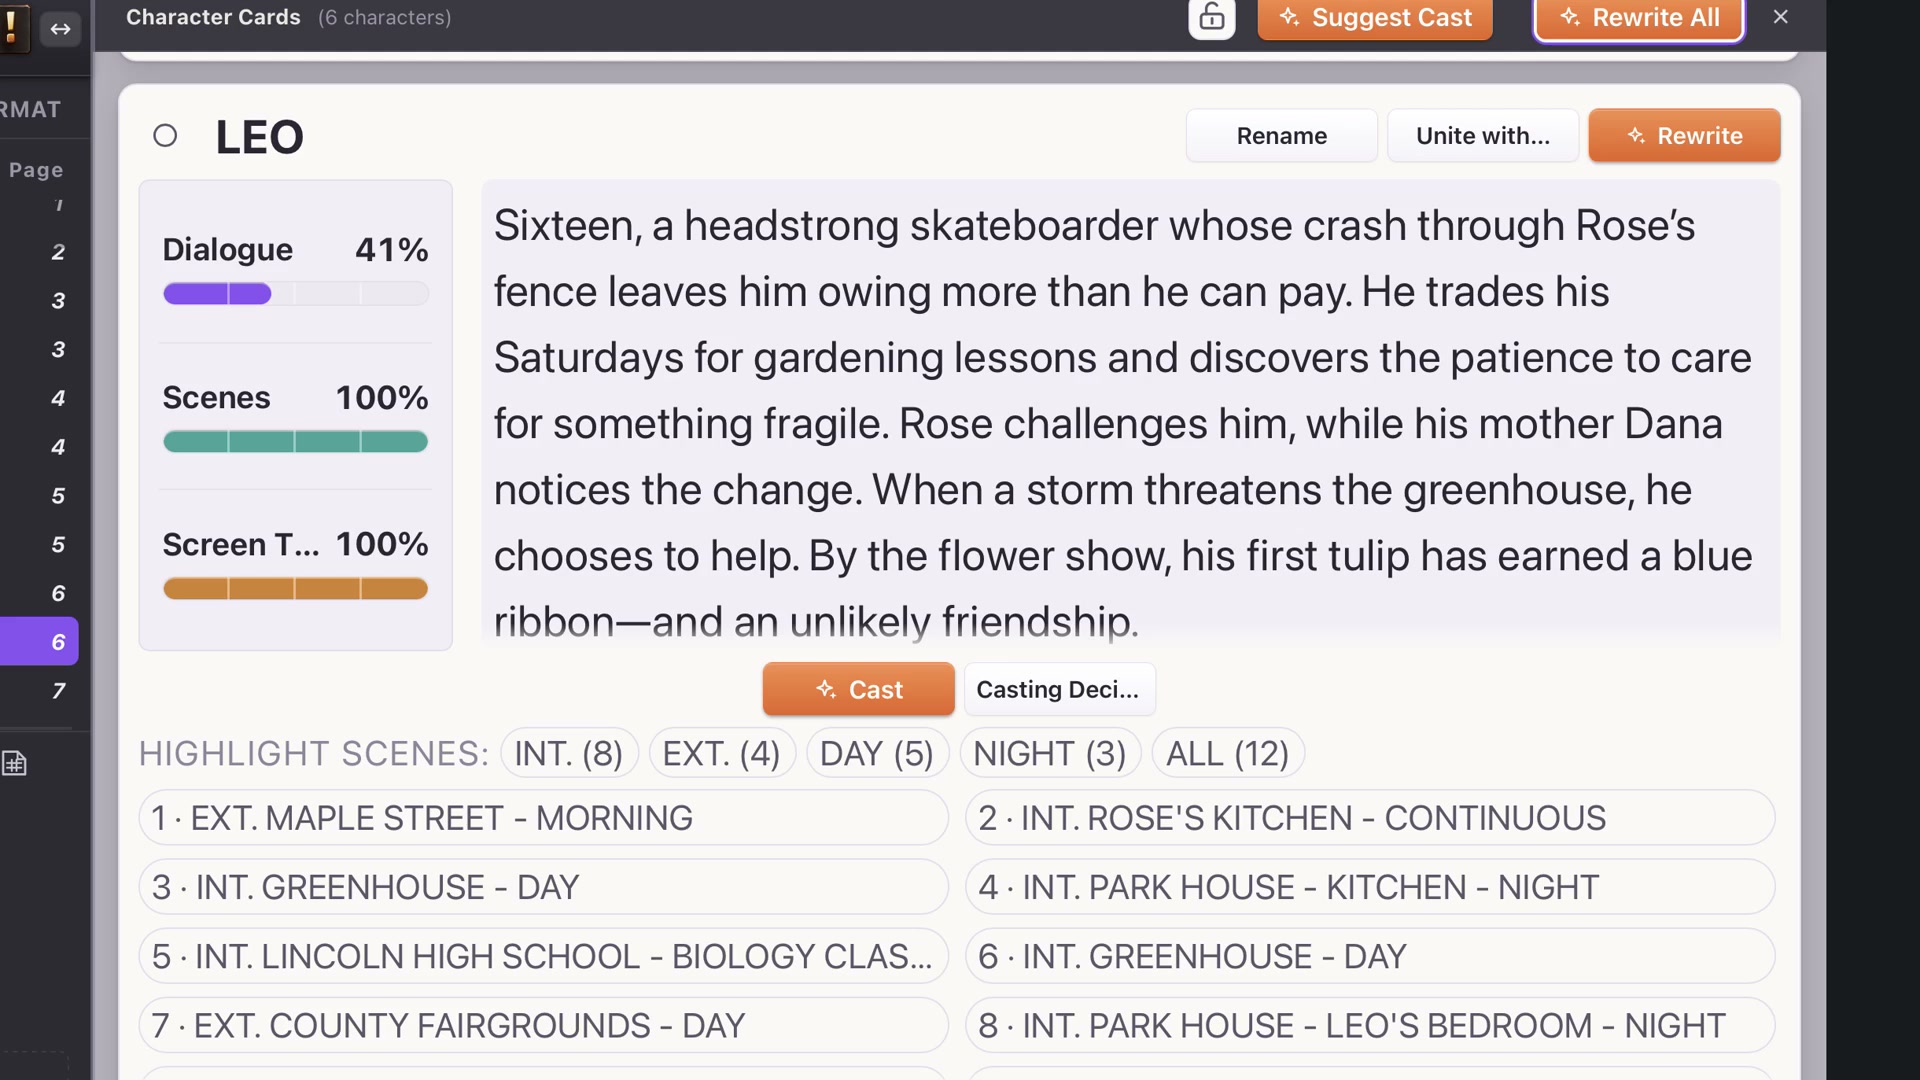
Close Scene Cards and use the four-squares control in Characters. Write All creates descriptions, shared with Character List. Read and edit them as needed.
Dialogue measures spoken-word share. Scenes measures appearances. Screen Time estimates from the page lengths of those scenes, counting each whole scene for every character in it. Those totals do not need to add to 100%.
Character statistics measure different kinds of participation.From lesson 15, 1:58 · Select the image to enlarge.
Use color and locking
Color rings work like the scene and character panels. A character’s Highlight Scenes controls can color a group such as their night scenes; choose No color to clear the reminder.
Locking gives a clean read-only view with editing controls hidden. Unlock when you want to edit again, and save the project.
CHAPTER 16
Meet the Story page
The Story page brings the screenplay’s pitch, analysis and visual development material into one place.
Follow the two rows
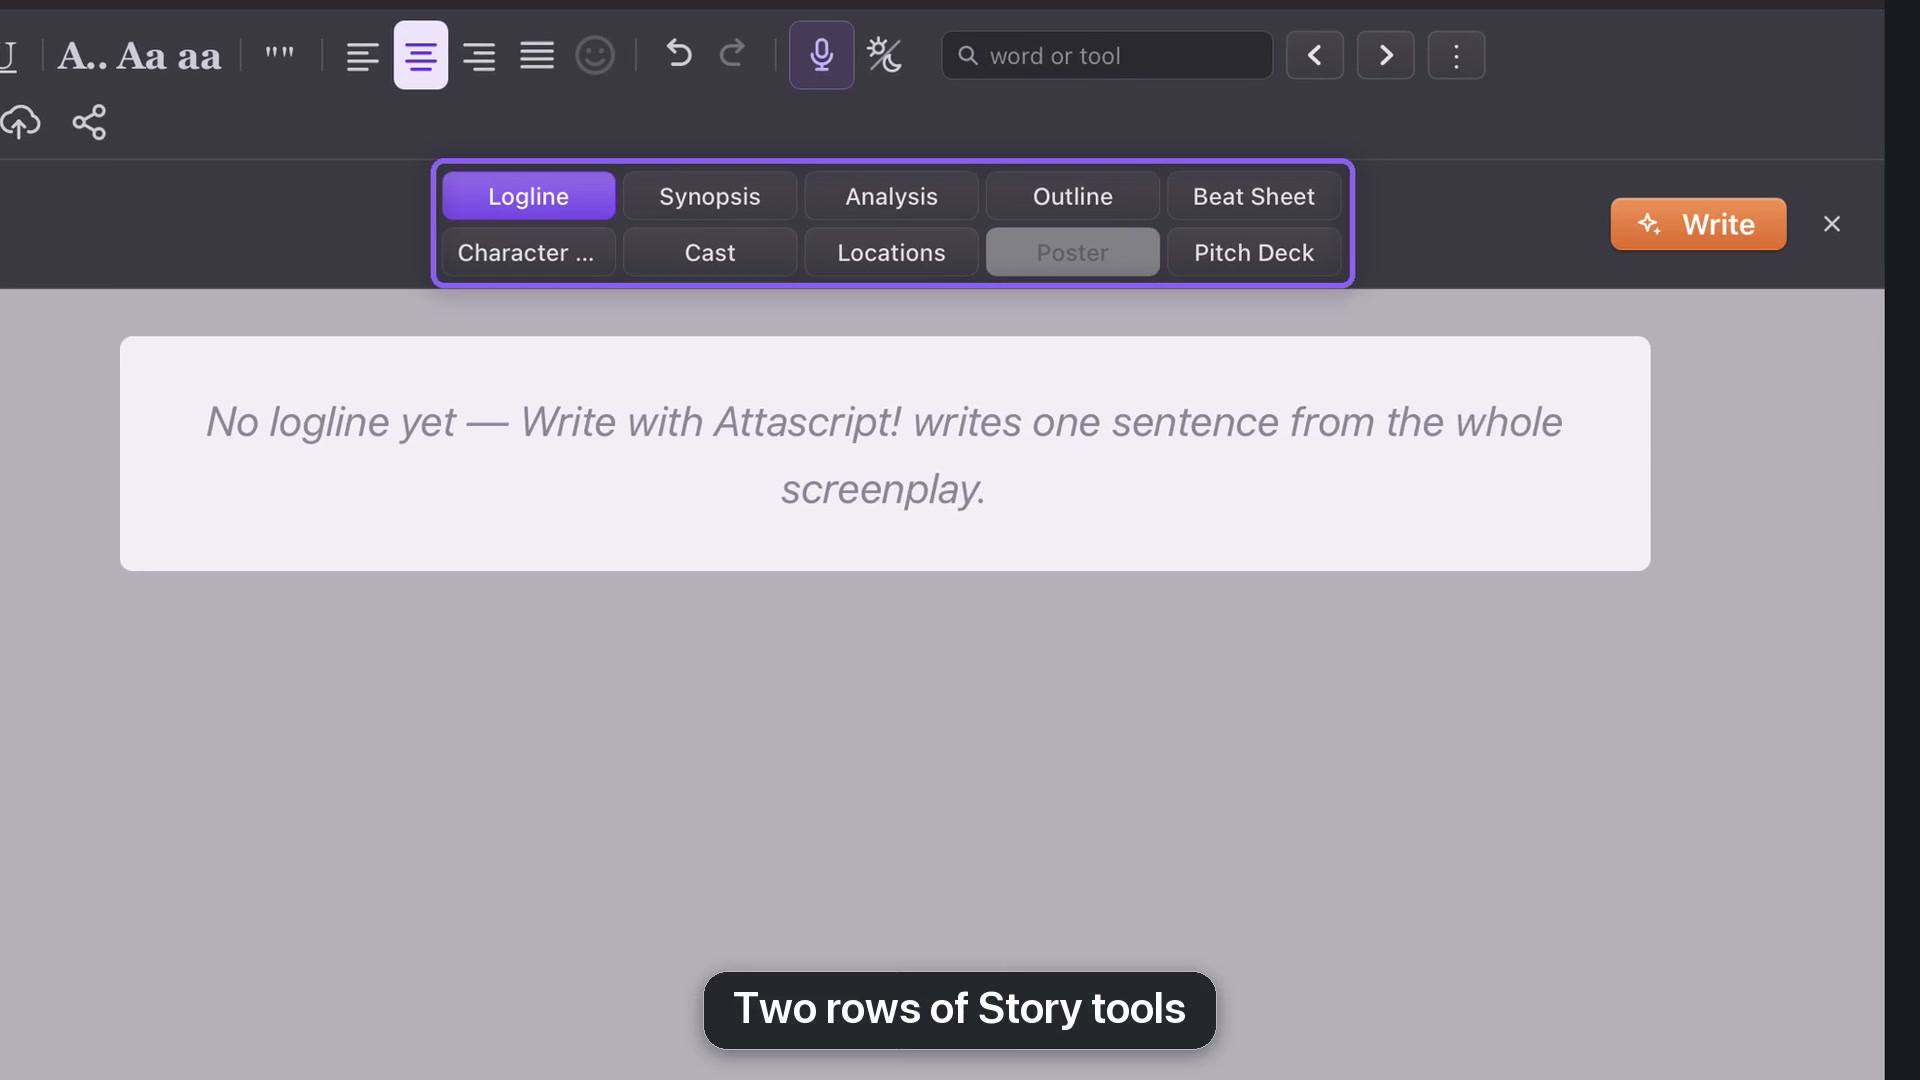
The top row runs Logline, Synopsis, Analysis, Outline and Beat Sheet. The bottom row runs Character List, Cast, Locations, Poster and Pitch Deck. The course follows that order.
Logline and Synopsis help explain the story. Analysis, Outline and Beat Sheet help examine it. Character List, Cast and Locations organize its people and places. Poster and Pitch Deck present it visually.
The current Story toolbar has two rows of five tools.From lesson 16, 0:13 · Select the image to enlarge.
Write, review and edit
Most pages offer Write to generate material from the screenplay. Longer reports such as Synopsis, Analysis and Beat Sheet need enough source material; the English example uses a minimum of a thousand words for these longer tools.
You can also click into editable text and write yourself. Use Bold, Italic and alignment when appropriate. Read generated material before using it as a statement about your story.
Images and prerequisites
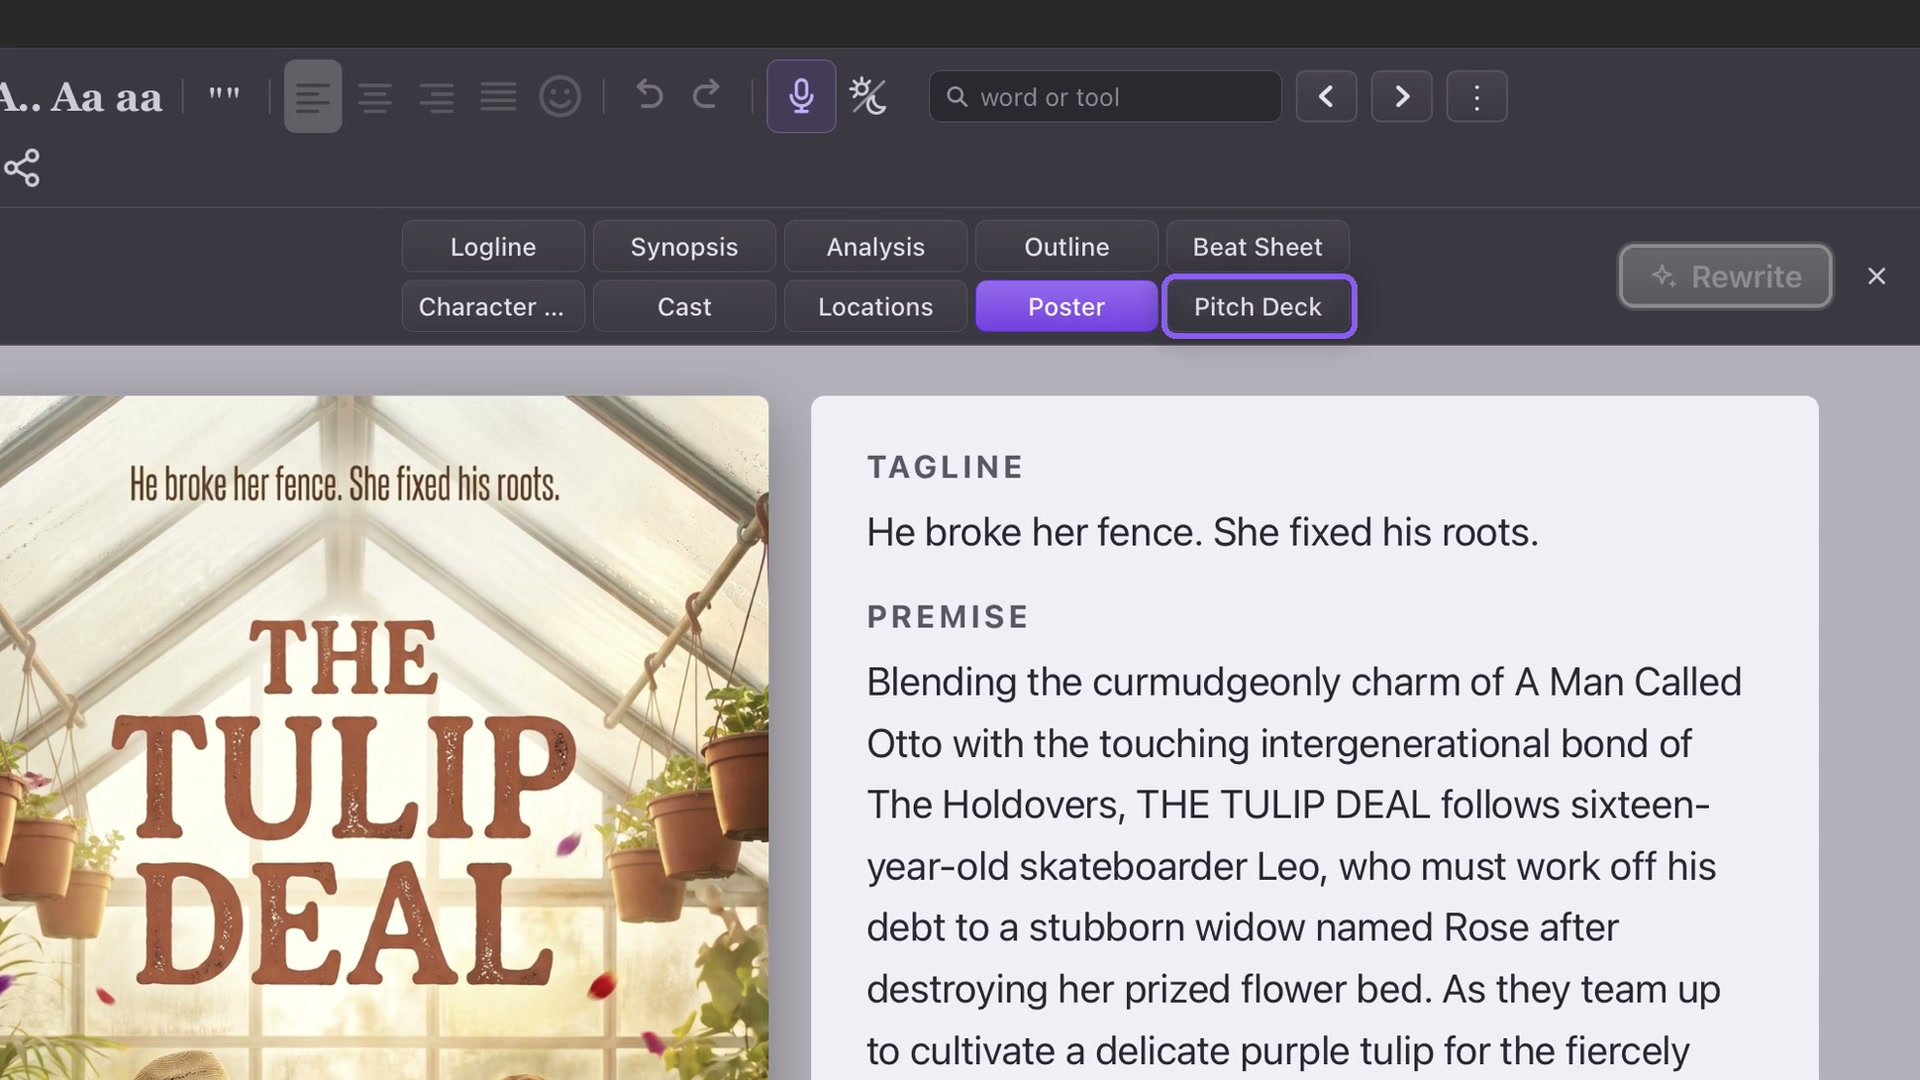
Creating or repainting a poster requires Paid mode. Once saved, the poster remains viewable and downloadable in Free mode. Pitch Deck becomes available when a poster exists. Casting photos are optional additions to a deck, not its prerequisite.
Poster and Pitch Deck complete the second row.From lesson 16, 0:48 · Select the image to enlarge.
Move between pages
When you are not typing, left and right arrows move among Story views. Escape leaves text editing; another Escape returns to the screenplay. The close control is another way back. Save the project to keep the material with your draft.
CHAPTER 17
Logline
Distill the story into a sentence that makes a reader want to know what happens next.
Generate a starting point
Open Story, then Logline. Click Write. Attascript reads the screenplay and proposes a compact pitch. Read it against the actual story: who drives it, what changes their situation, and what makes the outcome matter?
A directed rewrite can change the tone while retaining the story.From lesson 17, 1:00 · Select the image to enlarge.
Make it yours
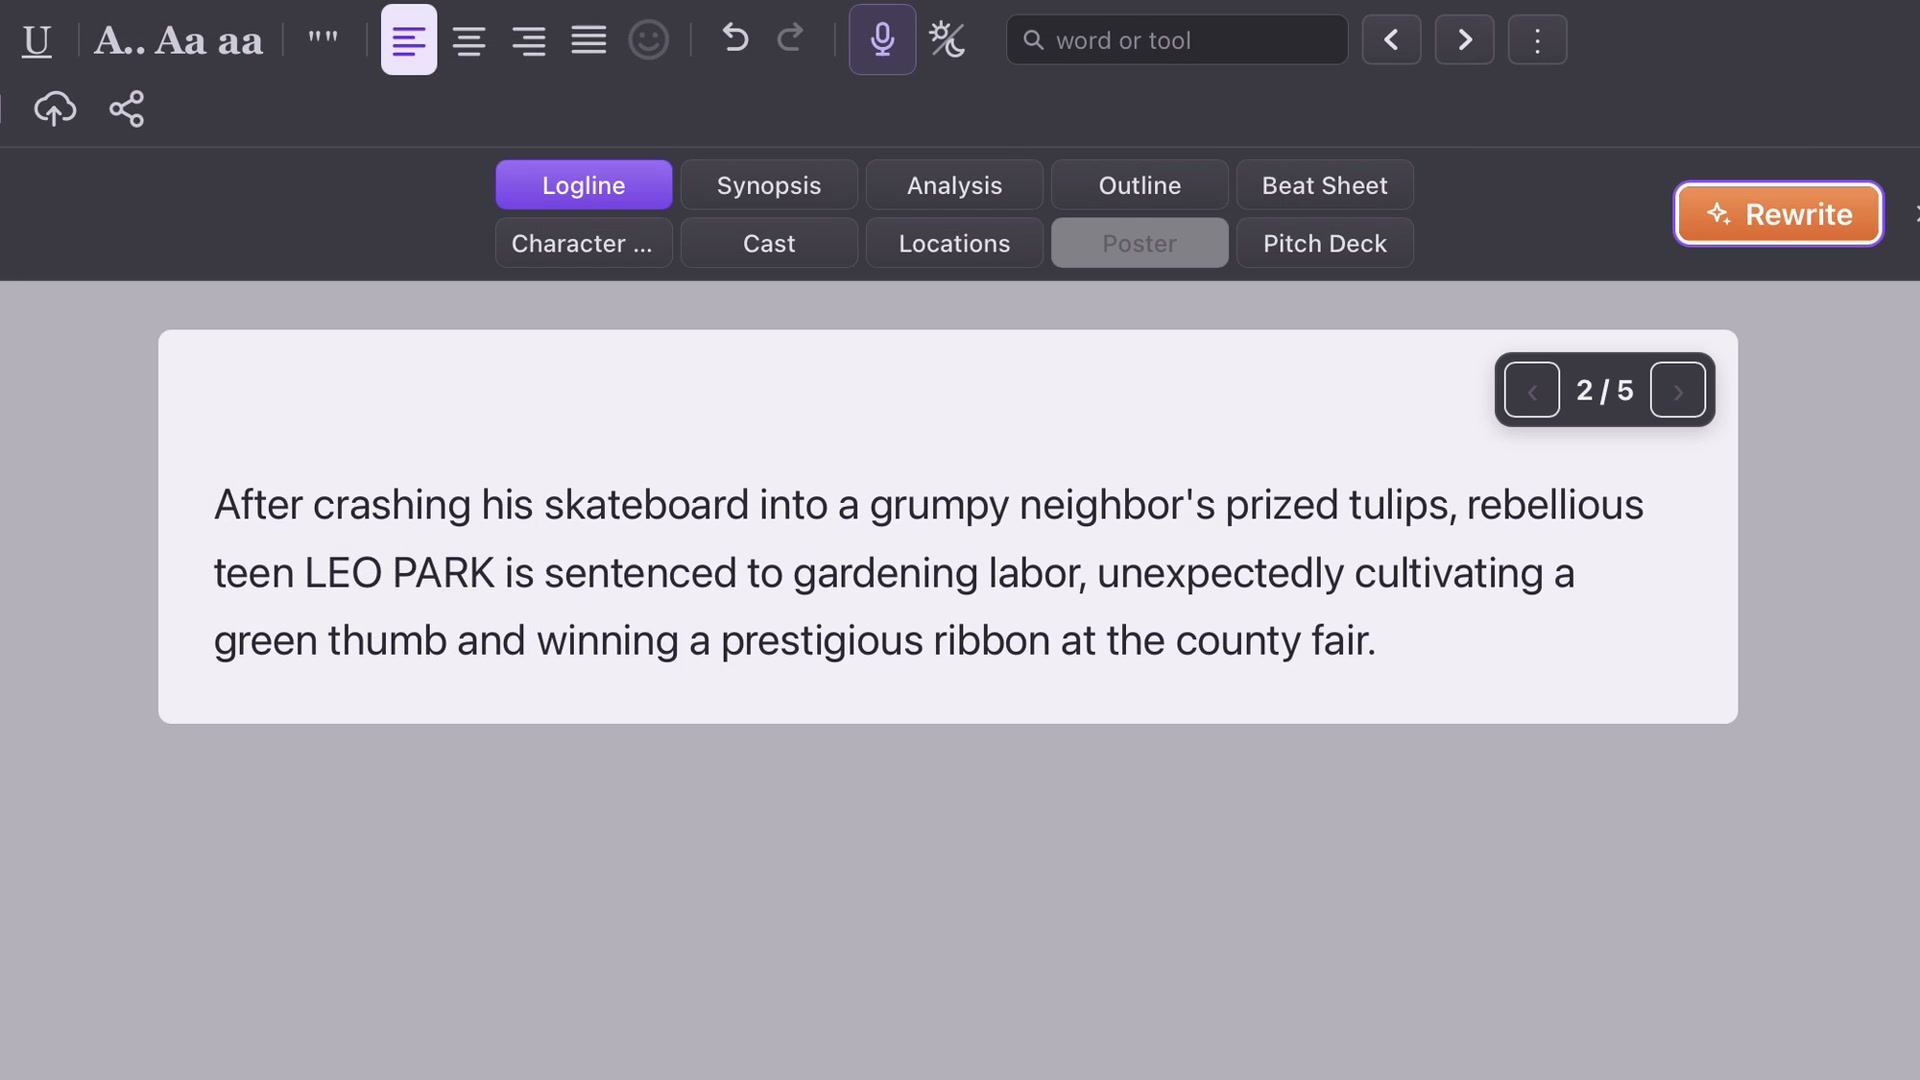
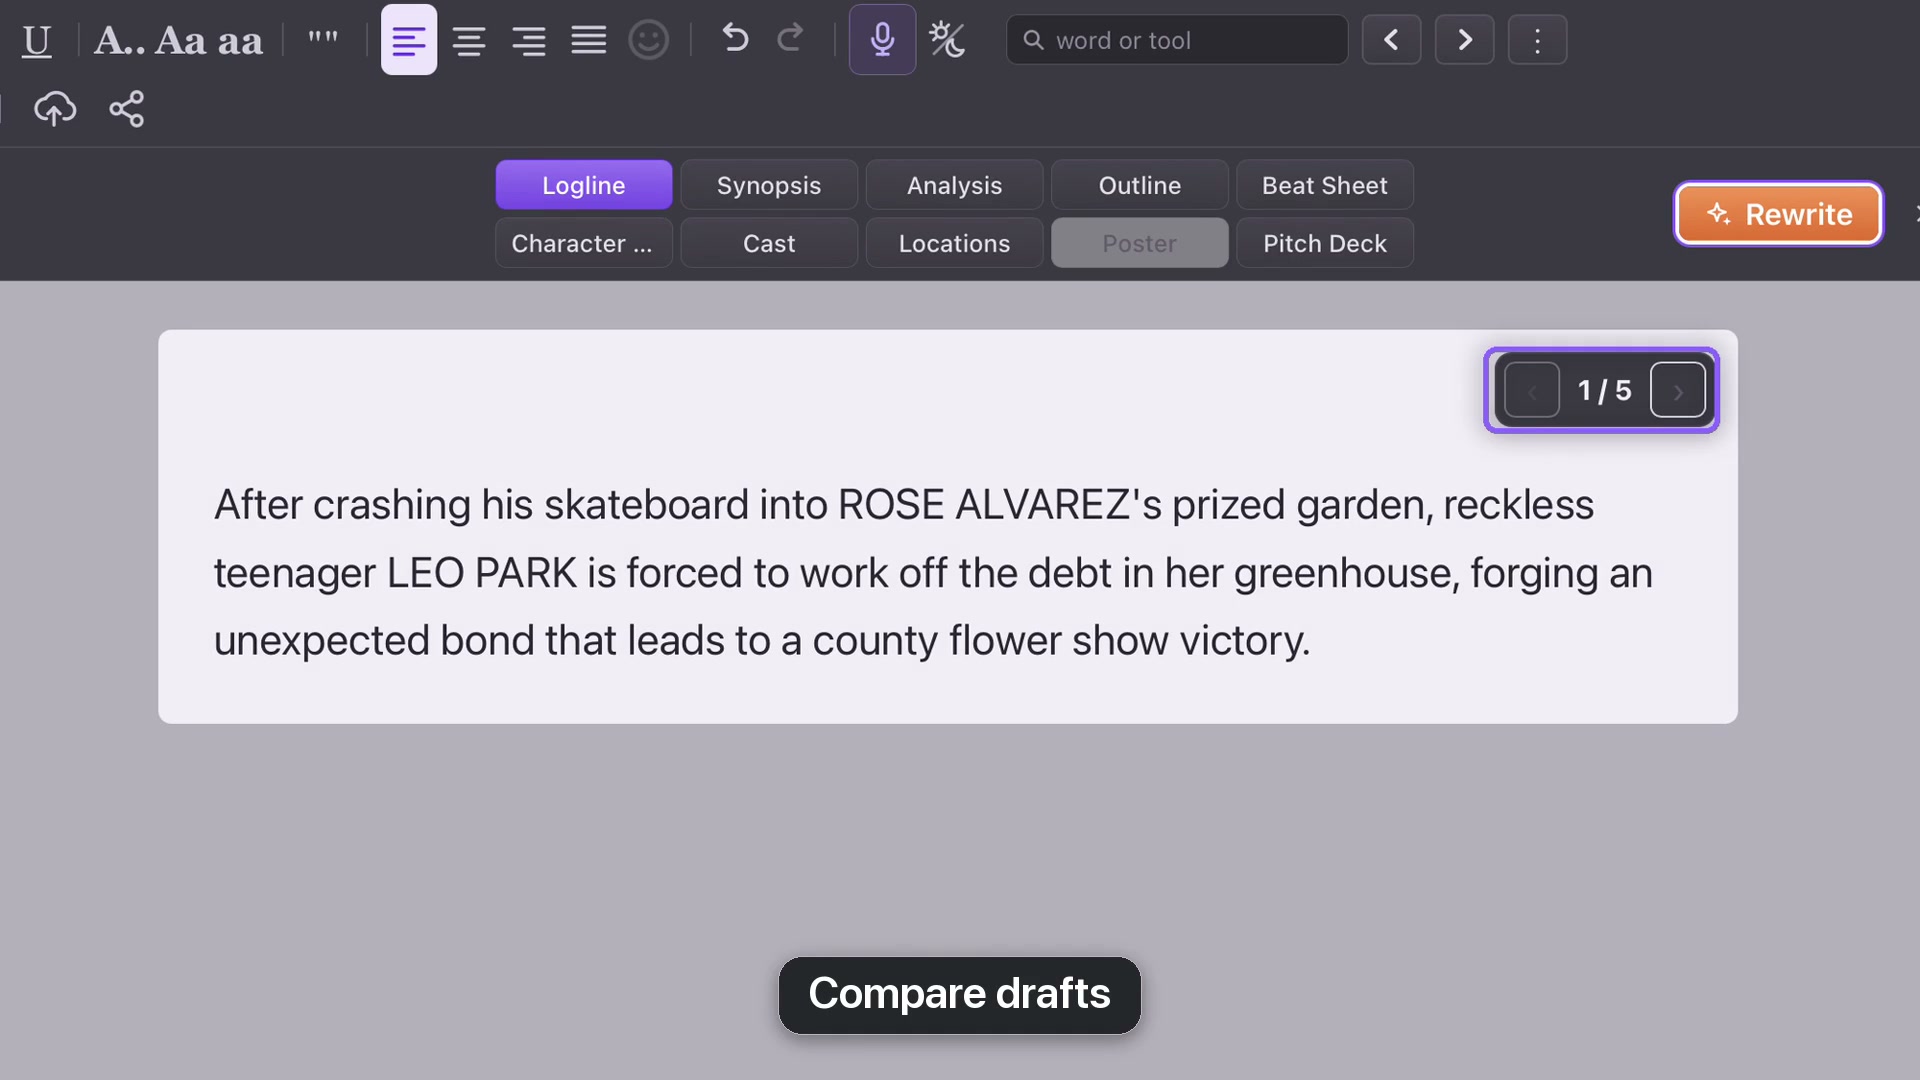
Click the wording to edit it directly. In The Tulip Deal example, “reckless” replaces “rebellious” because it fits Leo’s skateboard crash more precisely. Small word choices can make the pitch more faithful to the draft.
Try a directed rewrite
Finish editing, then choose Rewrite. Give a focused note, such as “Make it funnier.” Leaving the direction empty asks for another version. The comic phrasing in the example changes while the accident, gardening debt and unlikely friendship remain recognizable.
Draft arrows let you compare versions.From lesson 17, 1:12 · Select the image to enlarge.
Compare drafts
Use the draft arrows to compare previous wording with the new version. Leave the one you prefer on screen, then save the project. If the pitch suggests a story your screenplay does not actually tell, revise the pitch or investigate that difference in the script.
CHAPTER 18
Synopsis
Choose the length of a synopsis, generate it from the screenplay, and refine the wording for your reader.
Choose the length first
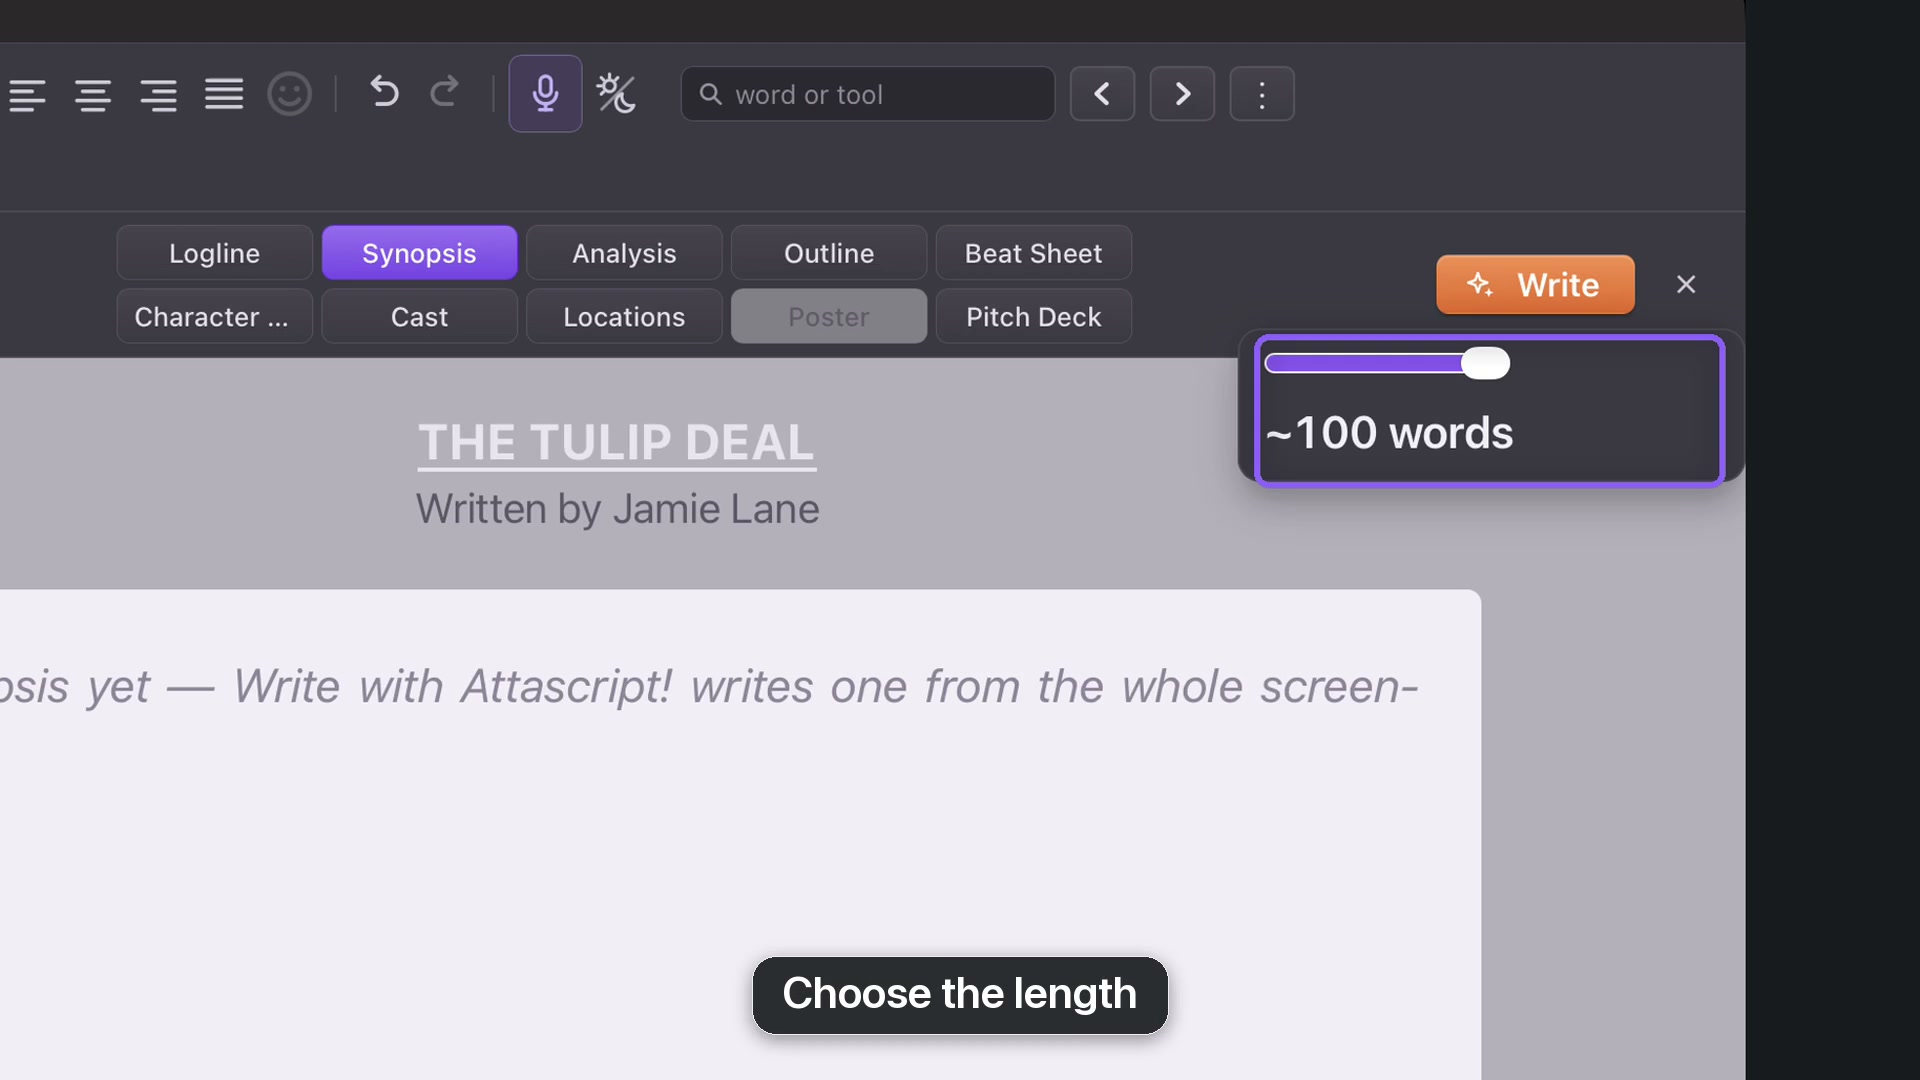
Open Story and Synopsis. The title and author come from the title page; edit them there if needed. Use the length slider before generating. A short screenplay offers shorter choices, while longer scripts unlock longer summaries.
Choose the synopsis length before generating.From lesson 18, 0:13 · Select the image to enlarge.
Write and check
Click Write and allow the reading to finish. Check the summary’s sequence, relationships and ending against the screenplay. In The Tulip Deal, the accident leads to the gardening deal, the storm and the flower show. Make sure the summary preserves the causes between those events.
Change the length deliberately
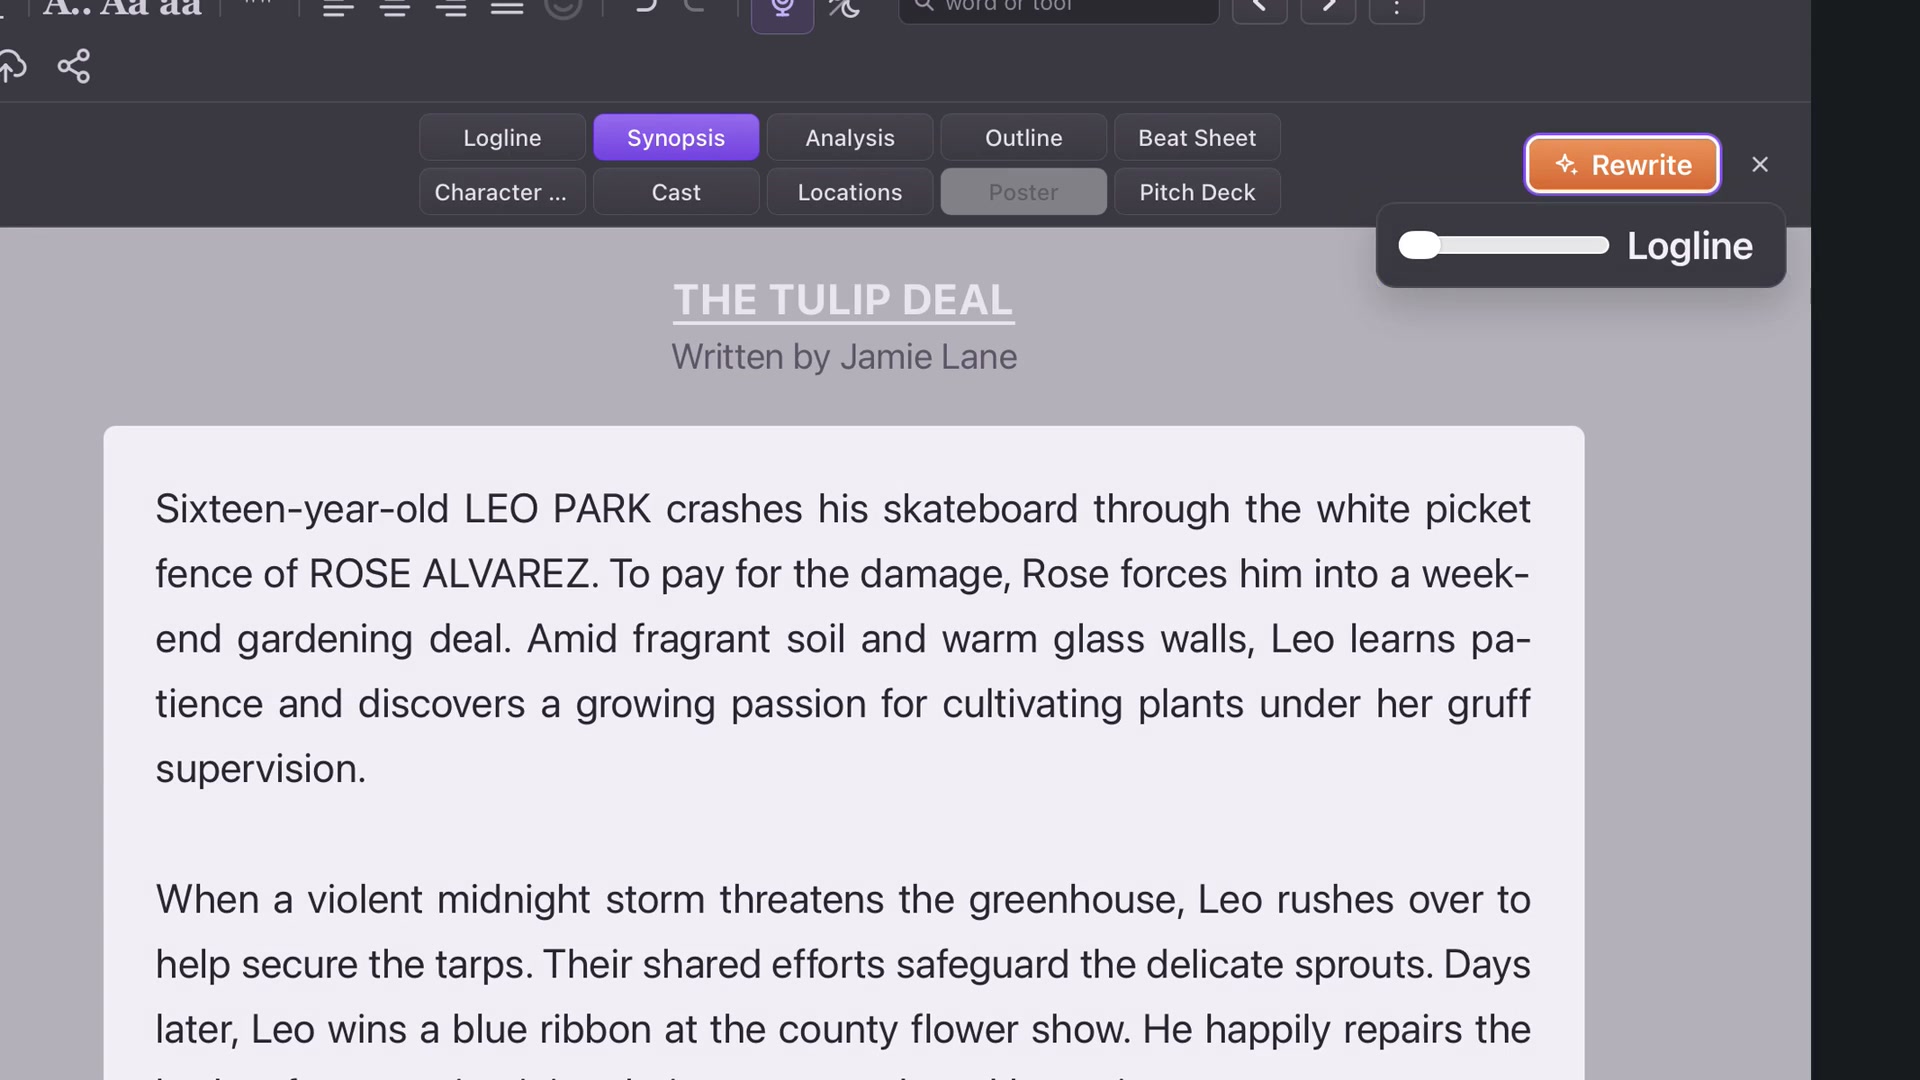
Moving the slider does not rewrite existing text. Select Rewrite when you want a new version at the new length. This lets you inspect a possible length without losing a synopsis you already like.
Rewrite applies a new length to a new version.From lesson 18, 0:50 · Select the image to enlarge.
Edit and format
Click into the synopsis to improve phrasing. Use the top-menu formatting controls for emphasis or paragraph alignment; Undo reverses an unwanted change. Save the working project when the synopsis reads accurately and smoothly.
CHAPTER 19
Analysis
Use Analysis as another reader’s perspective on the draft, then turn useful observations into specific revision questions.
Read the report
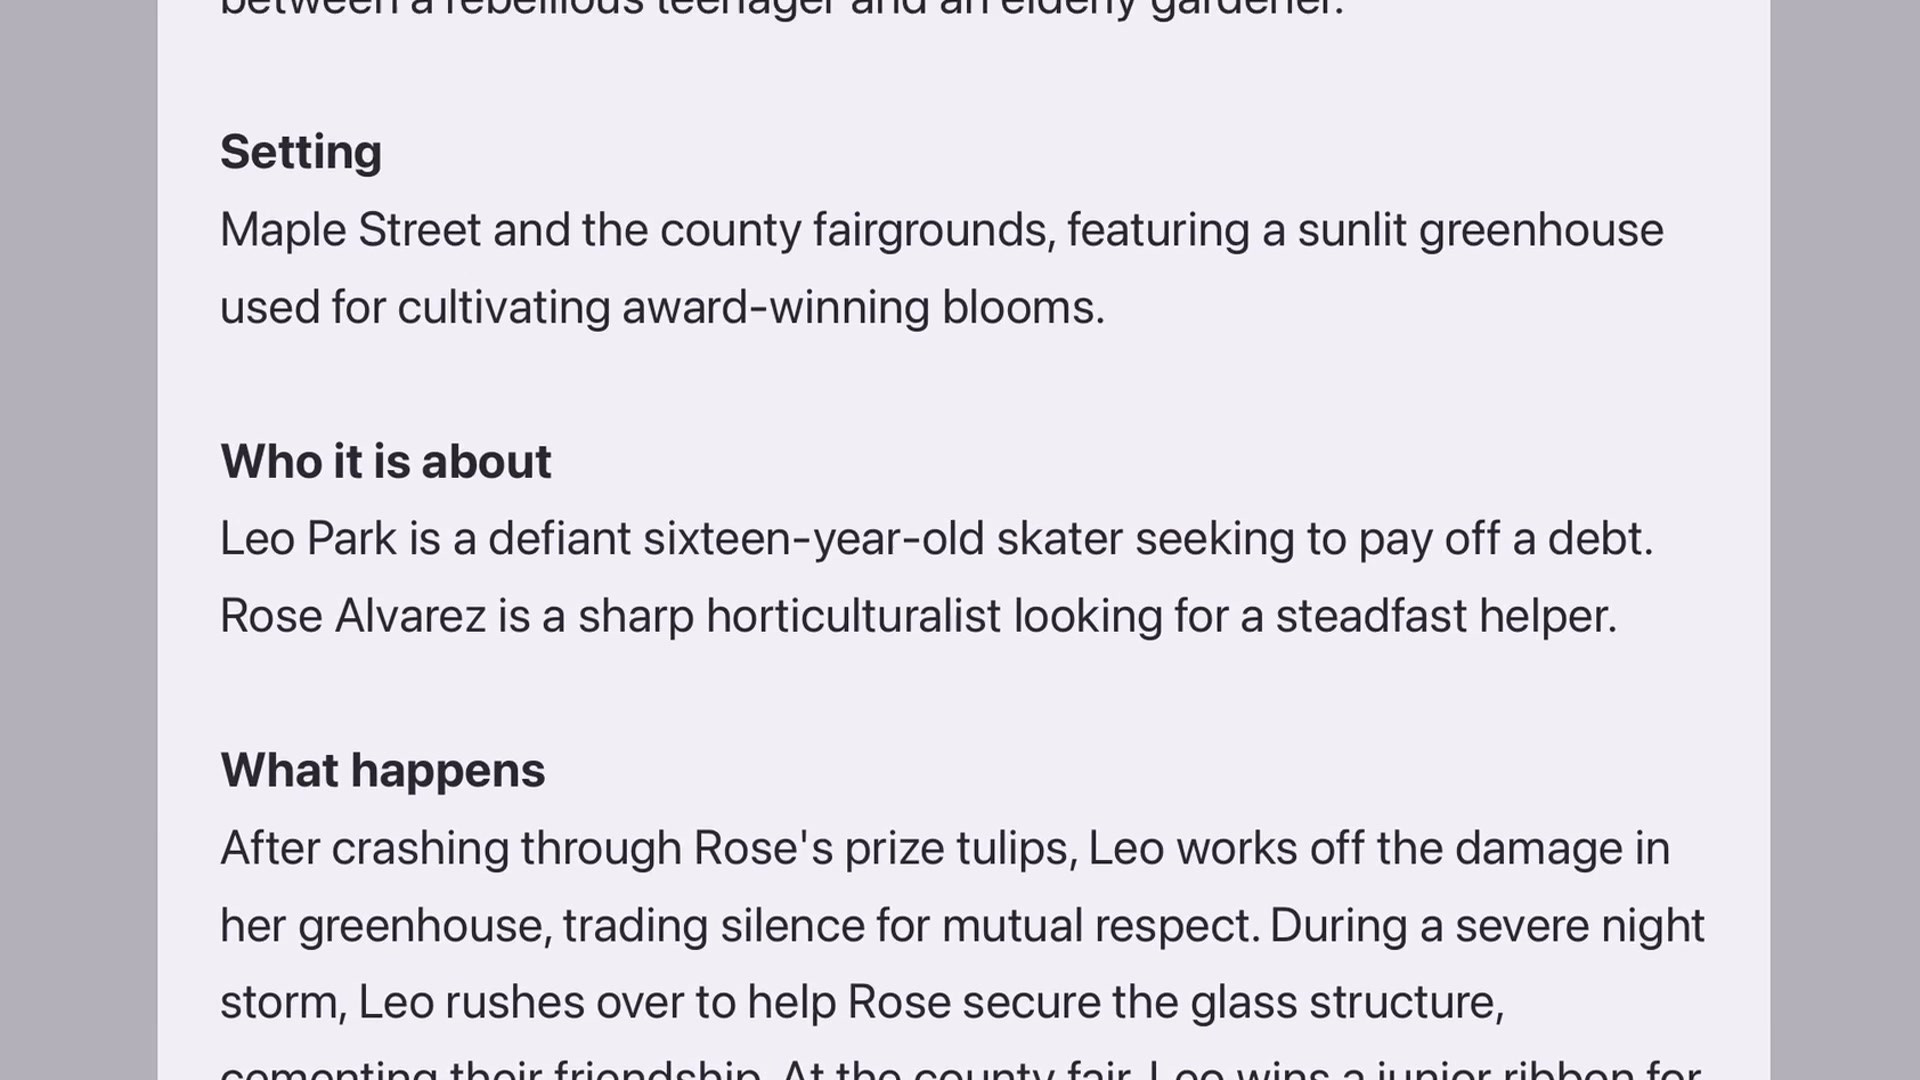
Open Story, choose Analysis and click Write. Start with the setting and the people: where the story lives, who drives it and what they want. Continue into what happens and what the story is about beneath the events.
The report separates plot events from the ideas beneath them.From lesson 19, 0:32 · Select the image to enlarge.
Look at the turning points
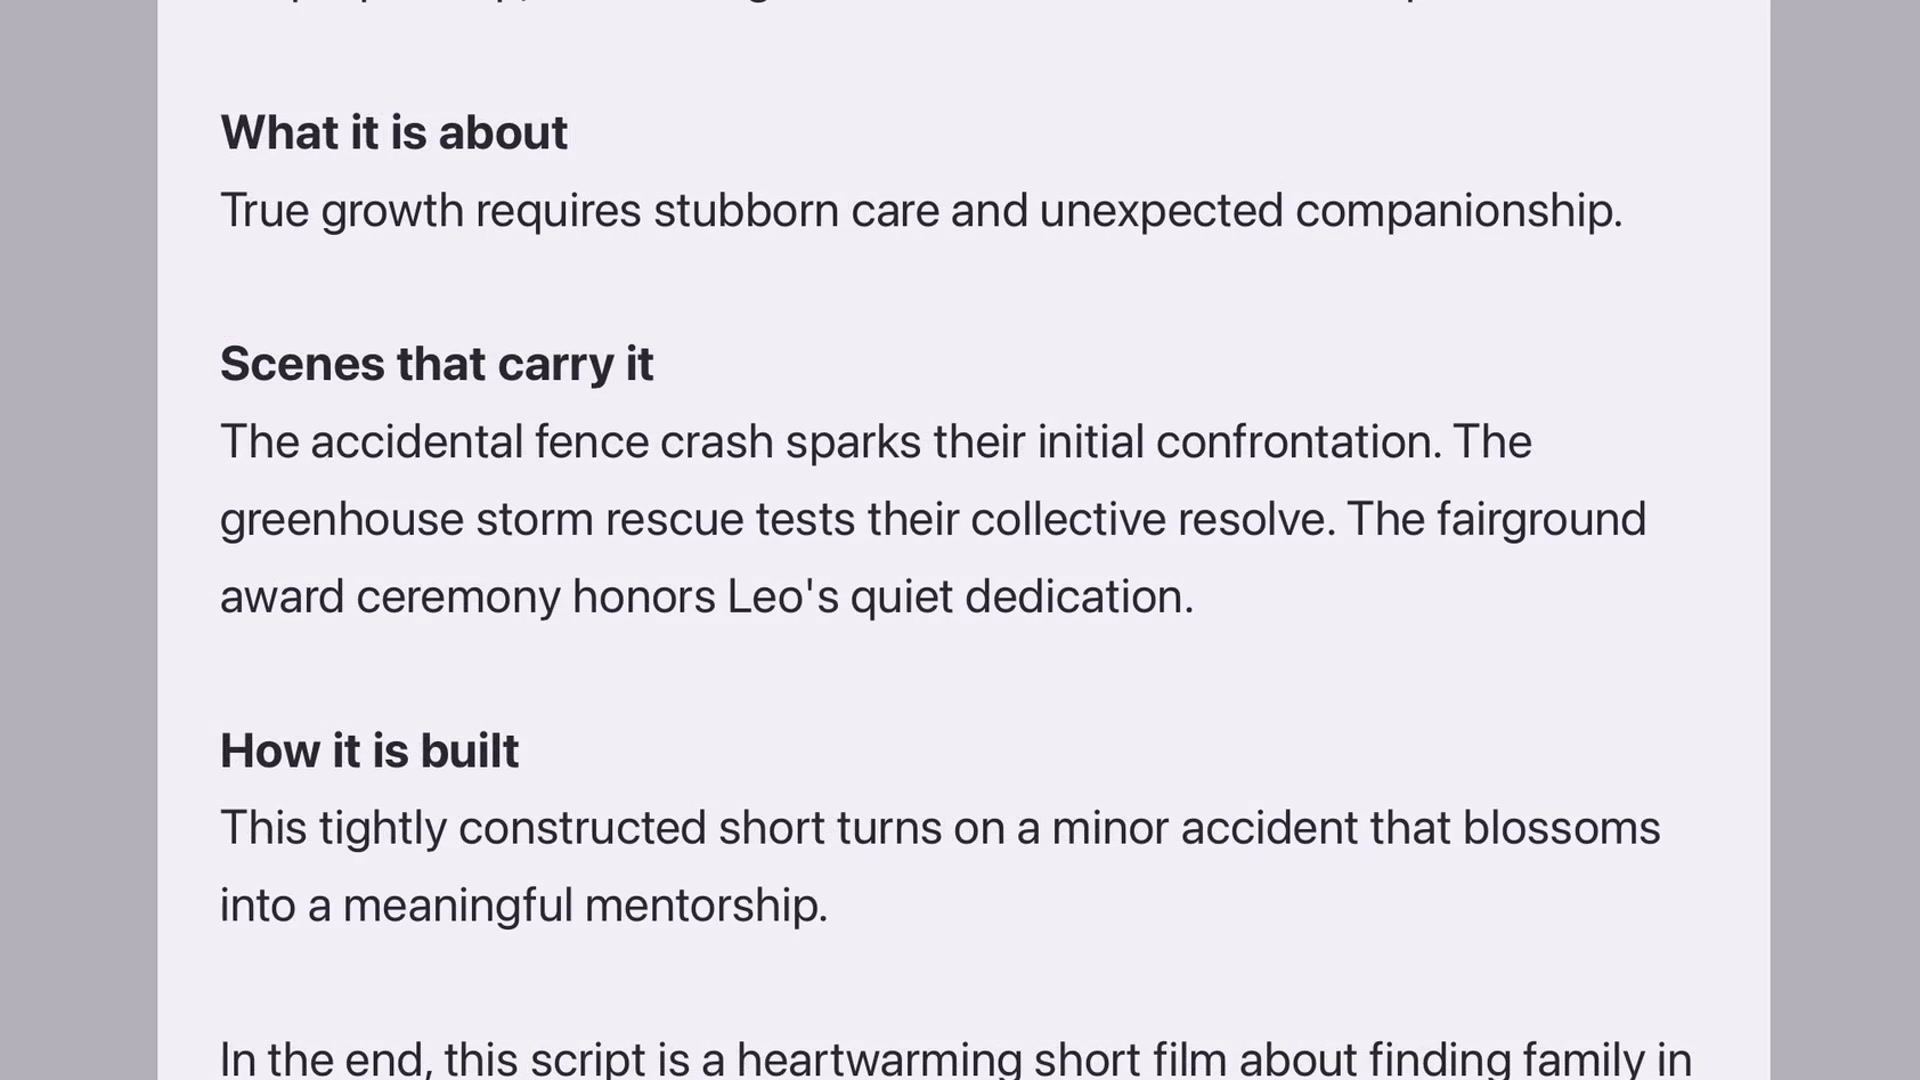
Scenes that carry it identifies important moments. How it is built examines the story’s shape. In the course example, the crash, storm rescue and award ceremony carry the change in Leo’s relationship with Rose.
Ask a practical rewrite question
Translate a broad observation into something you can inspect on the page. Does the storm scene show Leo choosing to help, or merely paying a debt? Return to the screenplay and read the action that demonstrates that choice.
A report may point you toward a stronger beat, but the action and dialogue still need to make it work for the audience.
Key scenes provide a practical starting point for revision.From lesson 19, 0:49 · Select the image to enlarge.
Keep your judgment
Save useful material and return to it after a revision. Accept what helps, question what does not, and retain responsibility for the final creative choices. Analysis is not a grade or an instruction to erase your own style.
CHAPTER 20
Outline
Read the story scene by scene and keep its descriptions consistent with Scene Cards.
Build an outline
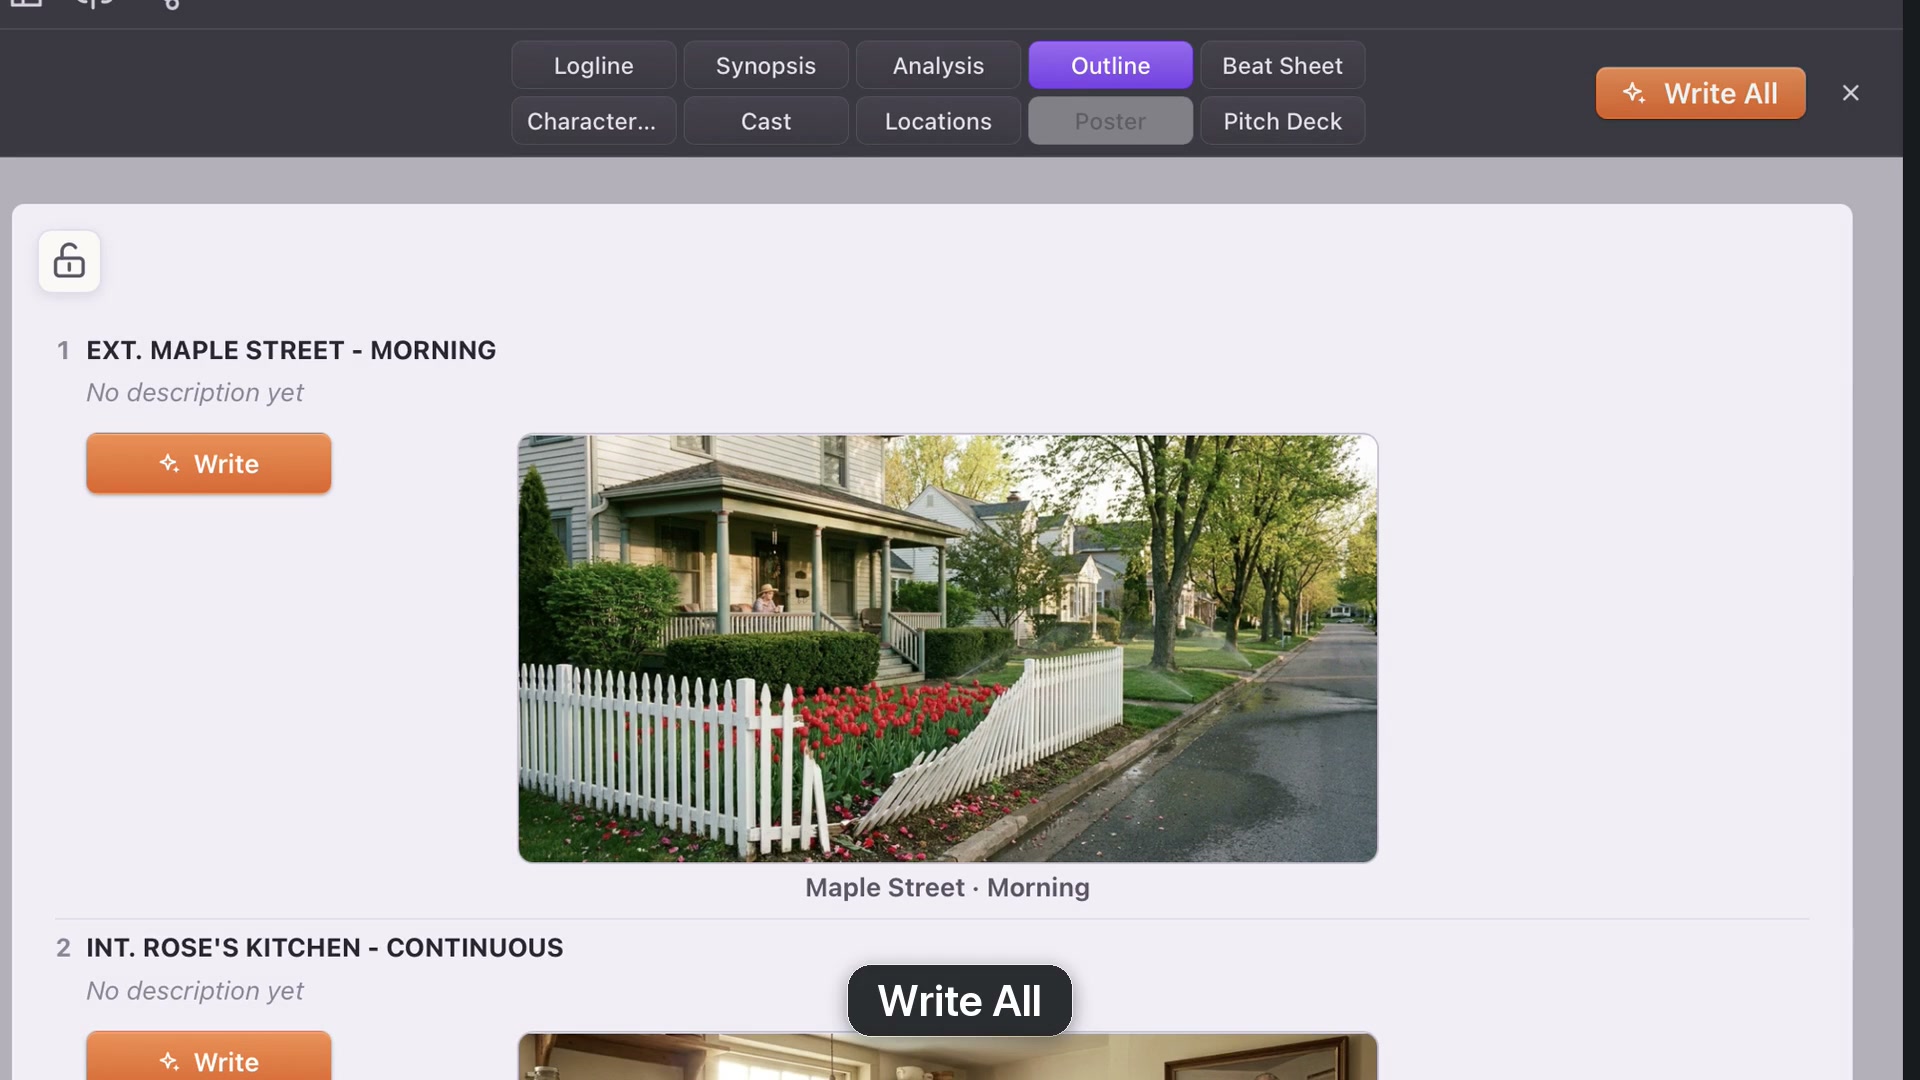
Open Story, then Outline. Each entry has a scene heading, description and location reference. Write All reads the scenes and fills their descriptions. Your screenplay remains intact.
Scan the sequence for progression: what does this scene change, and why does the next one follow?
Write All generates a description for each scene.From lesson 20, 0:18 · Select the image to enlarge.
Revise one description
Use the entry’s Write or Rewrite button to focus on one scene. Ask for a shorter summary or a different emphasis. You can also edit the wording directly. In the example, the description emphasizes the trouble Leo creates and the unlikely partnership that follows.
Move between outline and screenplay
Click a scene heading to open its pages. Return through Story and Outline to continue reviewing. Open Scene Cards and the same description is already there; both views use the same material.
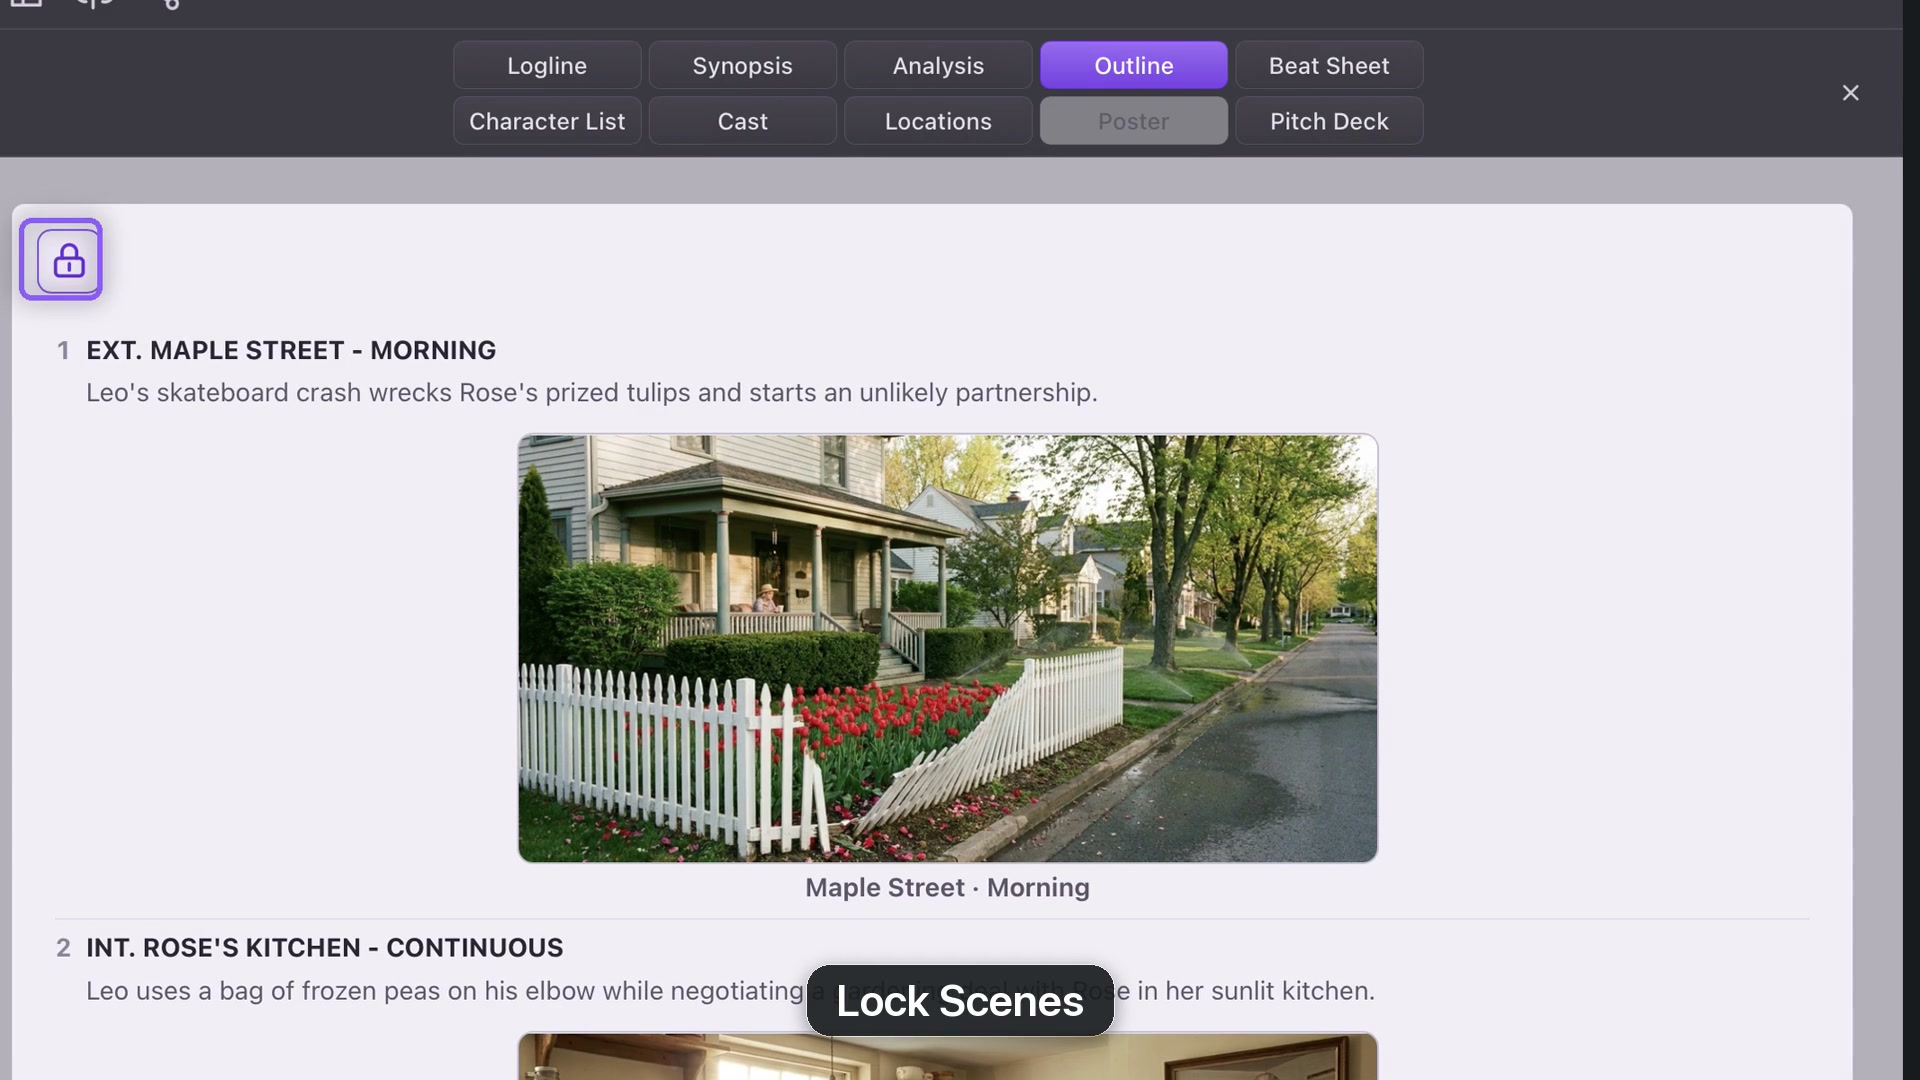
Lock Scenes makes the outline a clean review view.From lesson 20, 1:32 · Select the image to enlarge.
Lock for a clean read
Lock Scenes hides editing controls and protects the descriptions while you read. Unlock before making more edits. Save the project to keep the current outline.
Use Outline for scene-by-scene progression and Beat Sheet for larger structural turns. Neither needs to replace reading the actual screenplay.
CHAPTER 21
Beat Sheet
See the screenplay’s larger turns, with editable beat descriptions and links back to their pages.
Generate the beat sheet
Open Story, choose Beat Sheet and click Write. Each entry identifies a beat, describes what happens and gives a page reference with its position in the story.
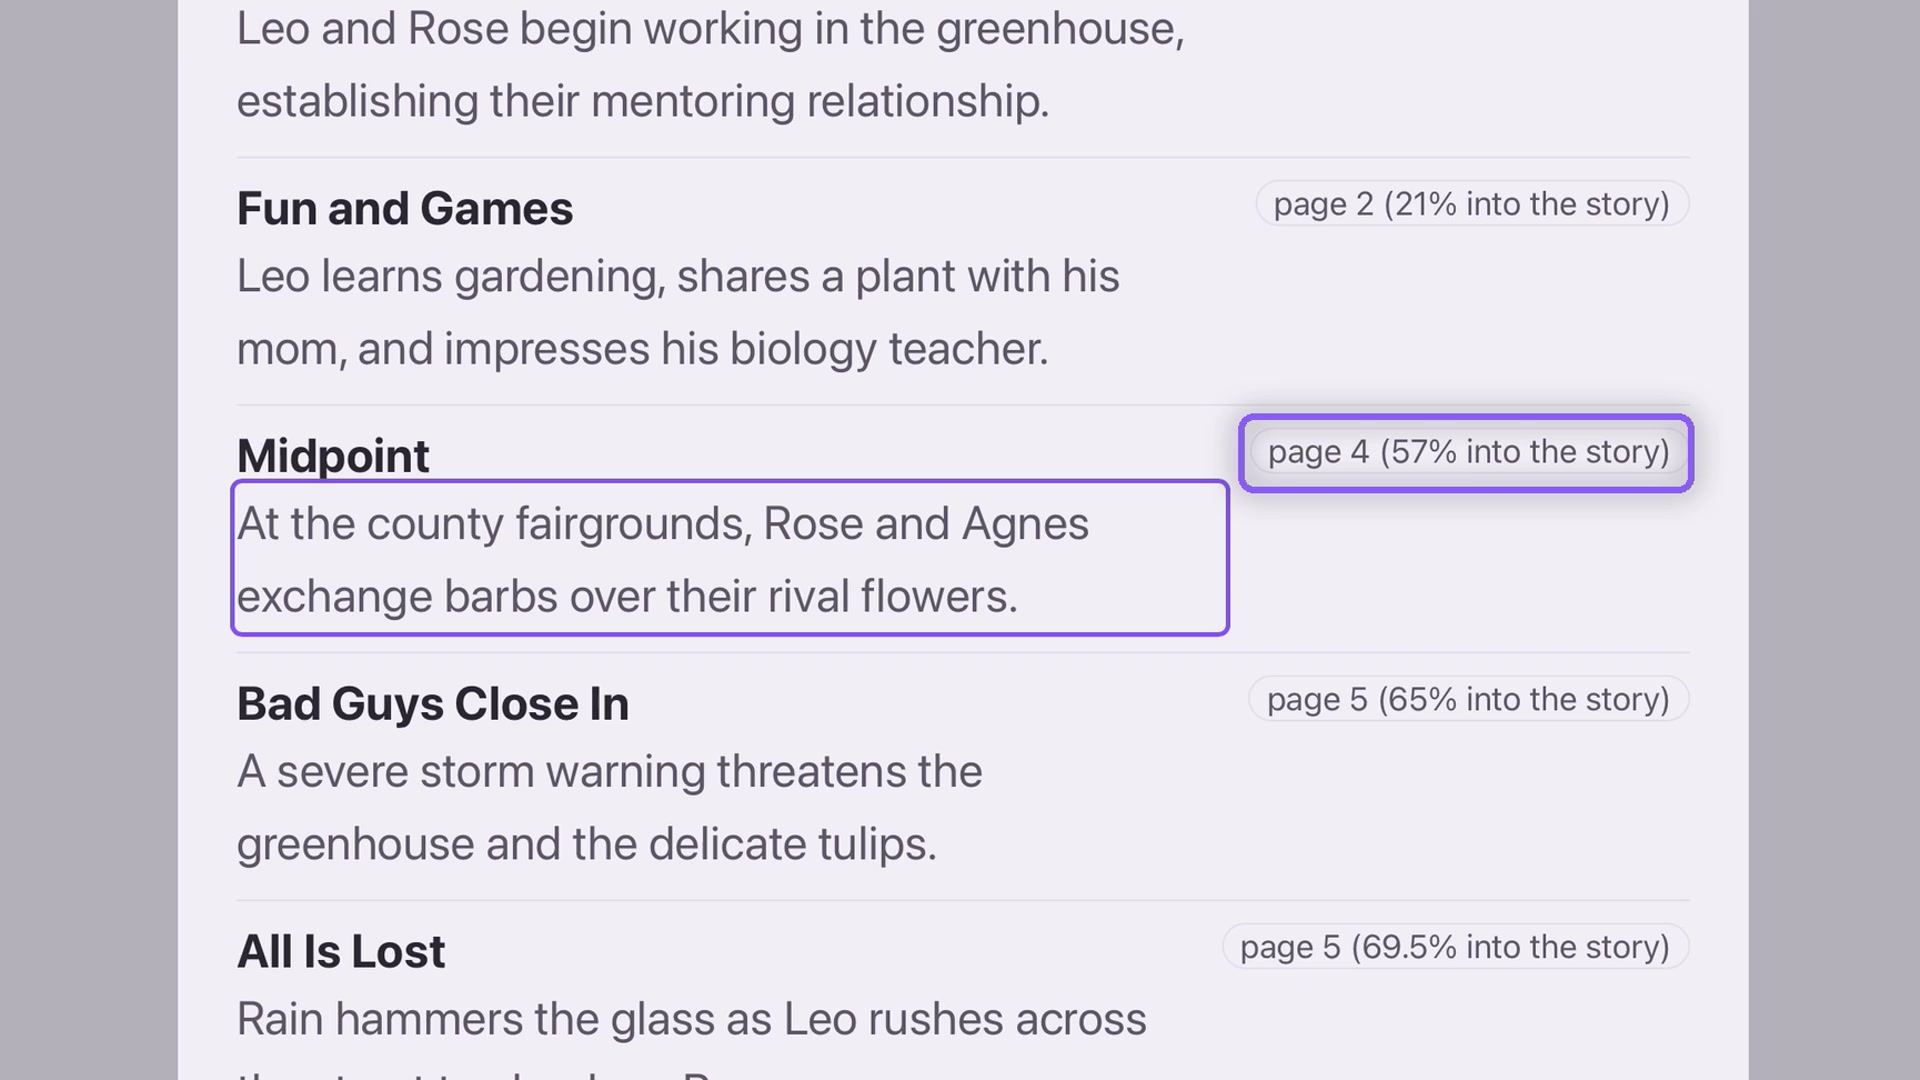
In the example, Midpoint appears on page four at 57% of the screenplay. These positions describe the generated reading of this draft; they are not a requirement that every story place the same event at an identical percentage.
A beat includes its description, page and relative position.From lesson 21, 0:30 · Select the image to enlarge.
Refine a description
Click a description to edit its emphasis. The demonstration brings Rose and Agnes’s rivalry into focus. Keep the wording faithful to the scene, especially if the draft has changed since the report was generated.
Follow the links
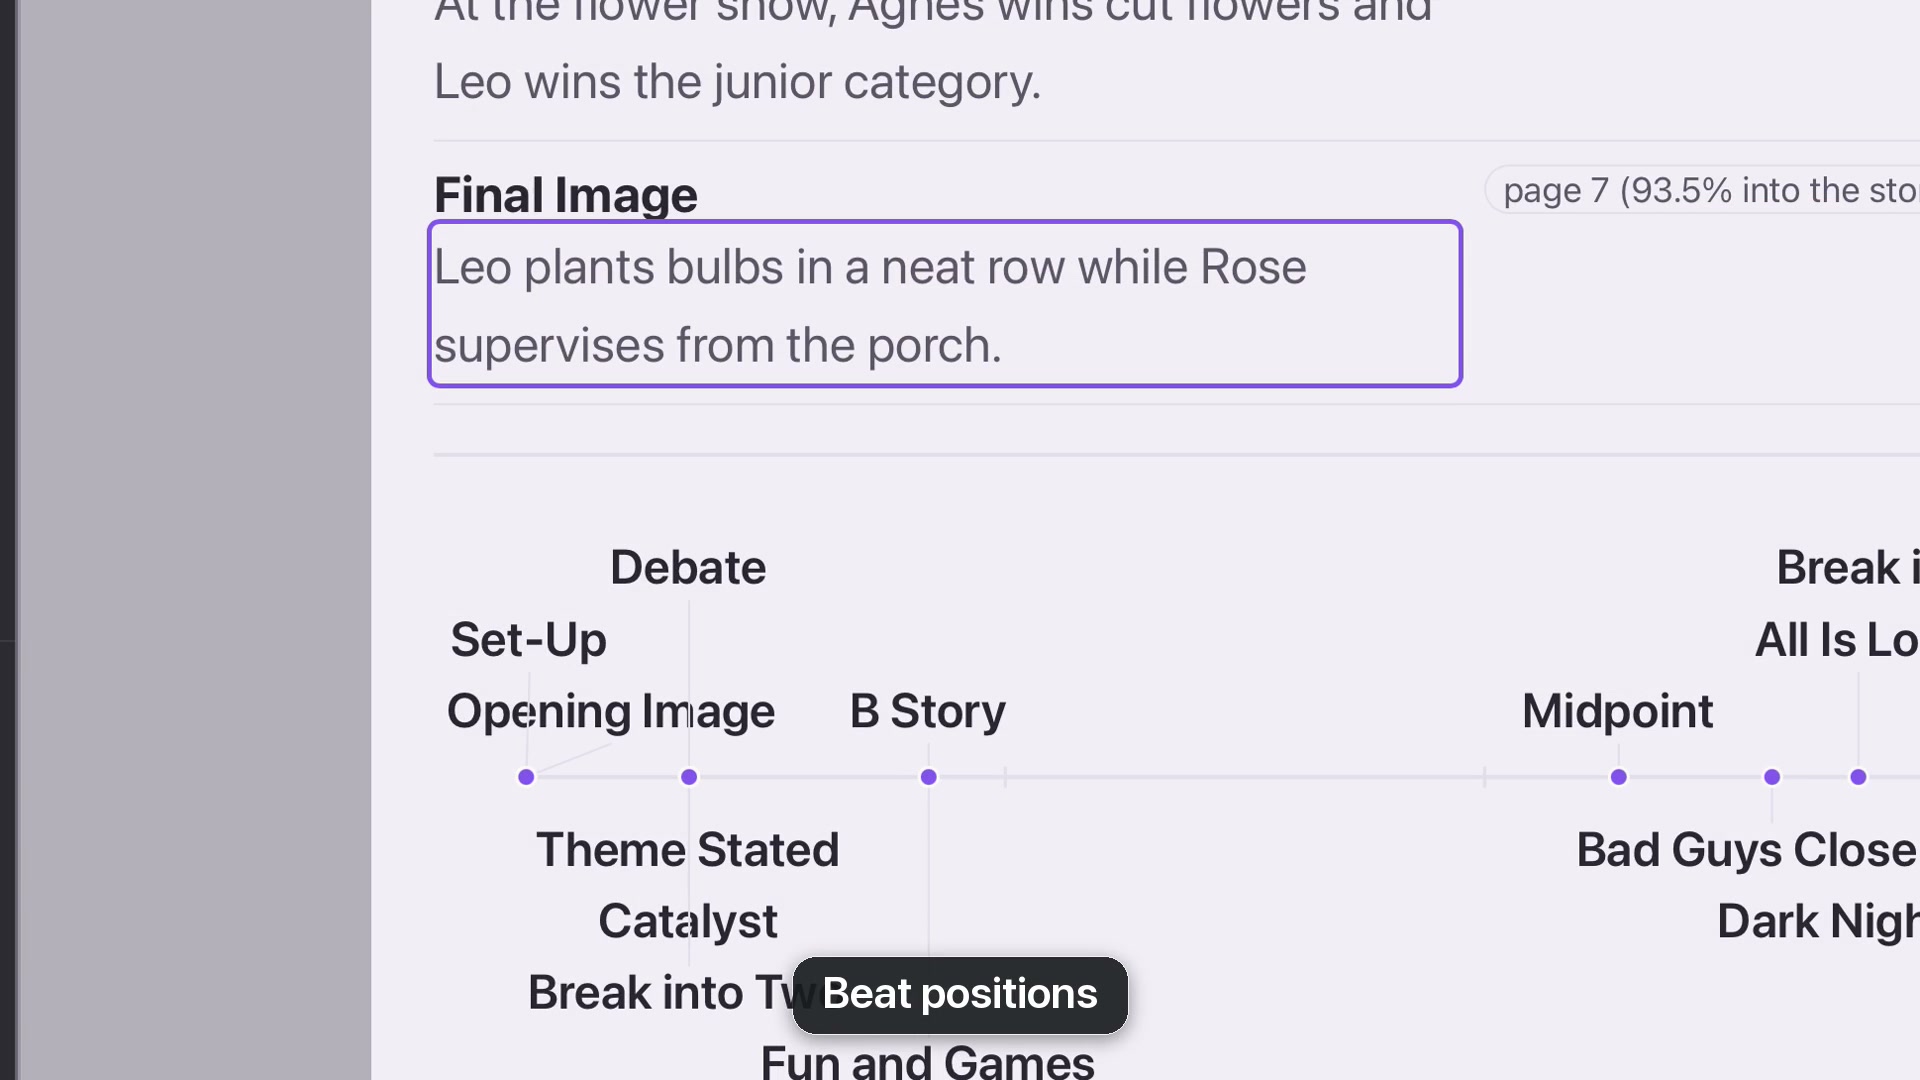
Click a page reference to open that page. Return through Story and Beat Sheet when you want to continue the overview. At the bottom, the diagram places beats between 0% and 100%. Its labels are links too: choose Final Image to jump to the end.
The diagram links structural moments back to the screenplay.From lesson 21, 0:59 · Select the image to enlarge.
Use the pattern
Look at where the story changes and where it has room to breathe. If a span feels empty or crowded, read those pages before deciding what to revise. Save your edited beat sheet with the project.
CHAPTER 22
Character List
Bring the characters’ descriptions into a readable list, edit them, and share a clean overview.
Write or rewrite descriptions
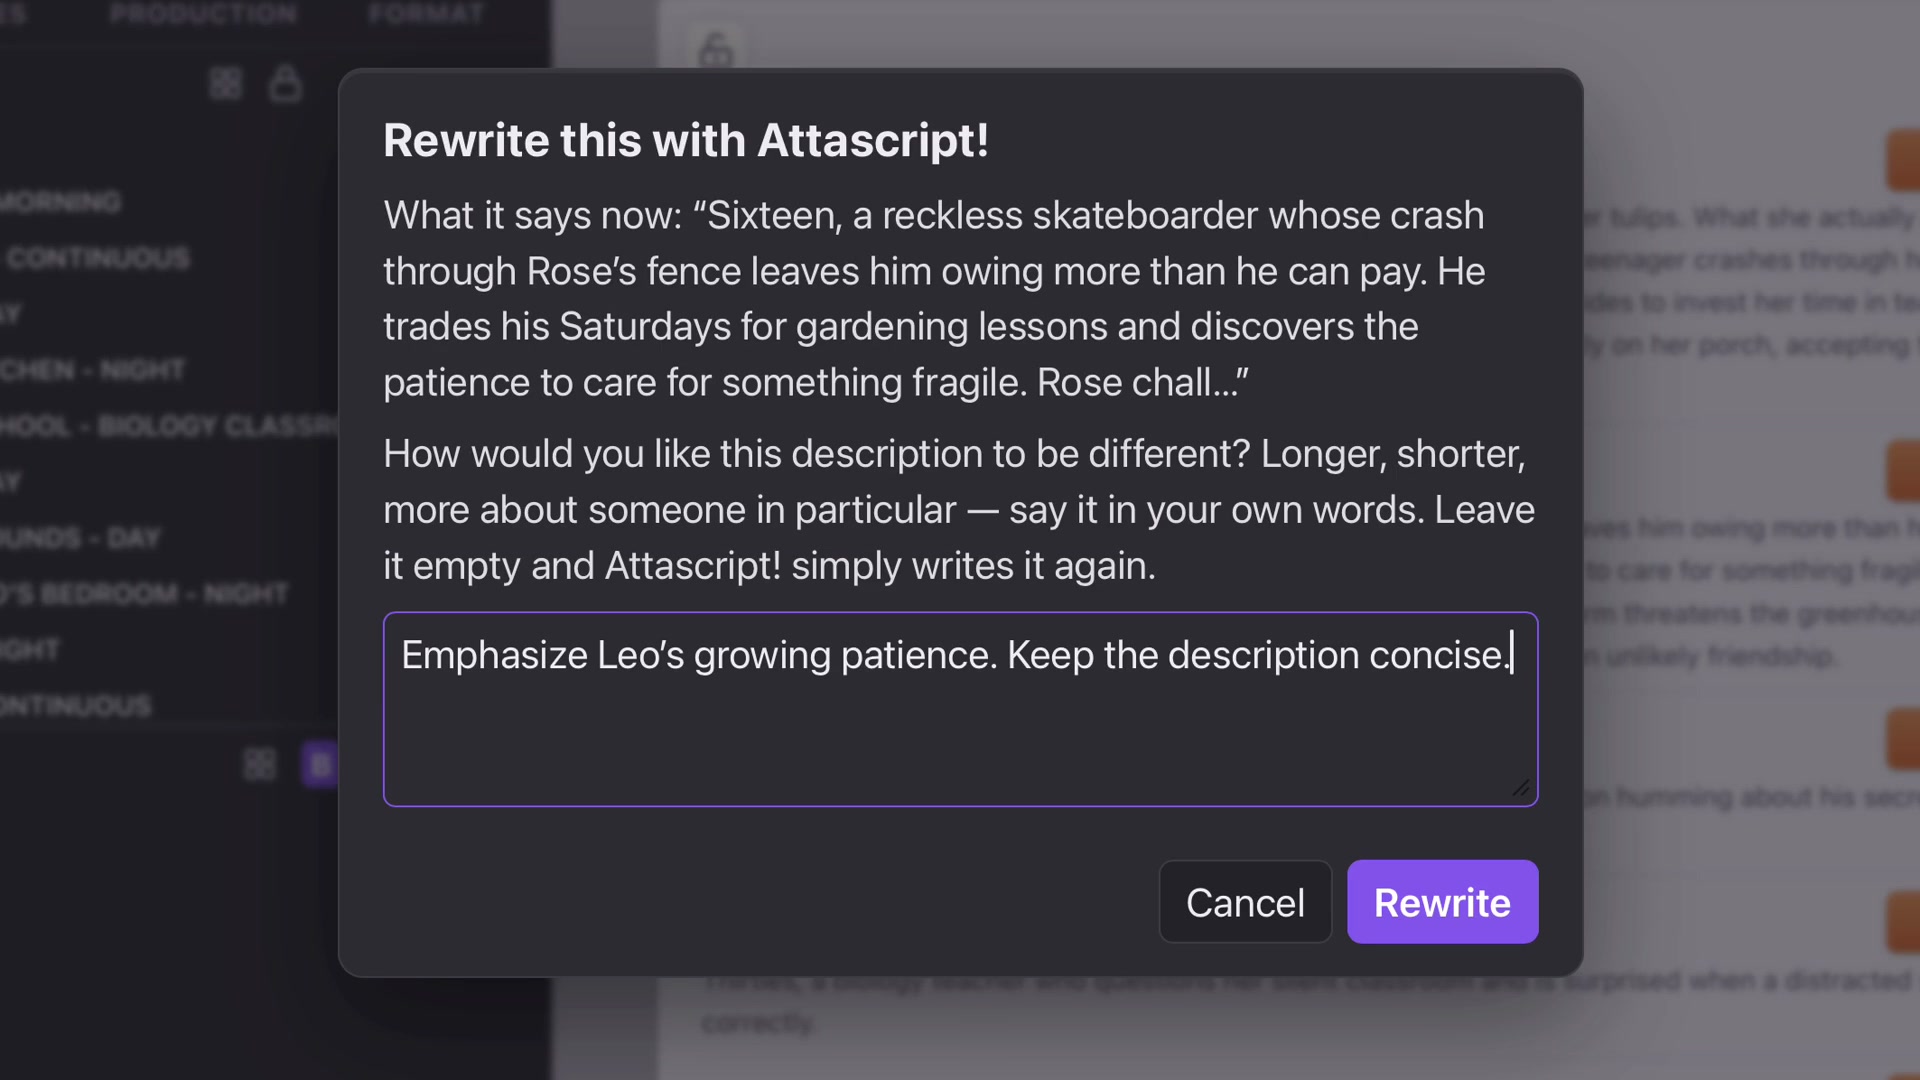
Open Story and Character List. These descriptions are shared with Character Cards. Rewrite All lets you guide length, tone or emphasis across the whole list; cancel to preserve the current set.
Each character also has a Rewrite control, so you can change one description without requesting a new version for everyone.
Rewrite can focus on a single character.From lesson 22, 0:27 · Select the image to enlarge.
Edit directly
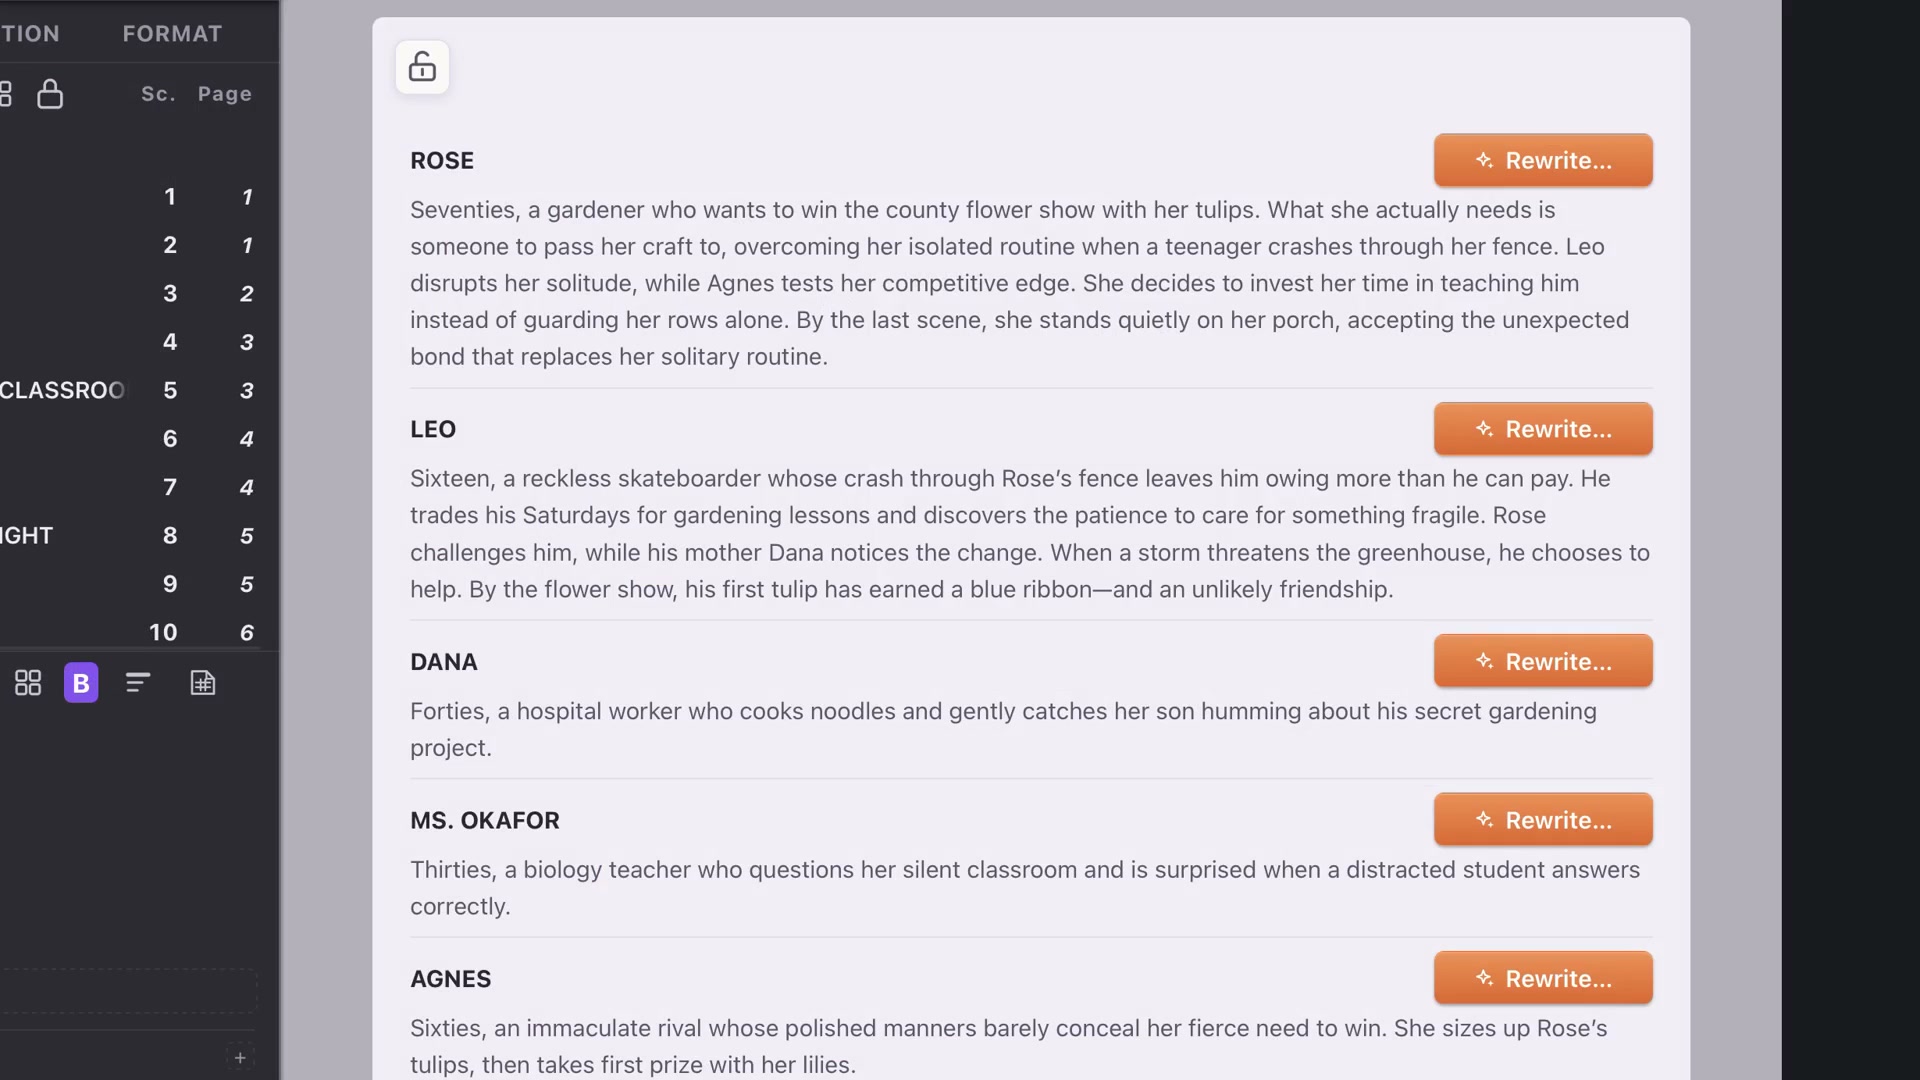
Click a description and refine it yourself. A useful character overview explains the role in this story, rather than accumulating unrelated biography. In the demonstration, Agnes’s competitive streak becomes more explicit.
Click the character’s name to open the card. The edited description is already there.
The lock makes the list ready for an uninterrupted read.From lesson 22, 0:48 · Select the image to enlarge.
Review and export
Lock the list for a read-only presentation with editing controls hidden. Unlock to continue working. Choose Save As, select Character List and save as PDF or Word to share it separately.
Save the Attascript project as well. The export is a delivery copy; the project keeps the material ready for future changes.
CHAPTER 23
Cast
Explore a casting wishlist or create original Synthespian portraits, keeping each choice connected to the character.
Start with the role
Open Story and Cast. The statistics show dialogue share, scene appearances and estimated screen time. Use them to understand the weight of a role. Write or edit the character description before asking for casting ideas; the description helps explain what kind of performance you need.
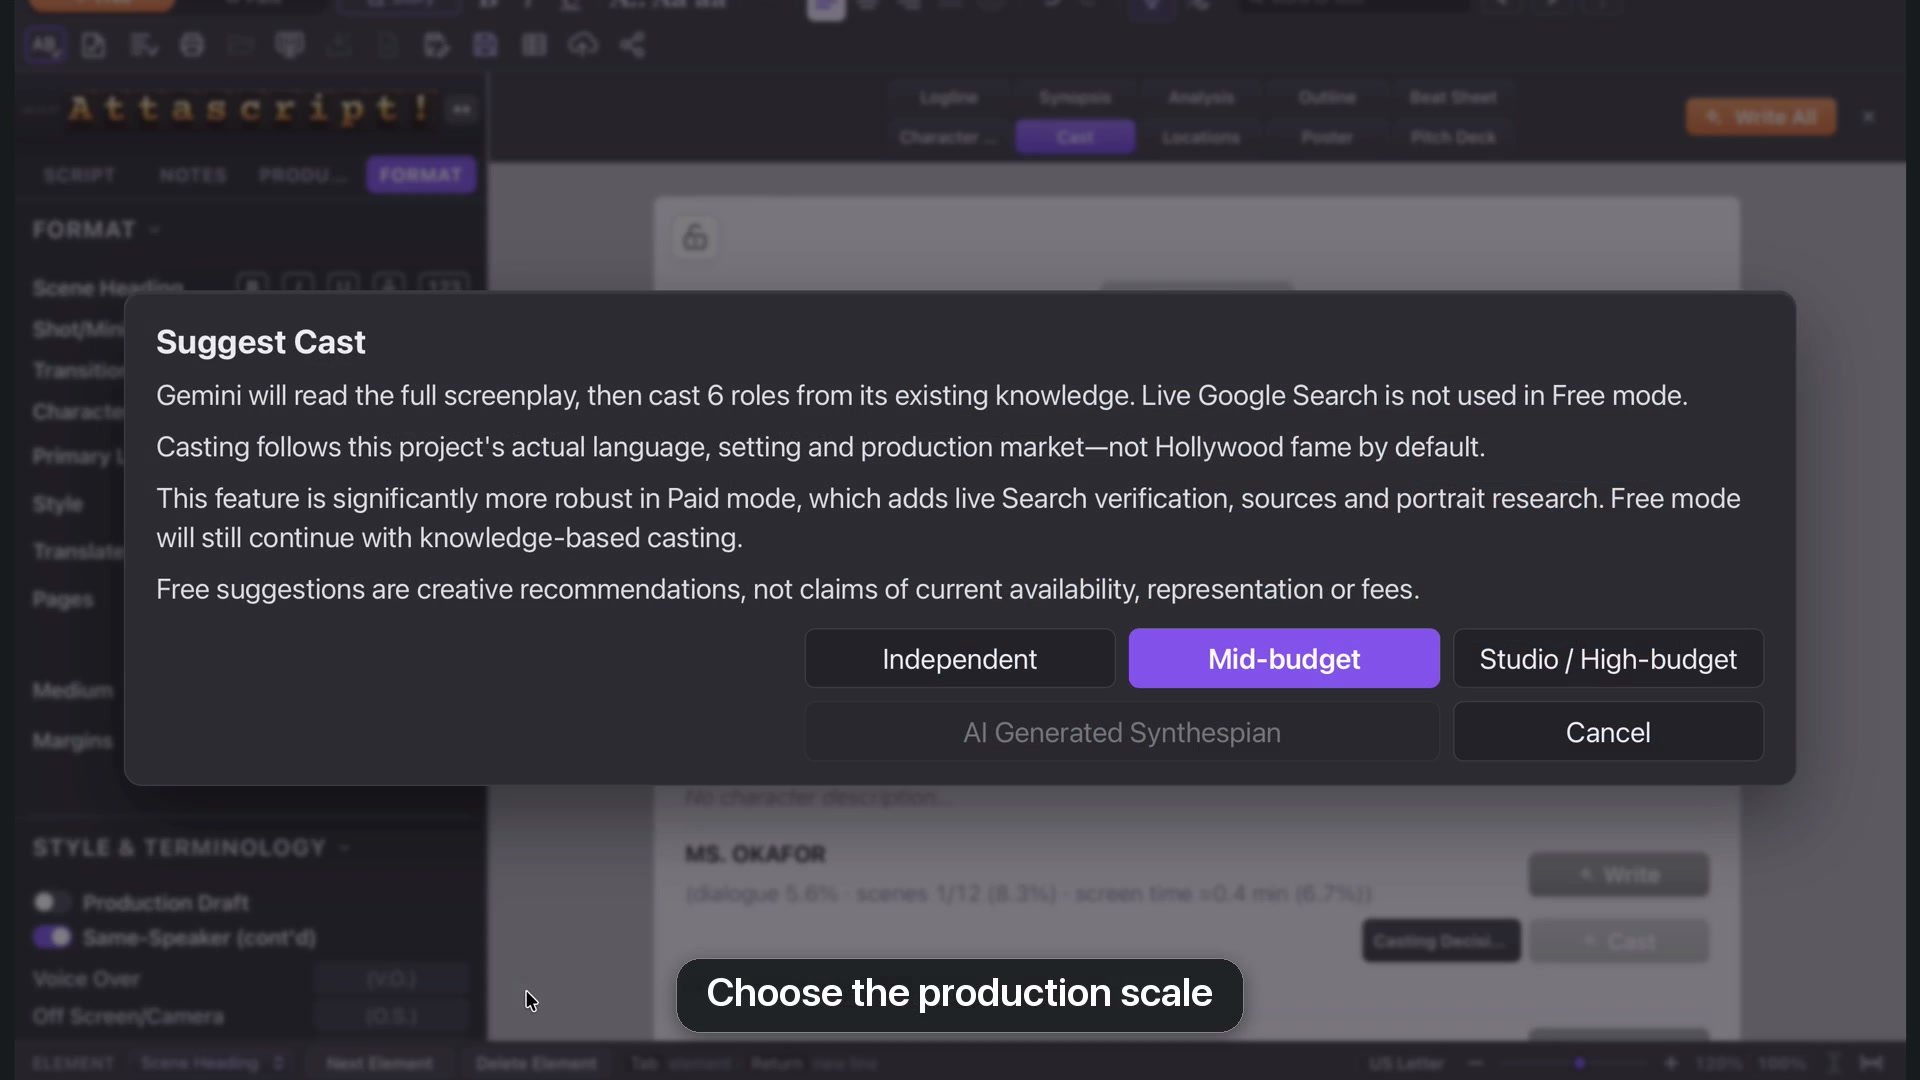
Suggest Cast begins with the production scale and casting approach.From lesson 23, 0:48 · Select the image to enlarge.
Suggest or decide
Suggest Cast offers production scales such as Independent, Mid-budget and Studio. Free mode uses the model’s existing knowledge; Paid adds live search verification and sources. A suggestion is a creative possibility, not confirmation of availability or fees.
Casting Decision lets you enter your own actor and reason. Recast can be guided with preferred or excluded performers, or a description of the energy you want. Review the explanation instead of relying on the name alone.
Add a missing photo
A blank photo can mean the service could not verify an image as free to use. The web-search button opens images of that actor. Choose an image you have permission to use, copy it, return to Attascript and click the empty image area to paste. You can also choose a file or drop a photo into the slot.
The reference is kept as a local project image. The course blurs real actors’ photos; its original AI portraits can be shown clearly.
Create Synthespians
In Paid mode, choose AI Generated Synthespian. The model chooses a consistent visual approach for the cast and creates an original portrait for each role. The choice is unavailable in Free mode.
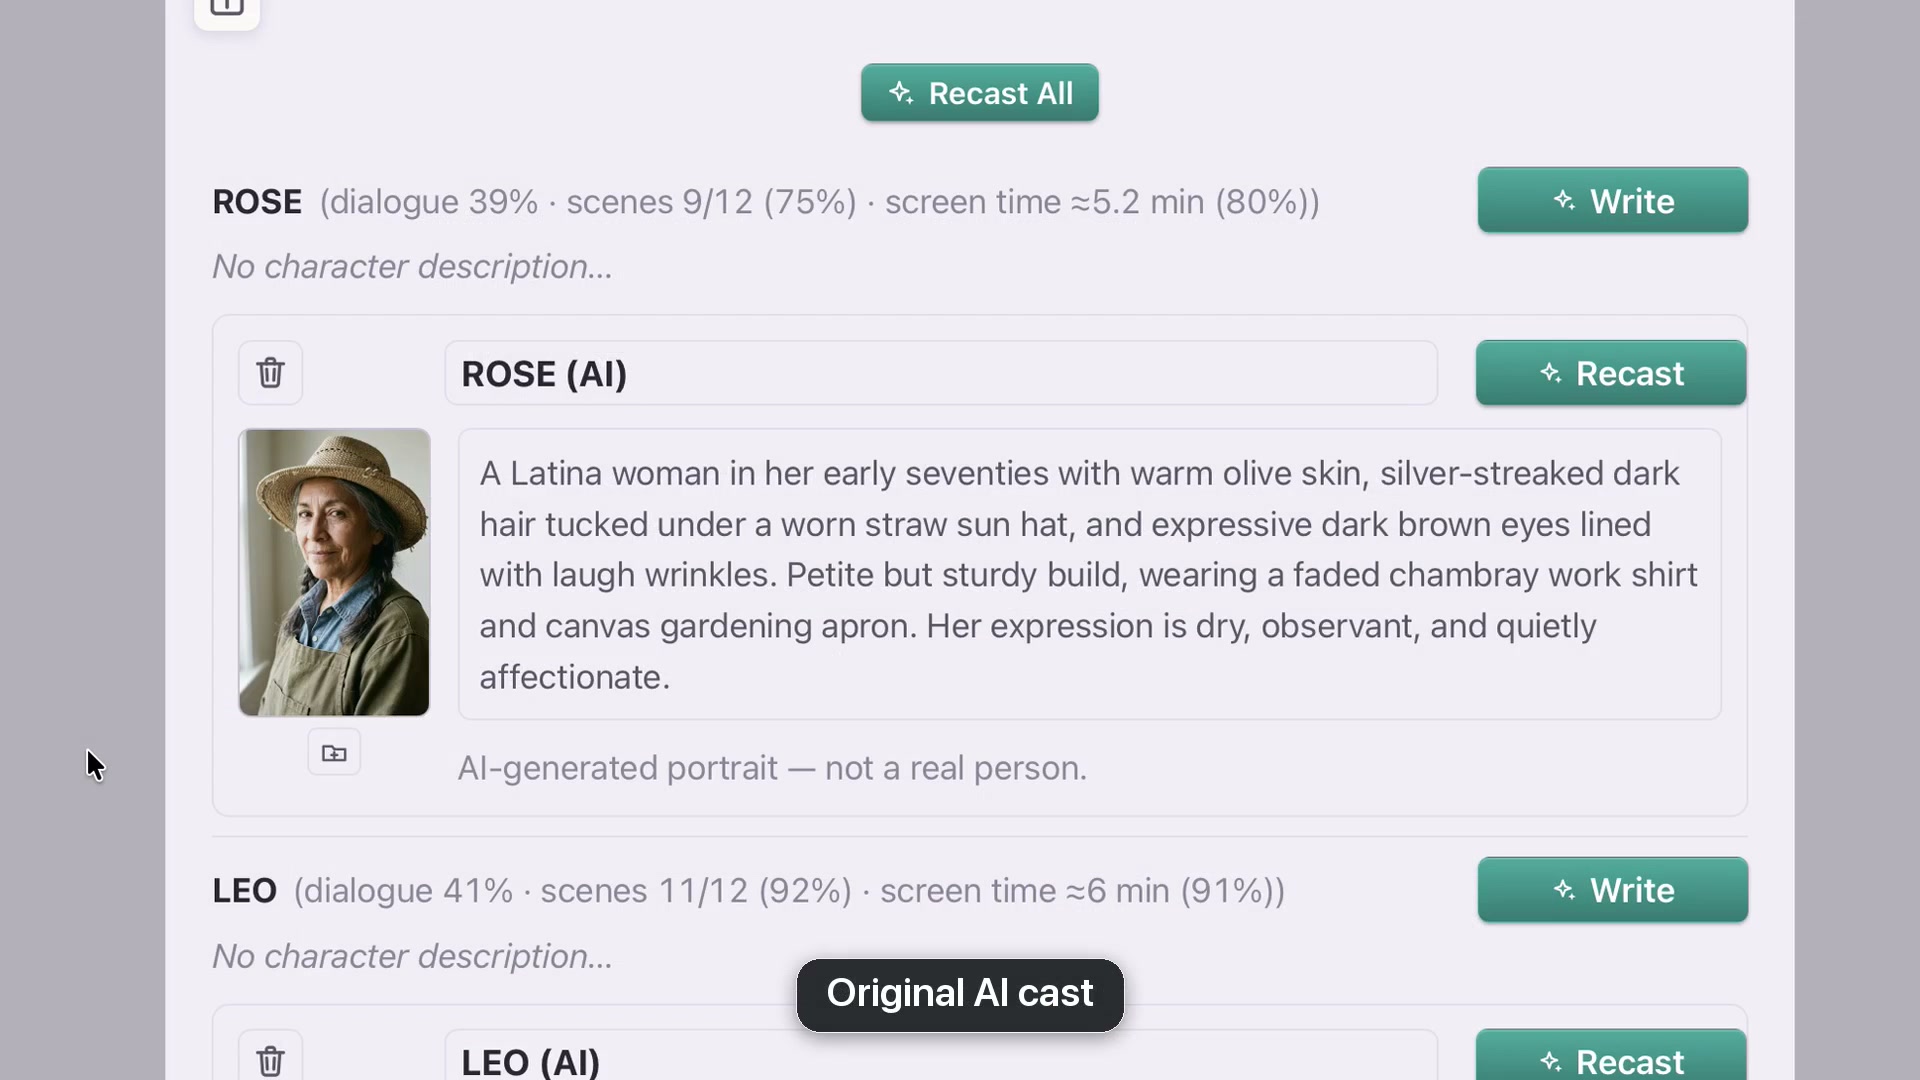
The row labels the name as AI and identifies the portrait as not a real person. Edit the appearance description to guide a later Recast. These images can appear in the Pitch Deck, credited as AI-generated portraits.
Original Synthespian portraits are clearly identified as AI-generated.From lesson 23, 2:54 · Select the image to enlarge.
Keep the board
Lock Characters makes the board read-only. Unlock before editing and save the project to preserve descriptions, choices and images.
CHAPTER 24
Locations
Connect the places in the story with time-of-day groups, scene references and visual production notes.
Build and inspect the sheet
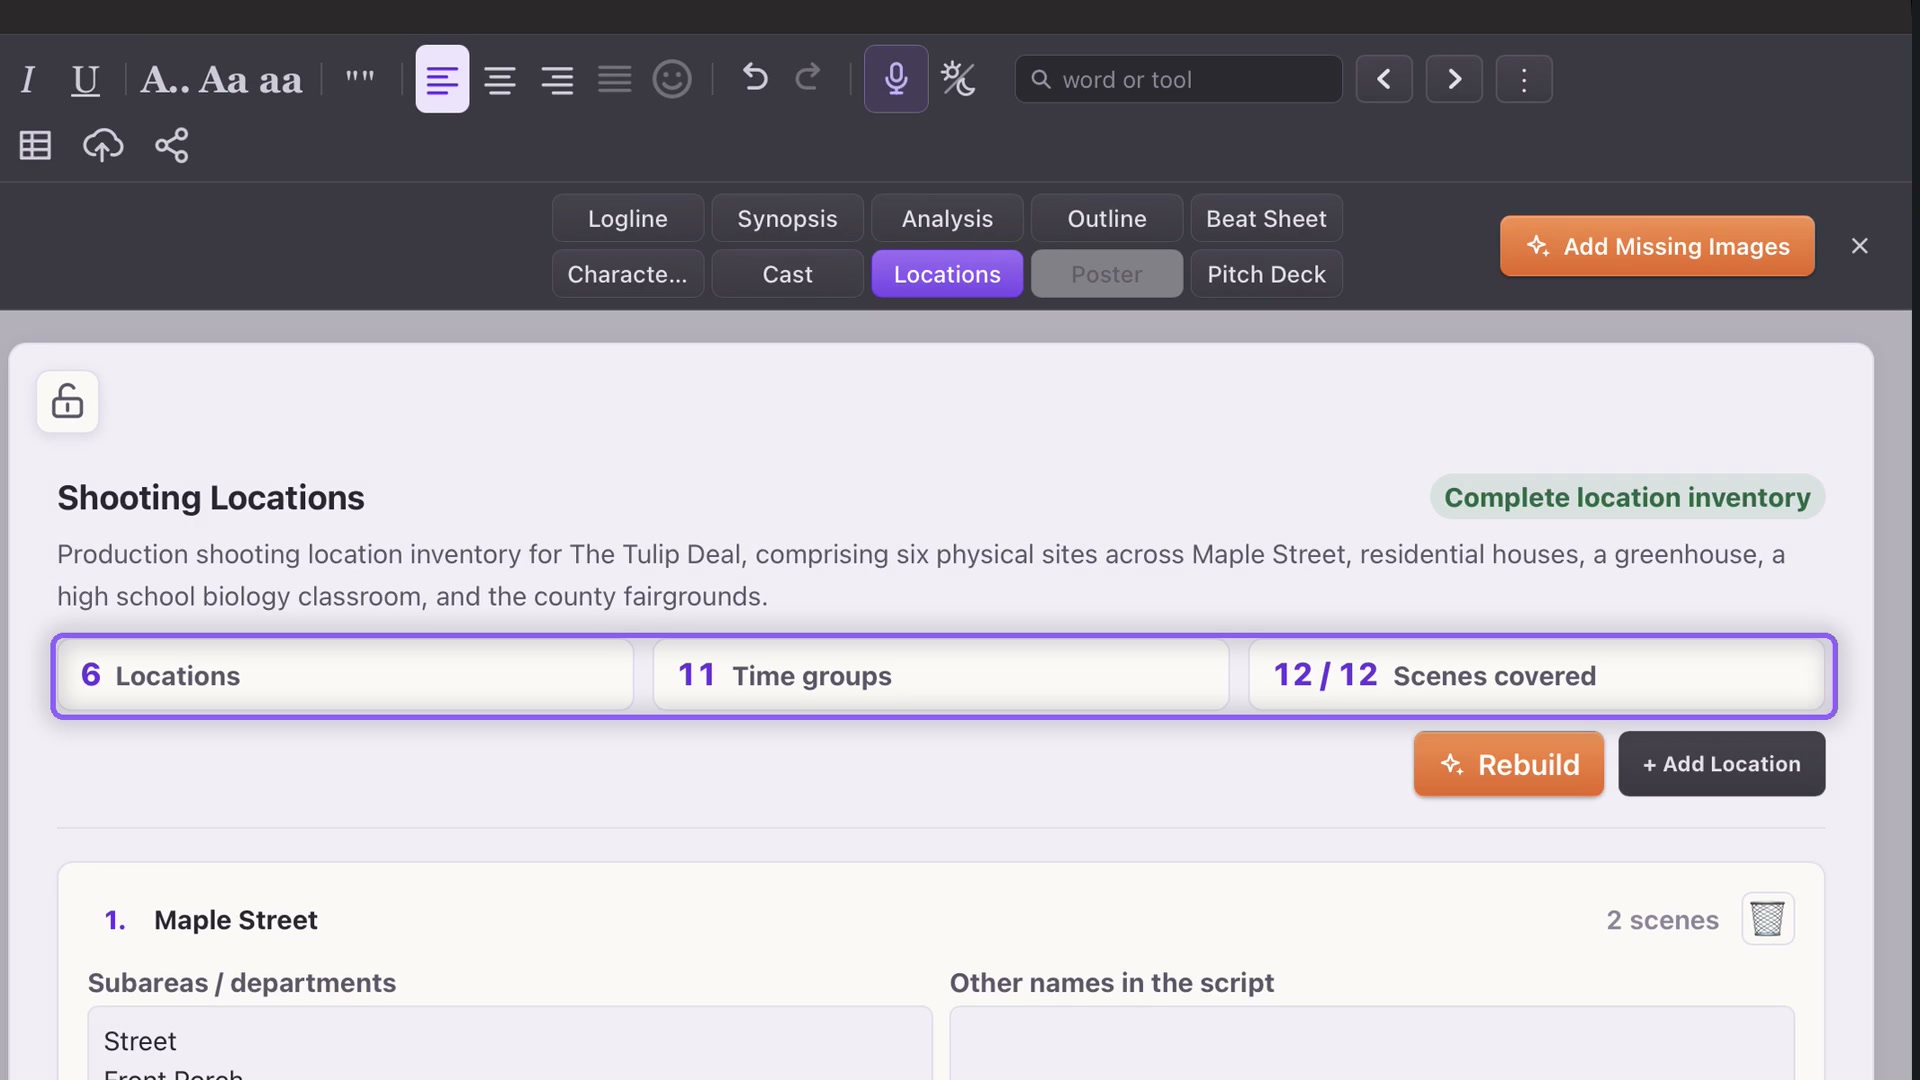
Open Story and Locations. Rebuild reads the screenplay and replaces the location sheet, including manual edits, when a complete replacement is ready. Save a copy first if you need to preserve a prior version.
A location can contain several time groups. The greenhouse by day and the greenhouse in a storm need different visual references even though they share a place.
A single location can have several time-of-day groups.From lesson 24, 0:33 · Select the image to enlarge.
Add practical details
Use Production details for reminders. Groups include the resolved time, the label used in the script, and fields for period, scheduling and visual continuity. Click a linked scene to read its pages, then return to Locations.
Add Location creates a manual entry. Fill its name and details; remove an unused entry with its trash control and confirm Delete.
Work with images
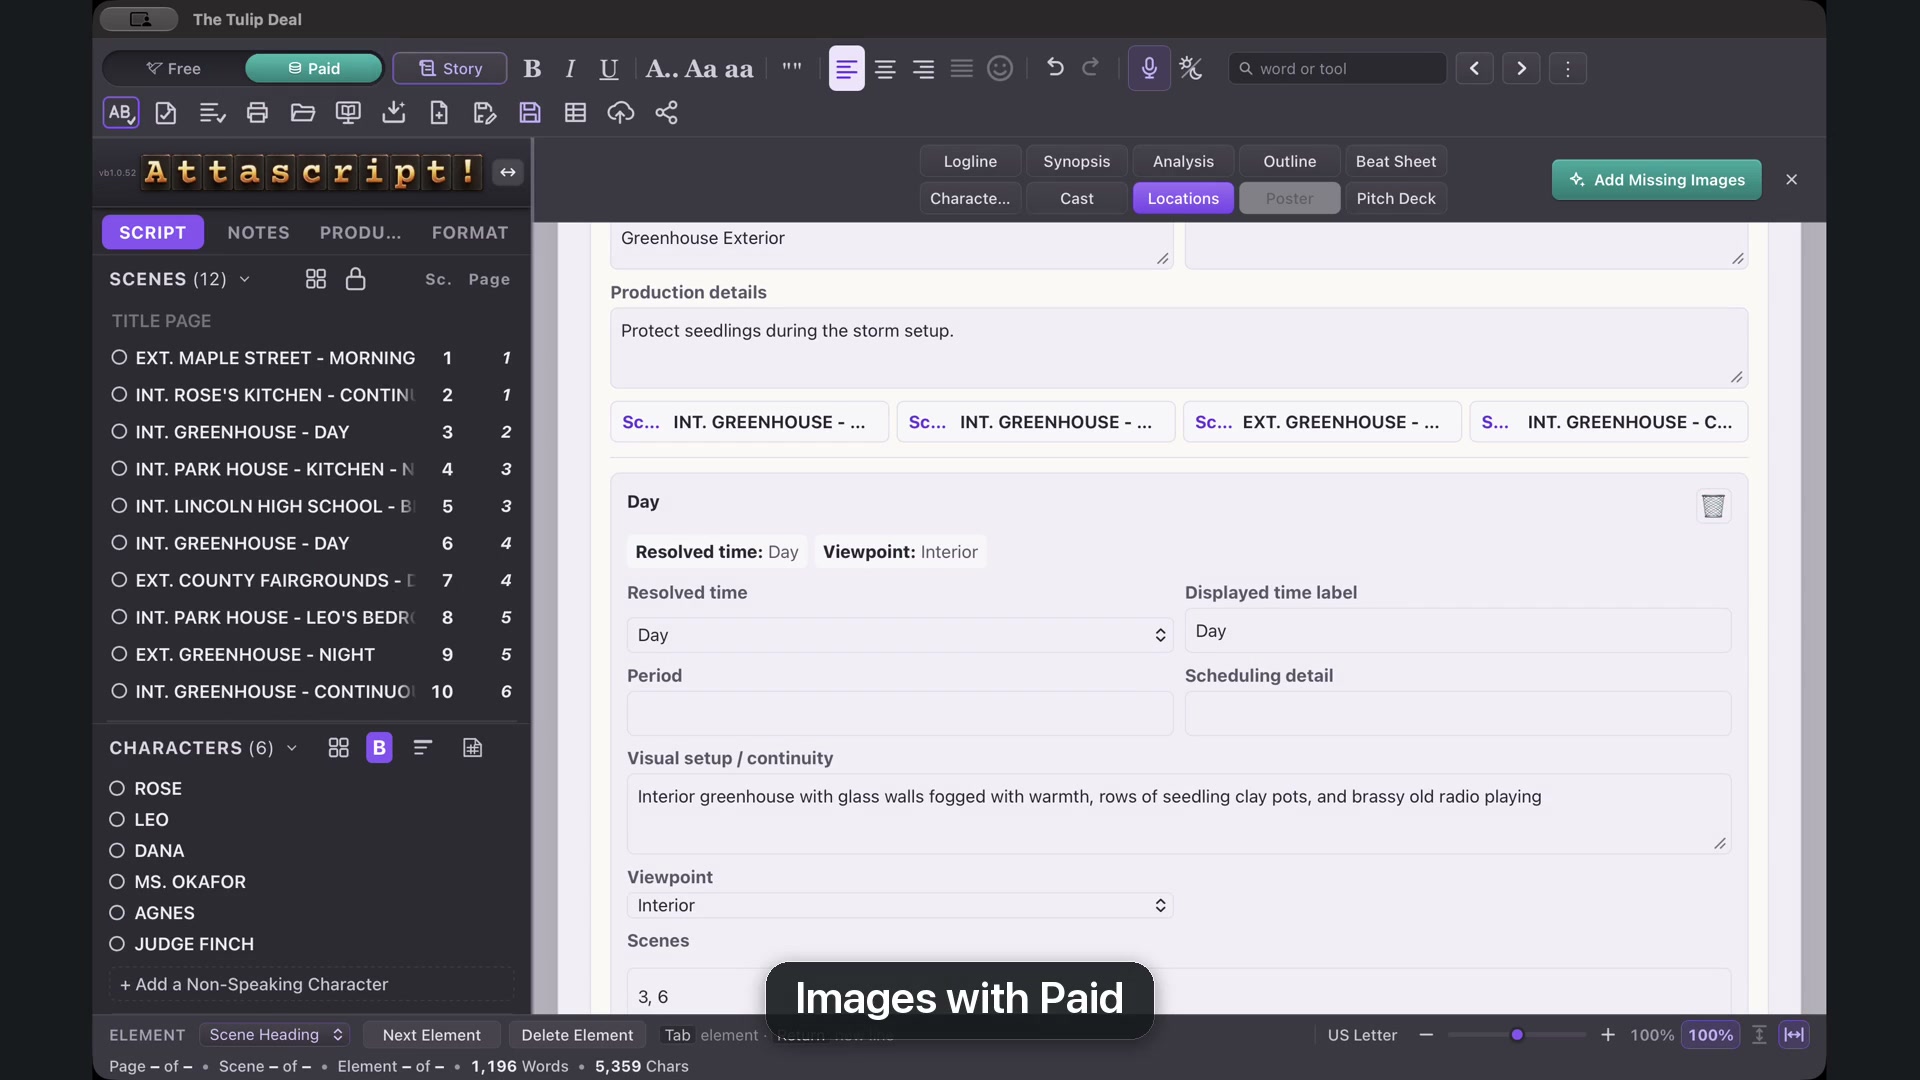
In Paid mode, Add Missing Images fills gaps, while Replace Image requests a new picture for one group. Review the result; Undo can restore the preceding image. Saved images remain part of your project when you return to Free.
You can also paste or drop your own reference images into a slot. Matching pictures appear in Scene Cards, connecting the setting to the relevant scene.
A saved image can also appear on the matching Scene Cards.From lesson 24, 1:40 · Select the image to enlarge.
Download and share
The image download control can save This image or All images as a ZIP. Print the sheet or use Save As for PDF or Word, choosing whether to include images. Lock the Location Sheet for a clean review and unlock it to edit.
CHAPTER 25
Poster
Give the screenplay a visual introduction and keep the finished poster with the project.
Create or view a poster
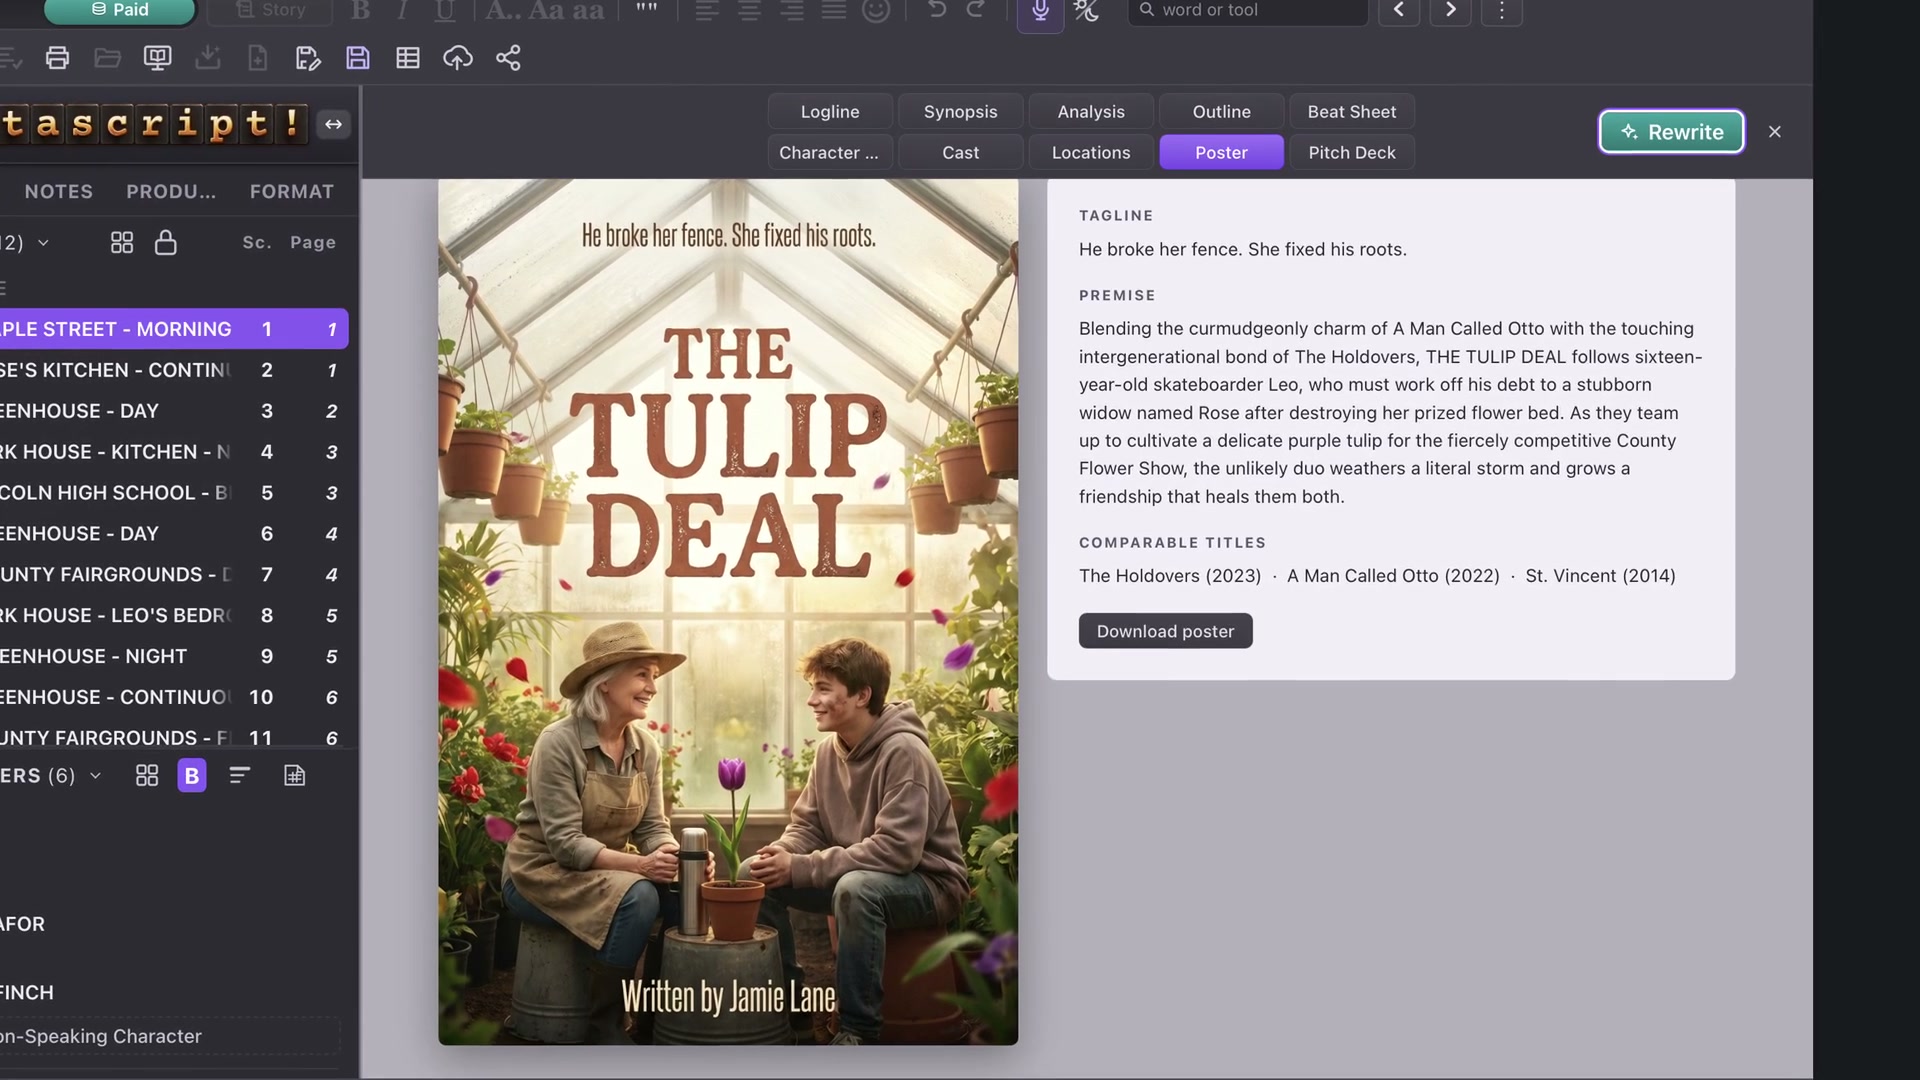
Open Story, then Poster. Creating or repainting the artwork requires Paid mode. Once a poster has been saved, you can still view and download it in Free mode.
The page also provides a premise and comparable titles to communicate tone and audience. Read those descriptions and comparisons before using them in a pitch.
The finished poster carries the title, tagline and writing credit.From lesson 25, 0:11 · Select the image to enlarge.
Choose the lettering
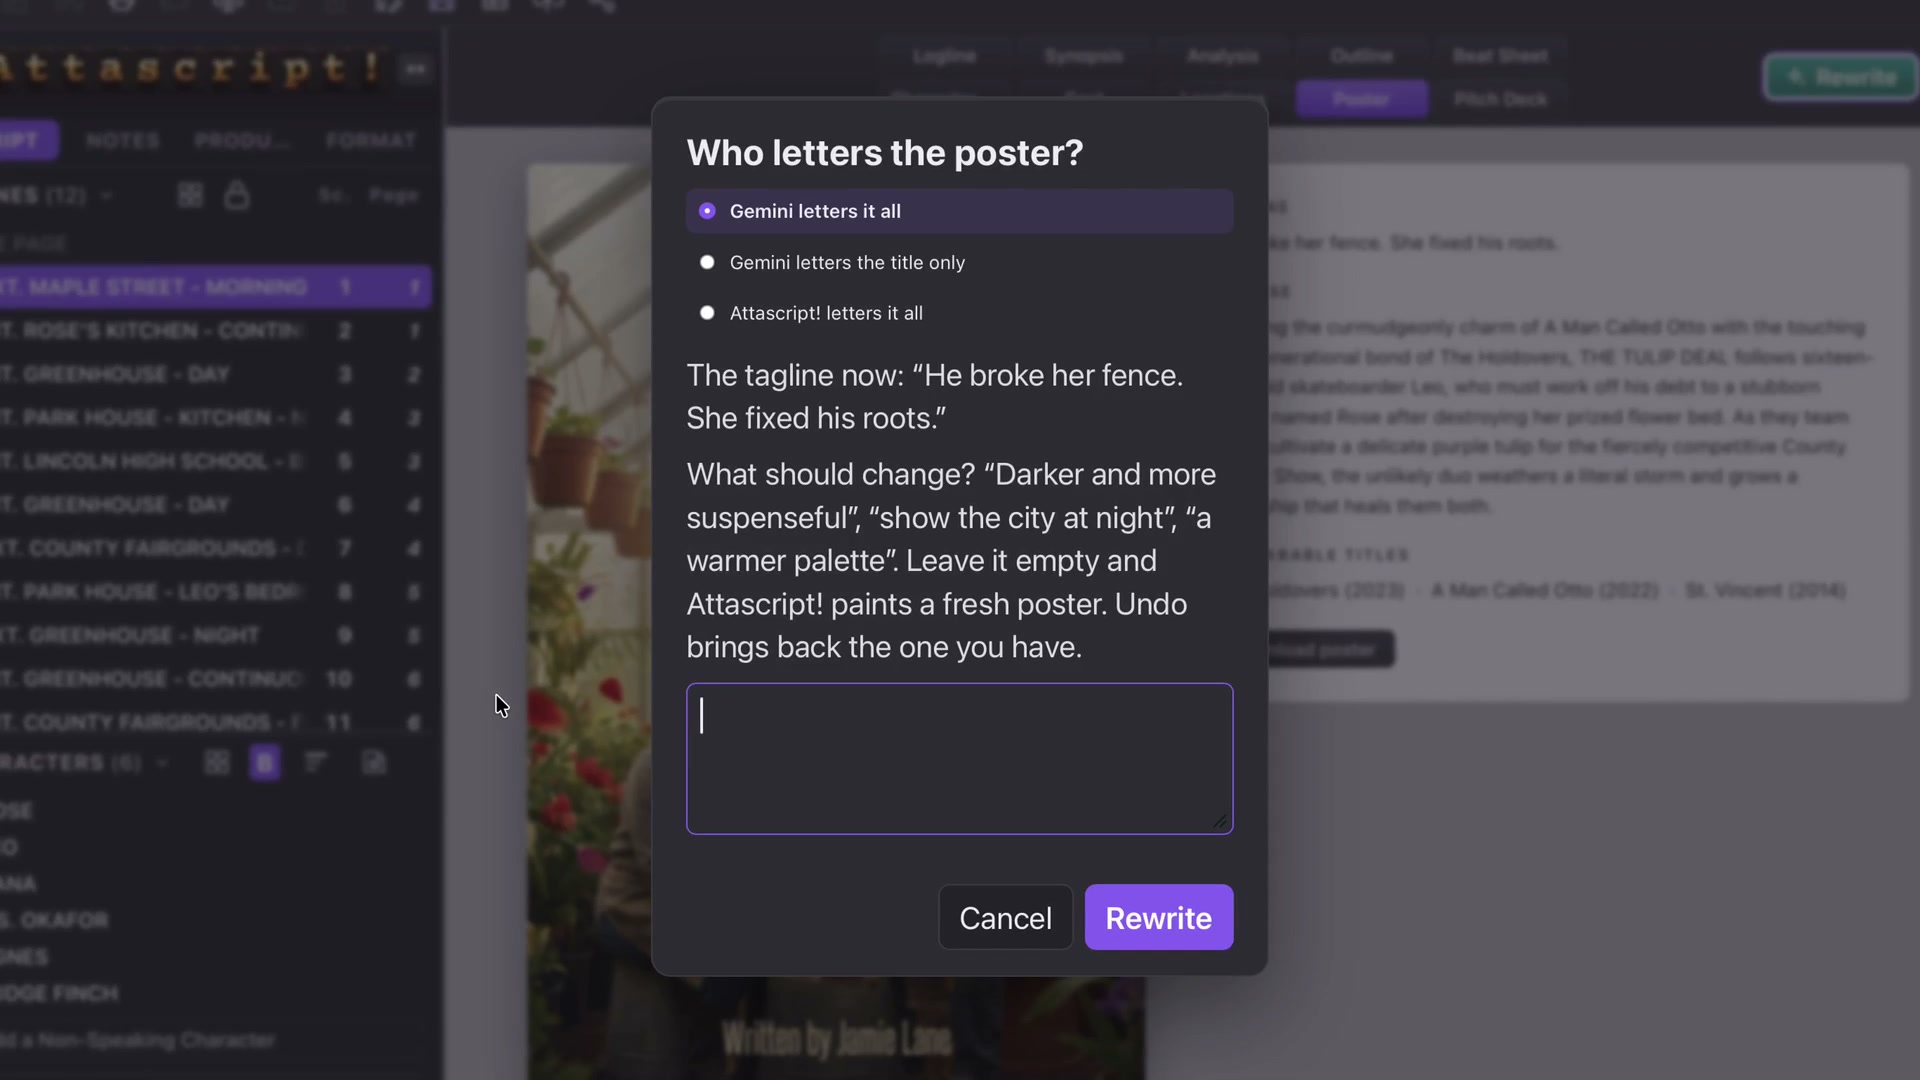
Rewrite lets you decide whether Gemini letters everything, only the title, or whether Attascript handles all lettering. Then describe the change you want, such as warmer, more golden light.
Read the title, tagline and writing credit carefully in the finished picture. Attractive artwork still needs accurate lettering. Cancel a rewrite when you prefer to retain the existing image.
Download or print
Download poster opens the Save panel. Choose its name and destination. Printing from Story offers the Story elements list with Poster and Include images. To include the artwork with a screenplay delivery, return to the screenplay’s Print choices and select Poster there.
Rewrite includes control over who handles the lettering.From lesson 25, 0:50 · Select the image to enlarge.
Use it as the deck cover
The poster is the prerequisite for Pitch Deck. Once it exists, the deck can use it as the cover together with the screenplay’s text and optional saved Cast and Locations images.
CHAPTER 26
Pitch Deck
Build an editable PowerPoint presentation and a companion PDF from the screenplay, poster and optional visual material.
Prepare the project
The poster comes first: without one, Pitch Deck is unavailable. Cast photos are optional. Prepare a casting wishlist or original Synthespian portraits if you want faces on the character slides. Existing Locations images can illustrate the world.
Check the title-page writer and contact details; the presentation uses them. The course uses The Tulip Deal with its saved poster, locations and fictional cast.
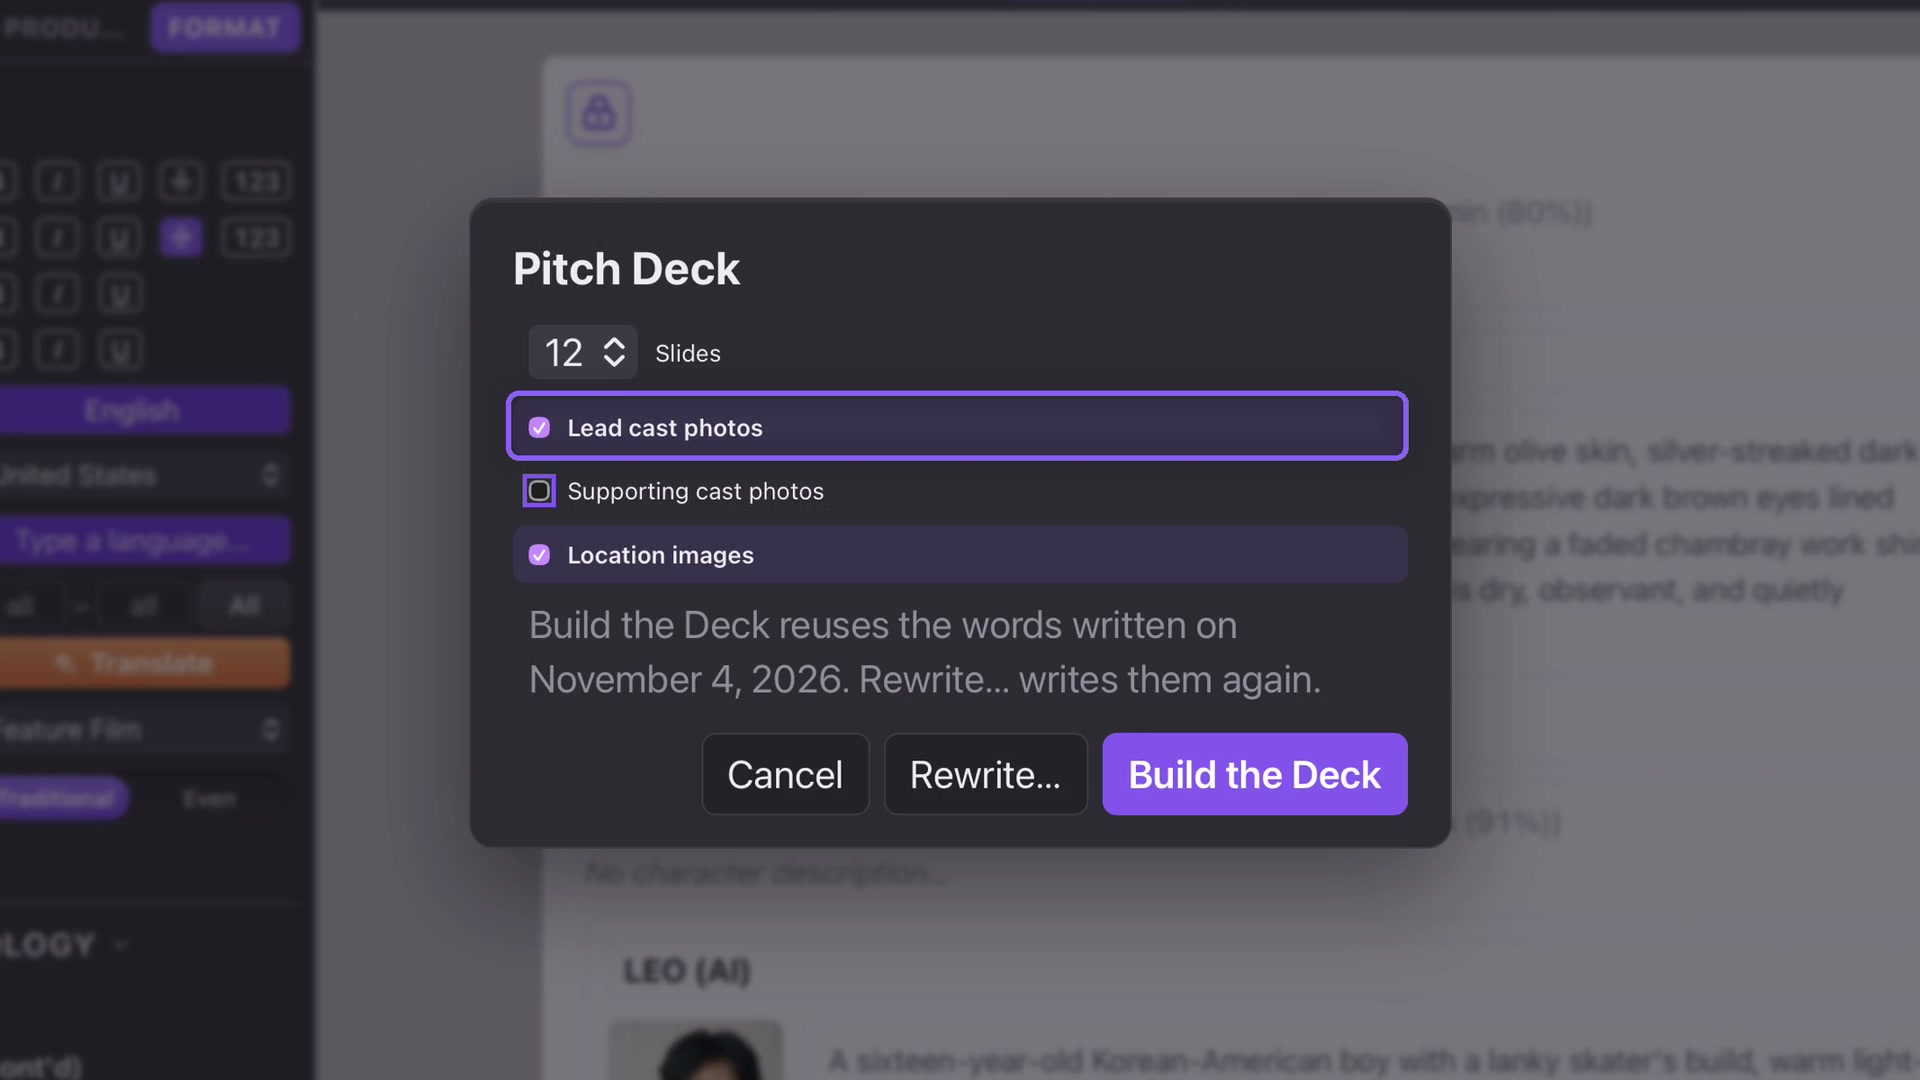
Choose slide count and the available portrait and location-image options.From lesson 26, 0:57 · Select the image to enlarge.
Choose and build
Open Story and Pitch Deck, the final key in the second row. File → Pitch Deck or a search for “pitch” opens the same options.
Choose 8–20 slides; 12 is the default.
Choose Lead cast photos, Supporting cast photos and Location images. A cast switch is unavailable when its characters have no portraits.
Select Build the Deck. Gemini writes the text in the screenplay’s language; Attascript then builds the slides.
Save the .pptx. A PDF is saved beside it automatically.
Building the text works in Free or Paid mode. The deck’s Gemini request sends screenplay text, not the project’s pictures. Creating the poster itself requires Paid.
Review the presentation
The default sequence covers the poster, logline, synopsis, writer’s statement, tone and world, lead characters, supporting cast, key beats, comparable titles, audience appeal, format figures and contact details.
Review the writer’s statement as a draft of your intentions, not a statement you must accept. Check comparable-film claims and running-time estimates. Synthespian images receive AI-generated credits; real actors remain a casting wishlist.
Build again or rewrite
Once the deck text is saved, Build the Deck reuses it without a new Gemini request. Use it to change the slide count or image choices.
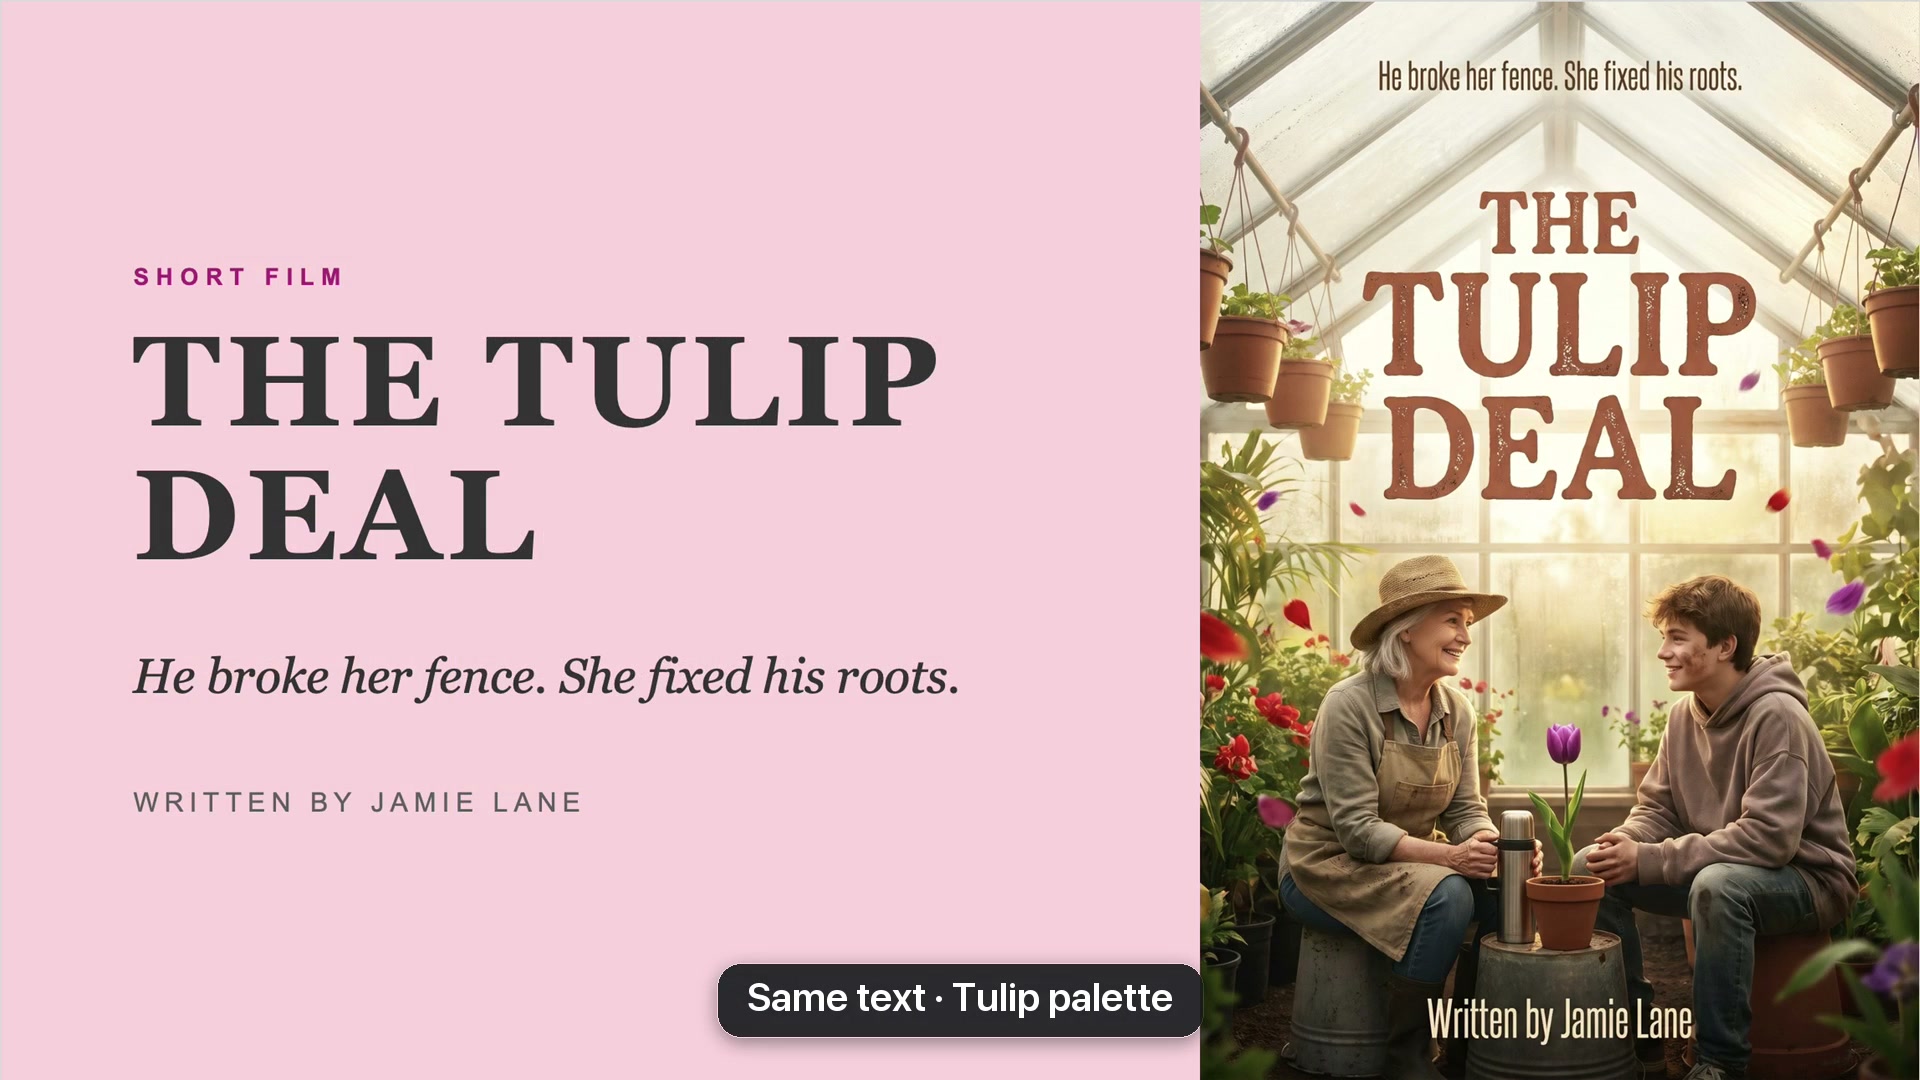
Rewrite sends a new request with your note. The course switches to Free and asks: “Make the colors resemble tulips, and keep the texts unchanged.” Review the resulting palette and wording. This appearance applies to that deck; a later Build the Deck returns to the usual dark style.
A Rewrite note can change the palette while asking to retain the text.From lesson 26, 2:54 · Select the image to enlarge.
Finish in PowerPoint
Open the .pptx in PowerPoint on Mac or Windows; Keynote on Mac can open it too. Text remains editable. Make your finishing changes and export a fresh PDF so the file you send reflects those edits.
CHAPTER 27
Save & export
Keep an editable master, then prepare the version your reader or production team needs.
Save the working project
Use Save: Command+S on Mac or Ctrl+S on Windows. The Attascript project retains the screenplay, title pages, notes and Story material. Save As creates a separately named copy; its shortcut is Shift+Command+S / Ctrl+Shift+S.
Keep that working project even when the recipient needs another format. An exported reading copy is not a replacement for your editable master.
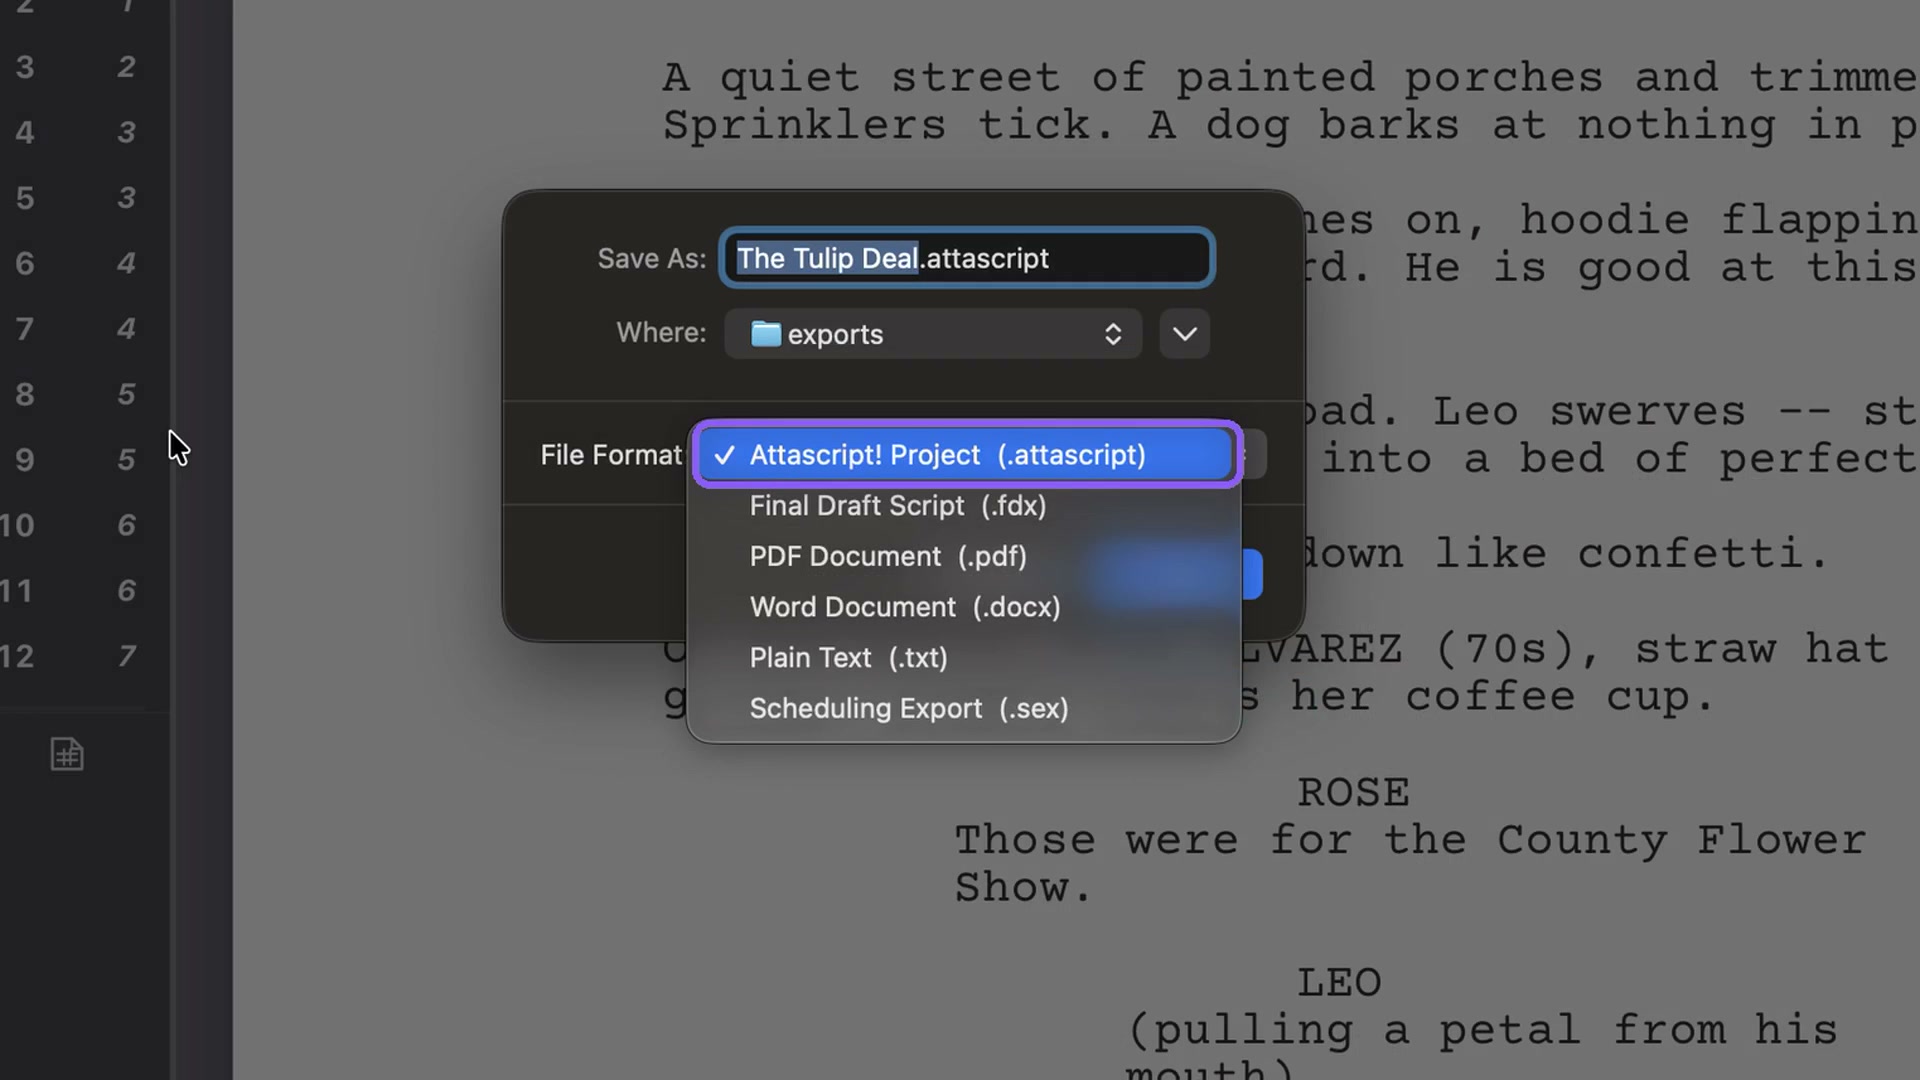
The file-format choice depends on the recipient’s needs.From lesson 27, 0:26 · Select the image to enlarge.
Choose a delivery format
Save As offers Attascript Project, Final Draft, PDF, Word, plain text and a Movie Magic scheduling export. Choose according to the recipient’s intended use.
For a PDF, choose PDF Document, a filename and a destination. Then choose what to include.
Build the reading package
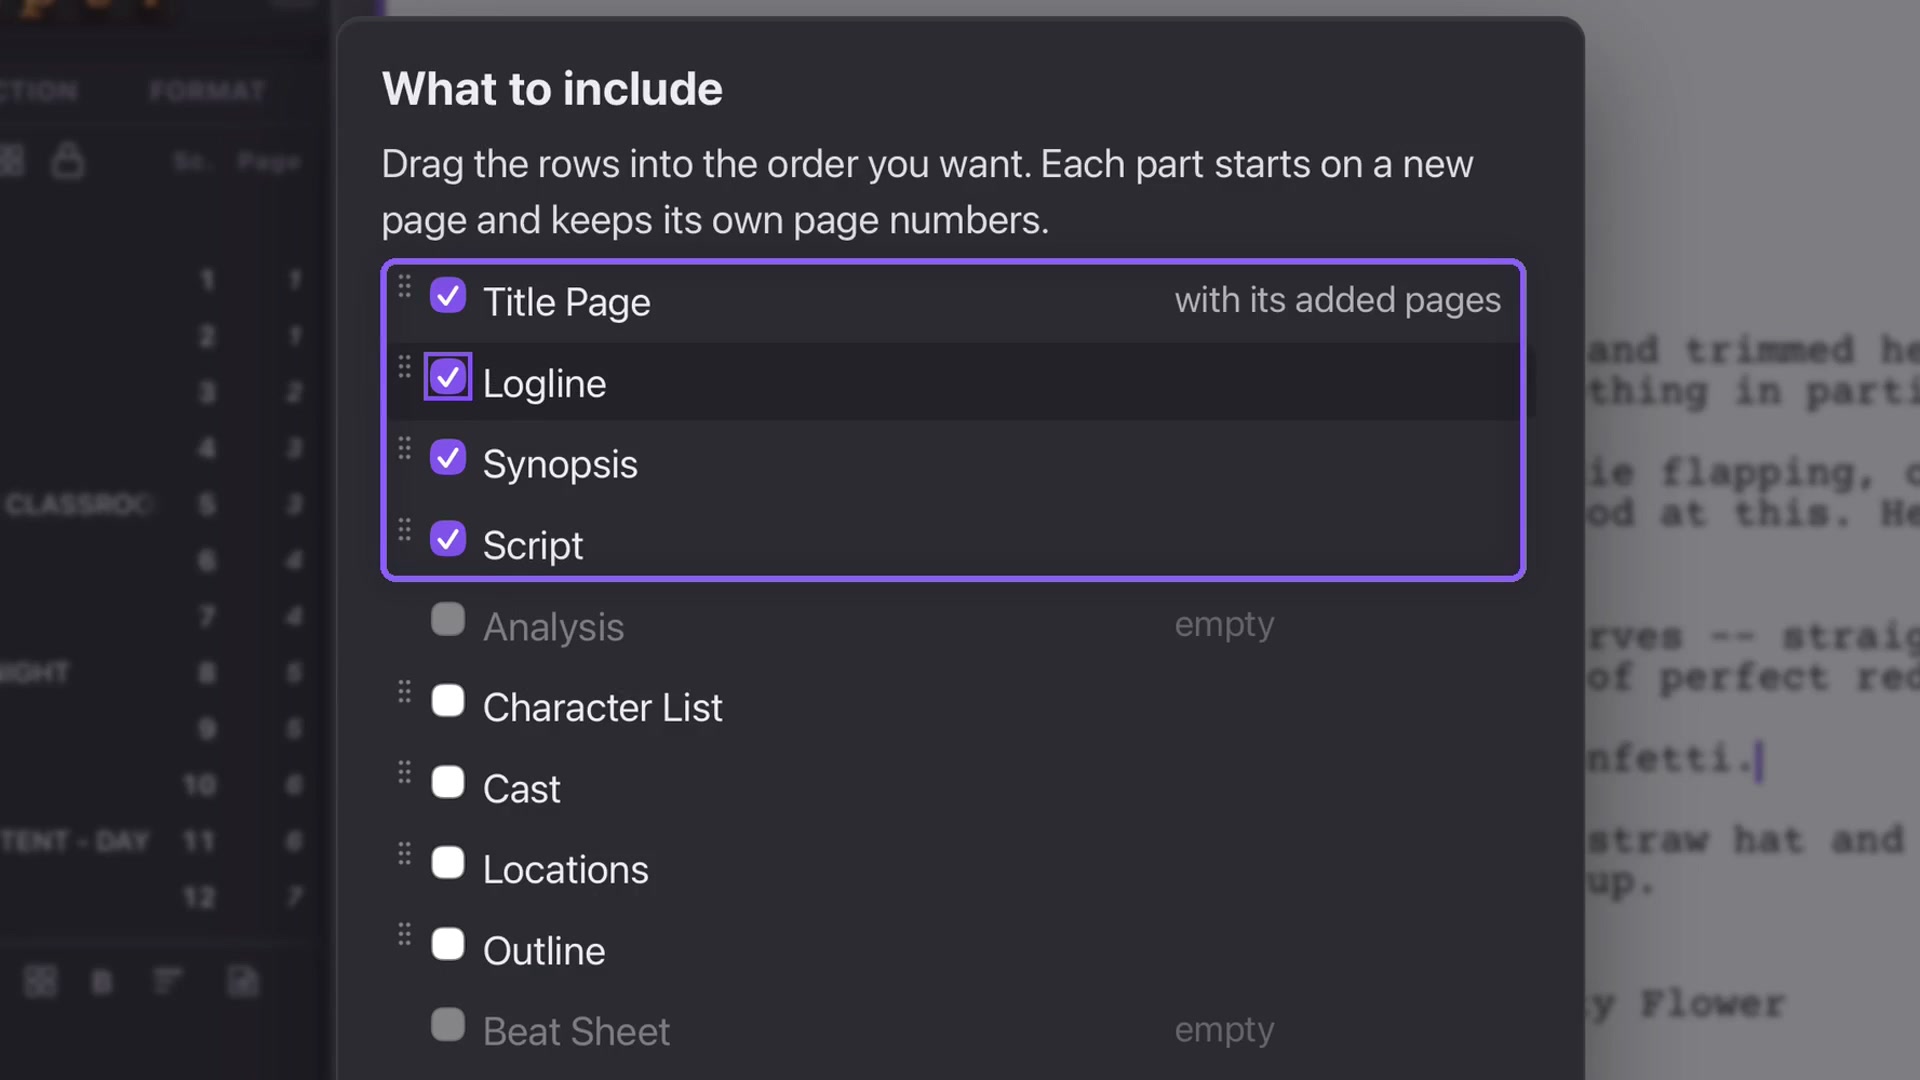
Select Title Page, Script and the Story sections you want. Added title pages travel with the title-page bundle. Empty Story sections are unavailable. Include images brings pictures from selected sections.
Drag the sections into order. For example: title page, logline, synopsis, then screenplay. Each part starts on a new page and keeps its own numbering, so front matter does not change the screenplay’s first page number.
Reorder selected sections before exporting the PDF.From lesson 27, 1:28 · Select the image to enlarge.
Inspect and print
Open the exported PDF and check the order, title and ending. Print uses the same inclusion choices: Command+P on Mac or Ctrl+P on Windows. Select the required sections, arrange them and print when ready.
CHAPTER 28
Share, back up & spreadsheets
Prepare several delivery formats, copy the project into a synced folder, and export useful production tables.
Share the right files
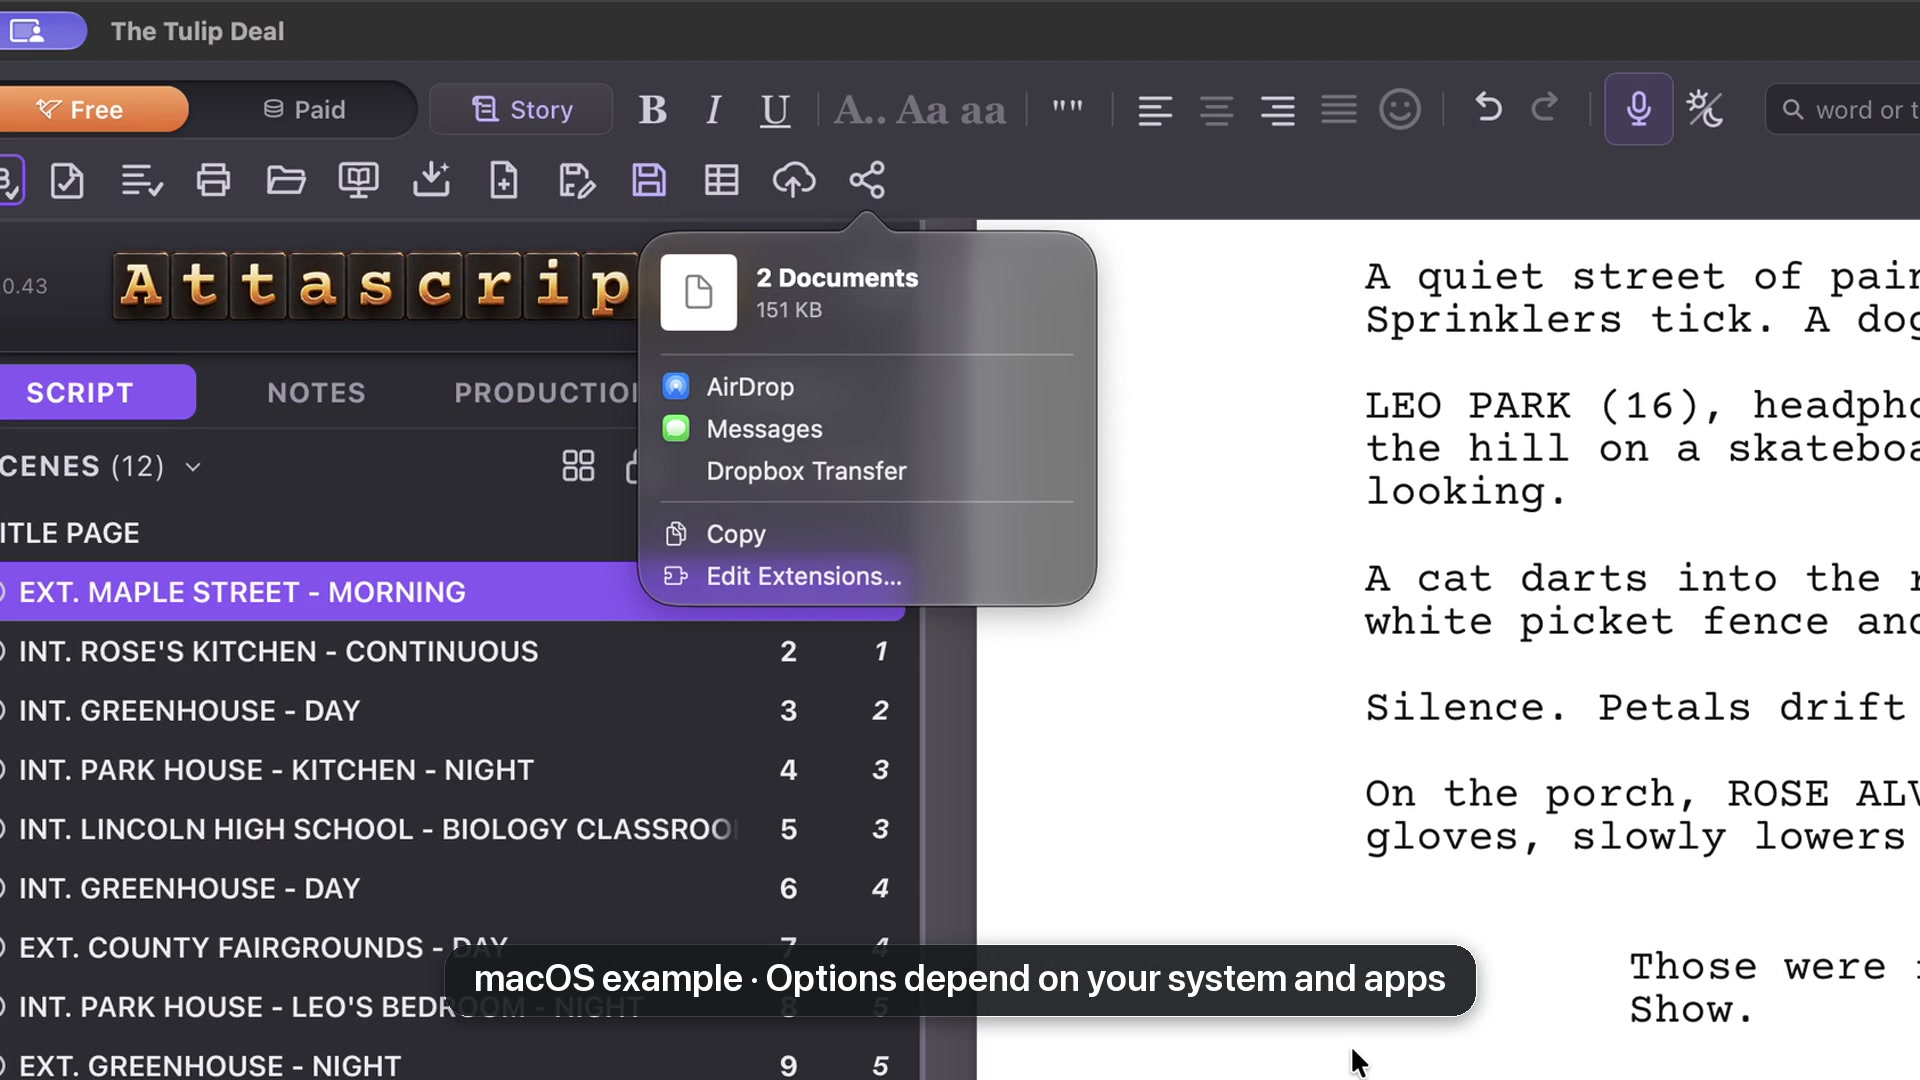
Open Share and select formats. Include Attascript Project only if you intend to send the working project. The example selects Final Draft and PDF, then chooses the title page and script for the PDF.
Sharing options depend on your operating system and installed apps. The Mac example offers AirDrop and Messages. On Windows, the prepared files open in File Explorer, ready to send using your preferred service.
The share destination depends on the operating system and installed apps.From lesson 28, 0:39 · Select the image to enlarge.
Set a backup folder
Choose Back up to your cloud folder, then Choose a Cloud Folder. Select a folder already synced by your cloud service. Attascript writes the copy; the cloud service handles synchronization.
On Every Save copies when you save. Save Every Fifteen Minutes offers a schedule. Save a Copy Now makes an immediate copy. Stop Copying to the Cloud turns off this arrangement for the project.
Select production tables
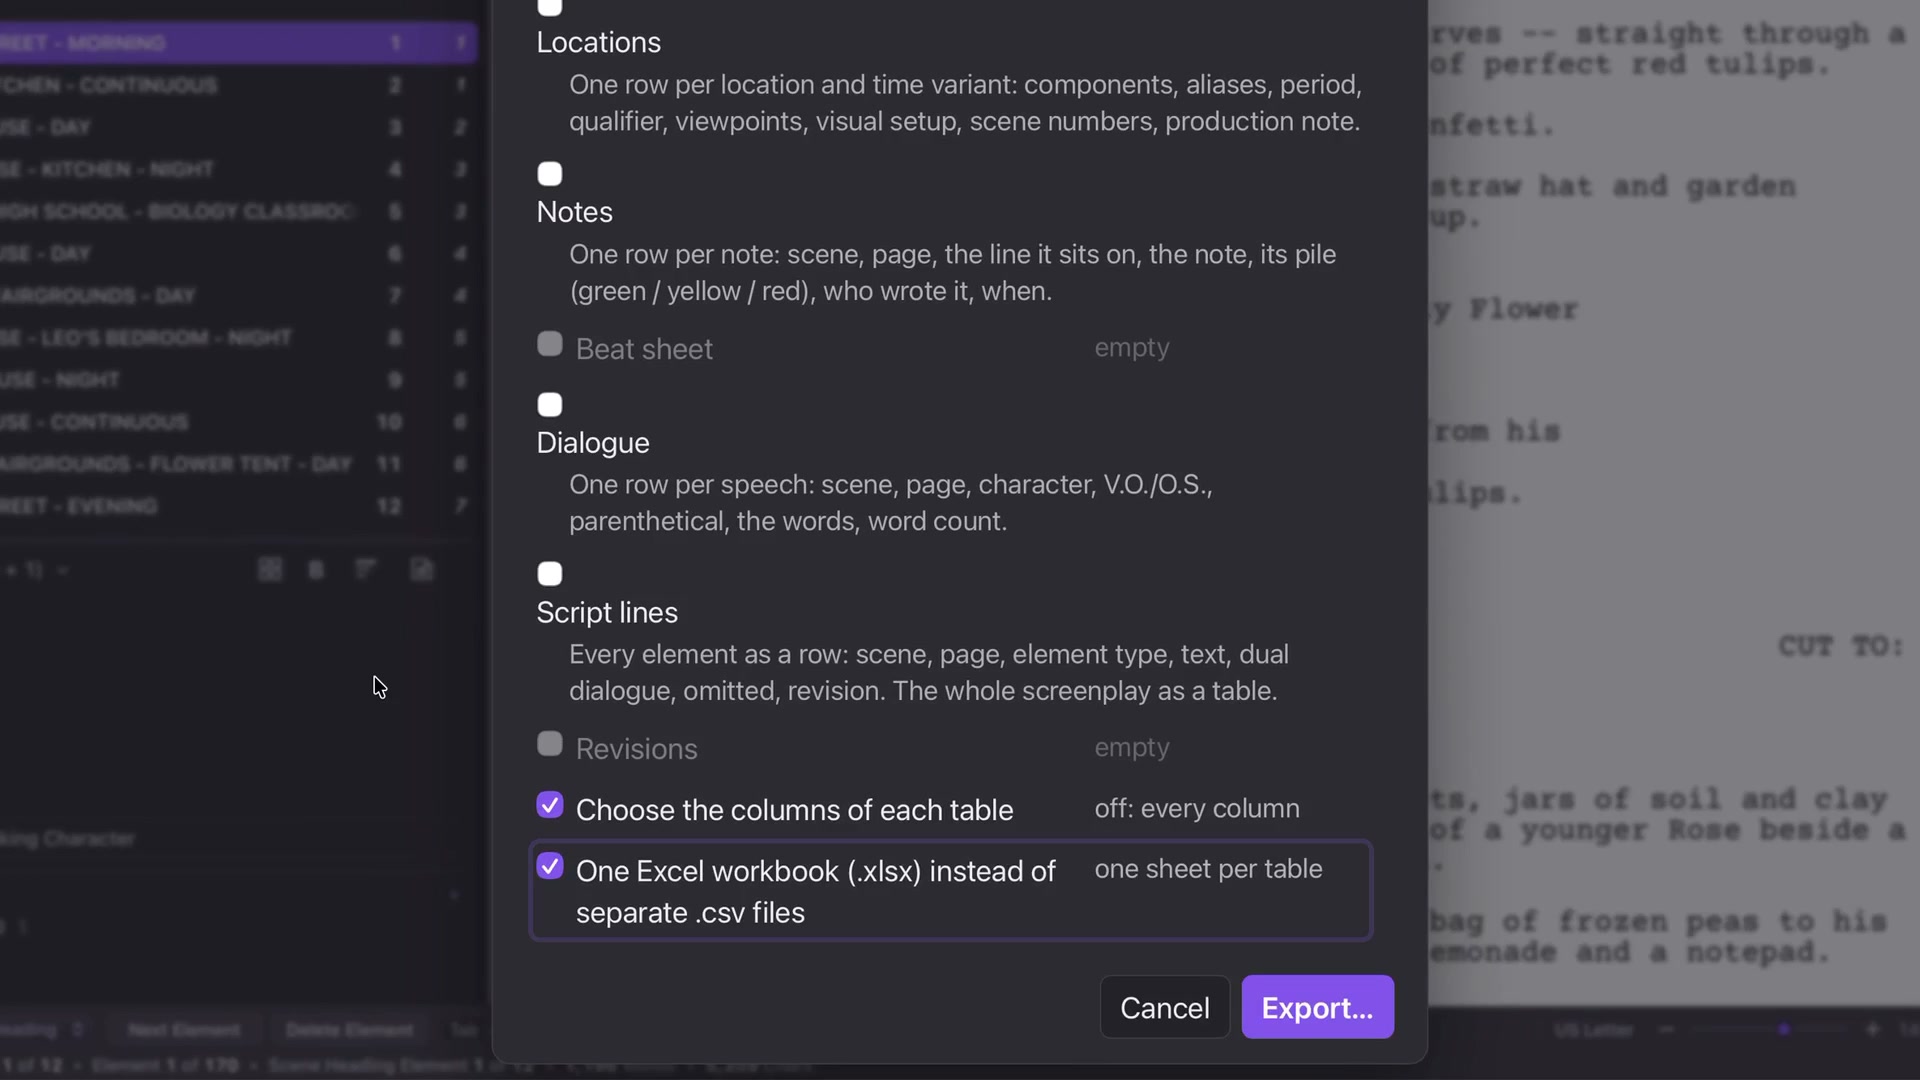
Export CSV offers tables such as Scenes, Characters, Background/Extras, Tags and Notes. Empty tables cannot be selected. Choose separate CSV files or One Excel workbook for separate sheets in one file.
Choose the columns of each table lets you specify the information included. For Scenes, you might keep headings, pages, eighths, speaking cast and background requirements.
Selected tables can become separate sheets in one workbook.From lesson 28, 2:05 · Select the image to enlarge.
Read the export
Open the result in Excel or another compatible spreadsheet app. Inspect scene totals and quantities. Background groups stay separate from individual characters; a scene reference explains where a crowd is required.
Keep reviewing estimates against the script. A precise-looking cell is only useful when it accurately represents the source.
CHAPTER 29
Translate your screenplay
Translate the screenplay into a separate document while preserving its element structure.
Set the target
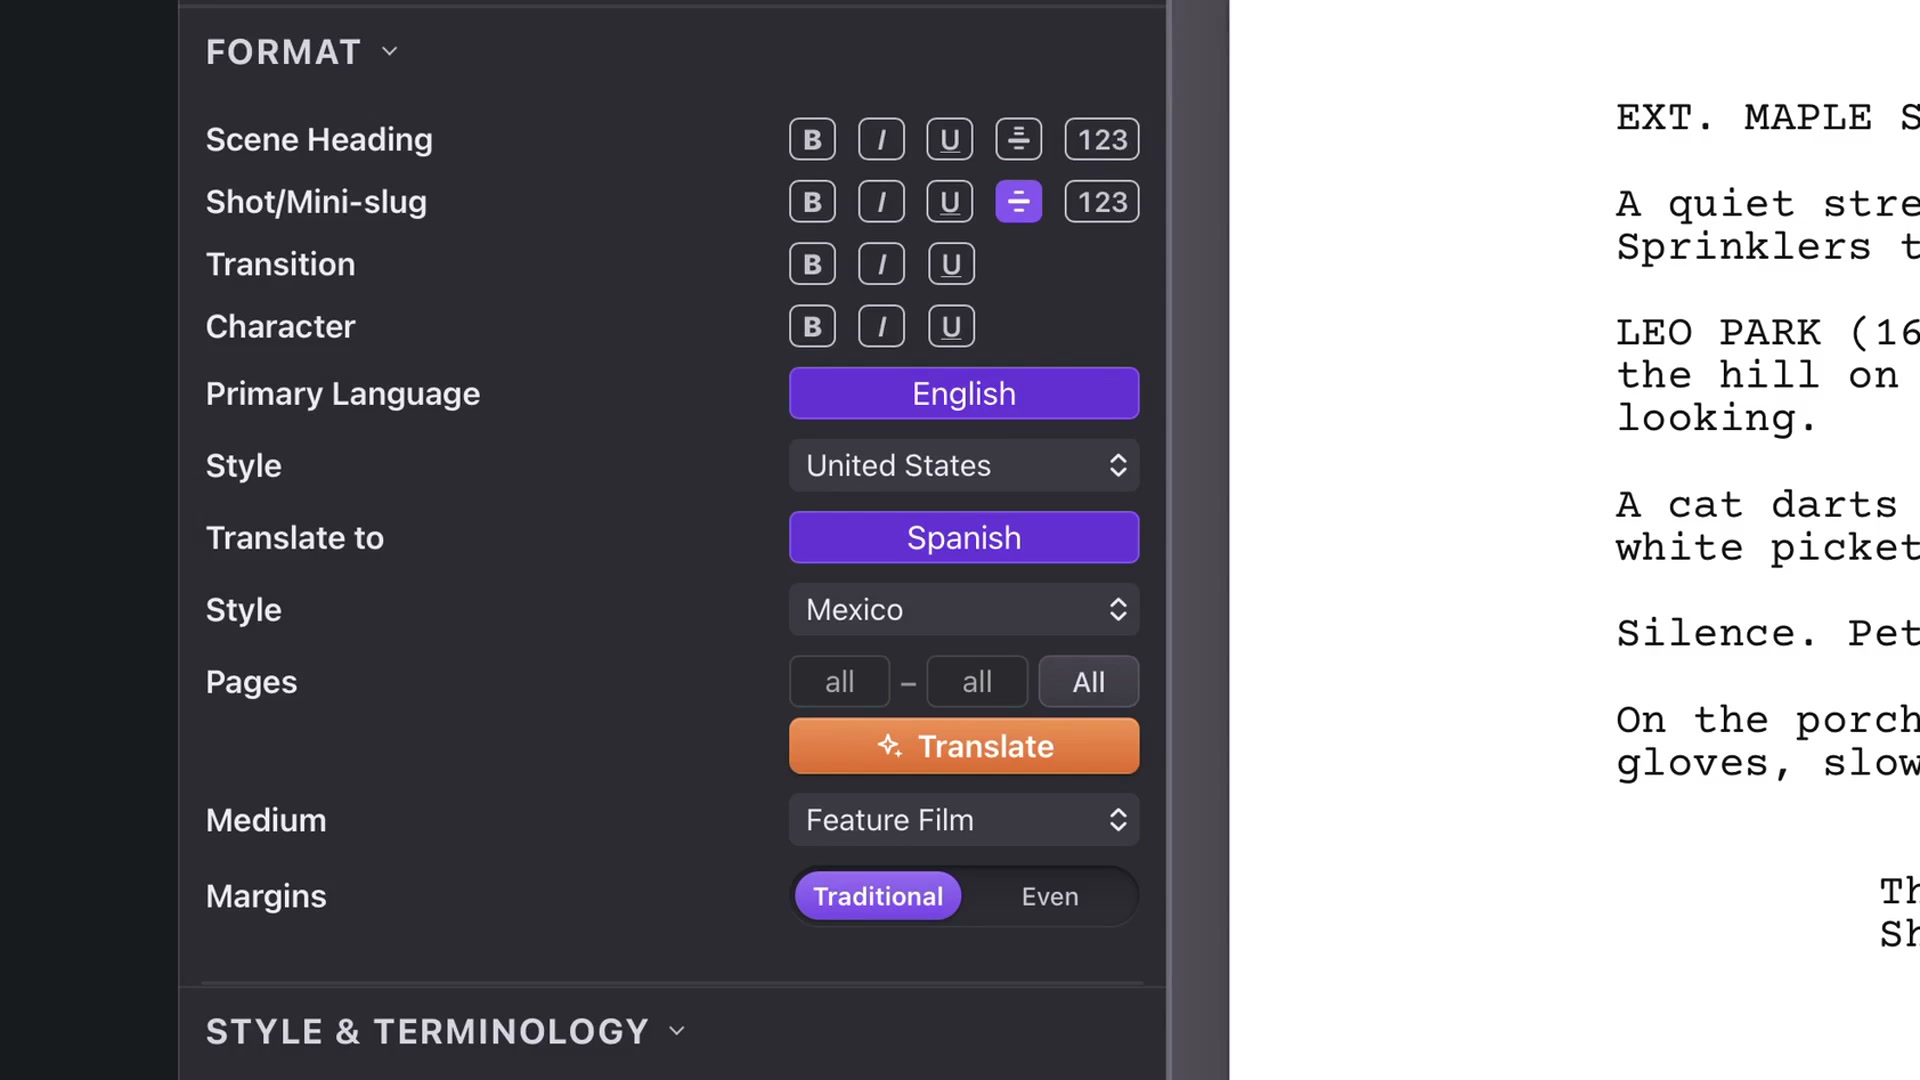
Open Format and find Translate to. This is separate from Primary Language and Style, which format the current document. Choose the target language and its regional style. The example uses Spanish with the Mexico profile.
Select the target language and regional convention.From lesson 29, 0:28 · Select the image to enlarge.
Try a range
Use the page fields for a sample, or All for the whole screenplay. A small range lets you review the translation approach before undertaking a longer job. Click Translate and allow it to finish; longer material takes more time.
Choose follow-up work
After translation, an optional checklist offers work such as Story material or tagging. Select only what you want. You can cancel the checklist and inspect the translated screenplay first.
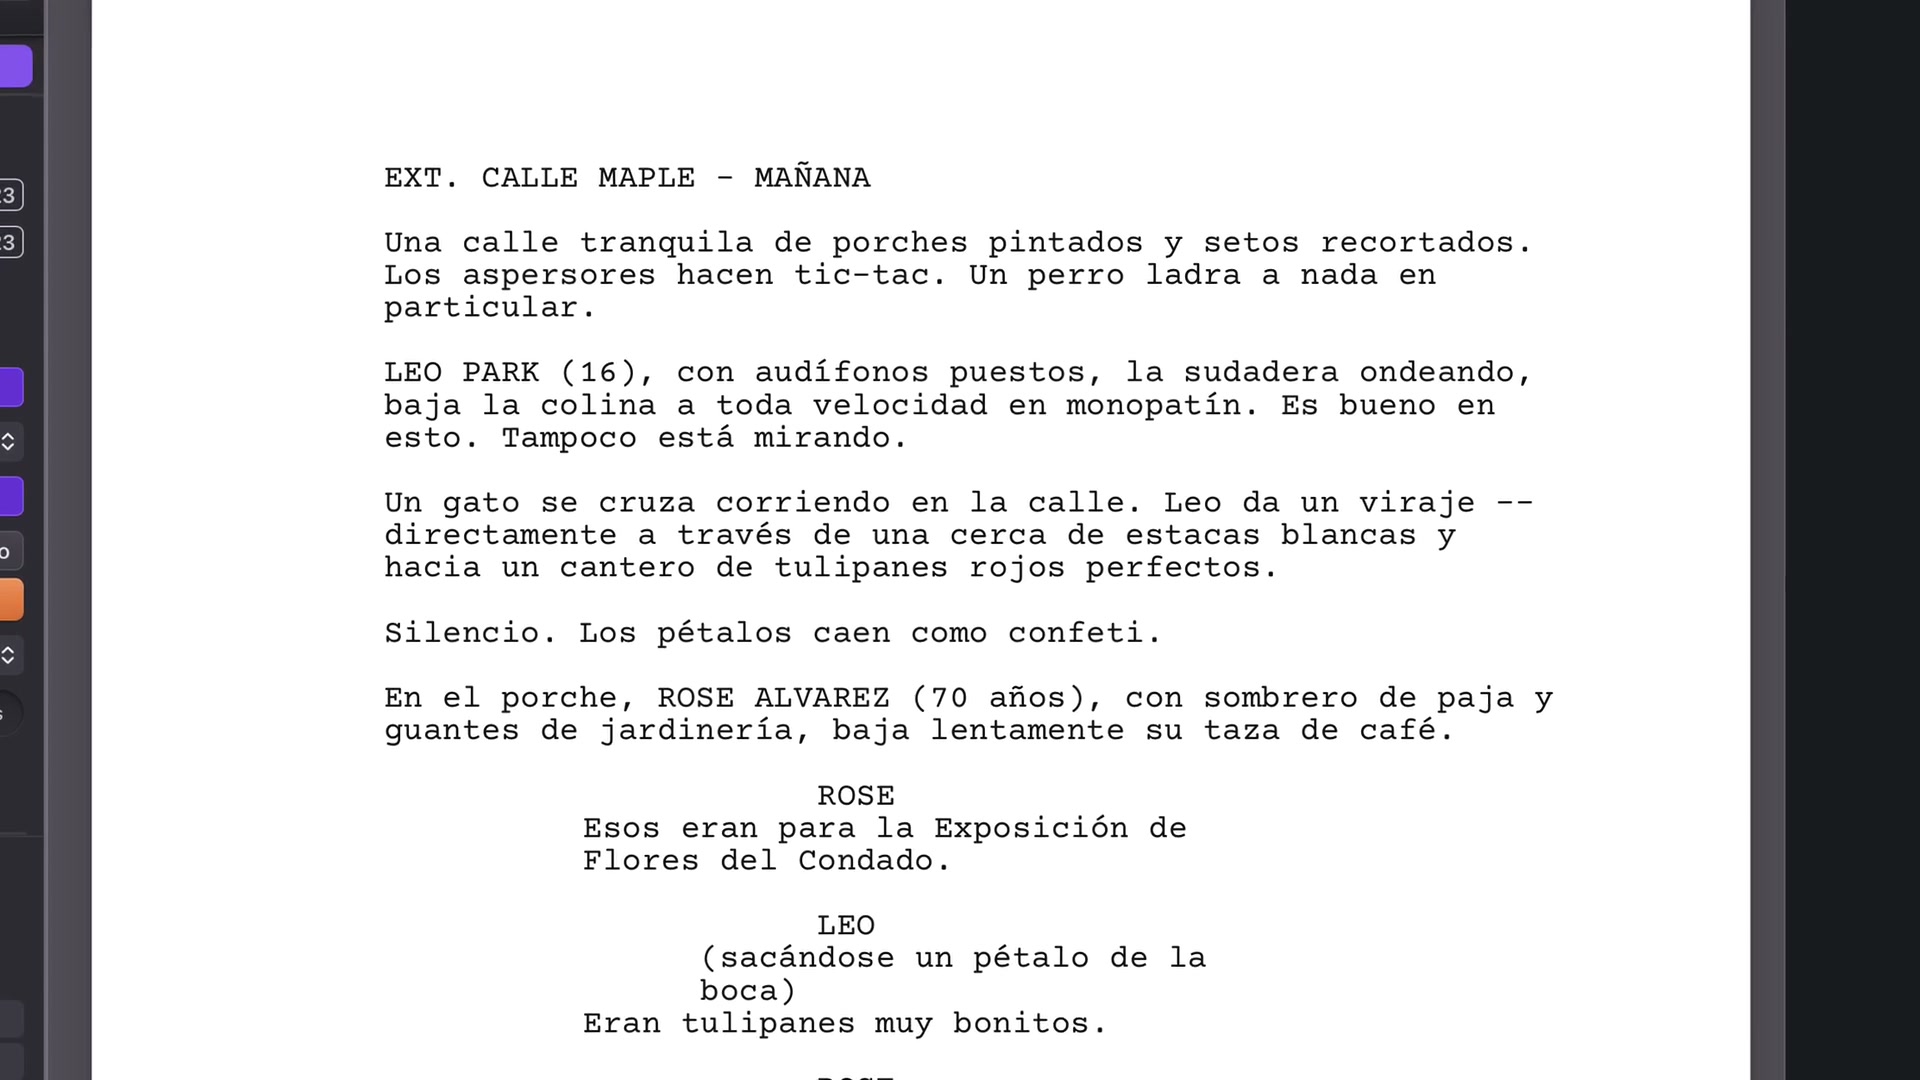
Review the translated document independently of the original.From lesson 29, 1:18 · Select the image to enlarge.
Review both documents
The translation opens in its own window. Scene headings, Action, Character, Parenthetical and Dialogue remain distinct elements. Line wrapping and word length differ between languages, so the translated page count may change.
Read the wording and inspect the layout before sharing. Your original remains in its own window and can be edited separately. Save the new project with a name that makes its language clear. The course demonstrates Free mode; Paid tries a stronger Gemini model first using your paid setup.
CHAPTER 30
Import a PDF or Word script
Turn an existing PDF or Word screenplay into editable elements, then verify its structure and production information.
Import the document
Click Import and choose a PDF or Word file. Enter a page range, or leave it empty for the whole file. Click Import and allow the process to finish.
Use Open or Choose File for an existing Attascript or Final Draft project. Import is the route for rebuilding a screenplay from PDF or Word.
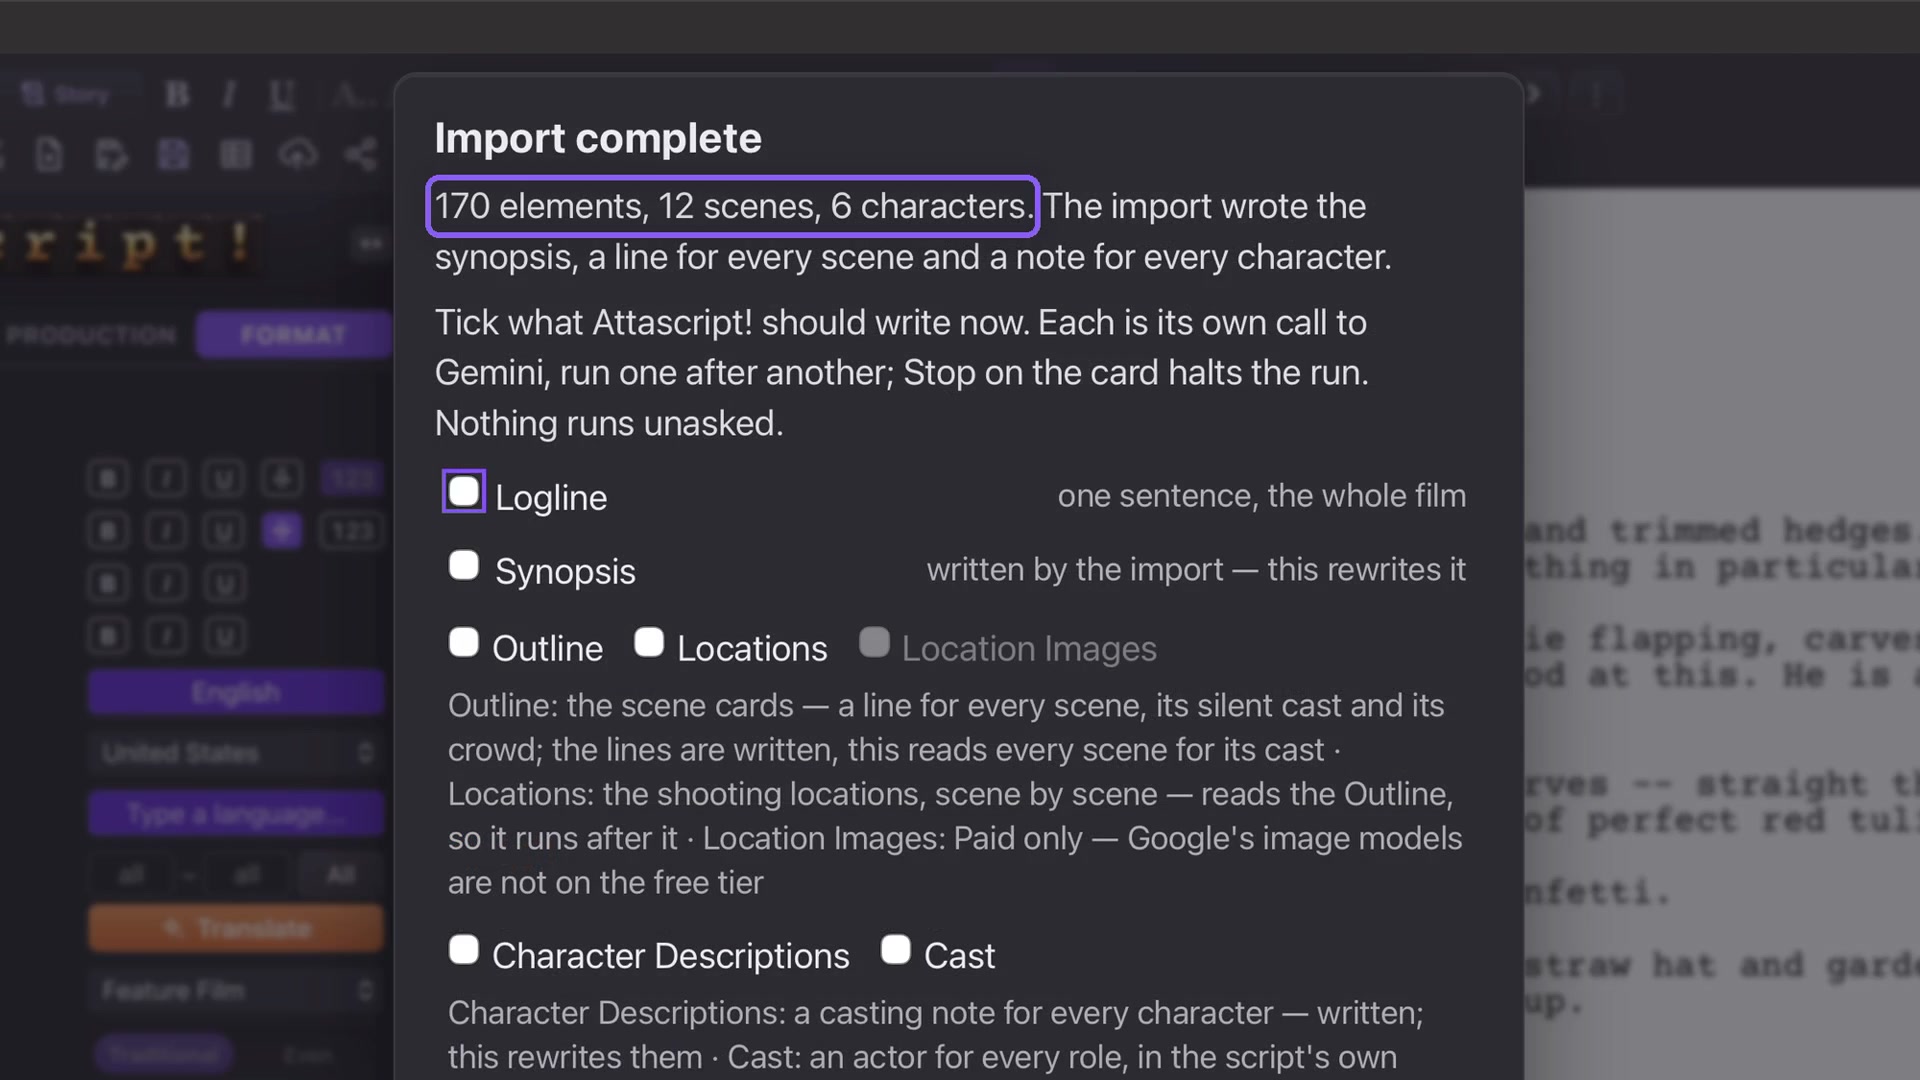
The completion report summarizes the imported structure.From lesson 30, 0:42 · Select the image to enlarge.
Check the result
Read the completion report for element, scene and character totals, then compare representative pages with the source. Check headings, speakers, parentheticals and dialogue. Select and edit a line to confirm the document is editable; Undo restores an experimental change.
Select additional work
Import provides initial material such as synopsis, scene summaries and character notes. The follow-up checklist offers further work. Nothing else runs until you choose it.
In the example, selecting only Outline reads scenes for silent cast and background groups. Open the Script tab and inspect Background in the Characters panel.
Background groups appear under the Script tab’s Characters panel.From lesson 30, 1:40 · Select the image to enlarge.
Verify crowd quantities
A classroom explicitly contains thirty teenagers, so that count can remain. A flower tent is described as packed with neighbors but supplies no number. Choose How many, in this scene and clear an unsupported quantity. The group remains attached to the scene without inventing a headcount.
Save an Attascript project after checking the import, keeping the original source available for comparison.
CHAPTER 31
Adapt a book or story
Develop a screenplay from a book, short story or existing script, then shape the result in your own voice.
Choose the source and form
Open Adapt. Use the current project or select a source file. The course uses the original short story Three, and a Cat. Choose a short film, feature or series; the relevant runtime or episode controls appear.
A one-to-one screenplay route first builds a treatment that follows the source scenes and order, then writes screenplay scenes from that treatment and the original text.
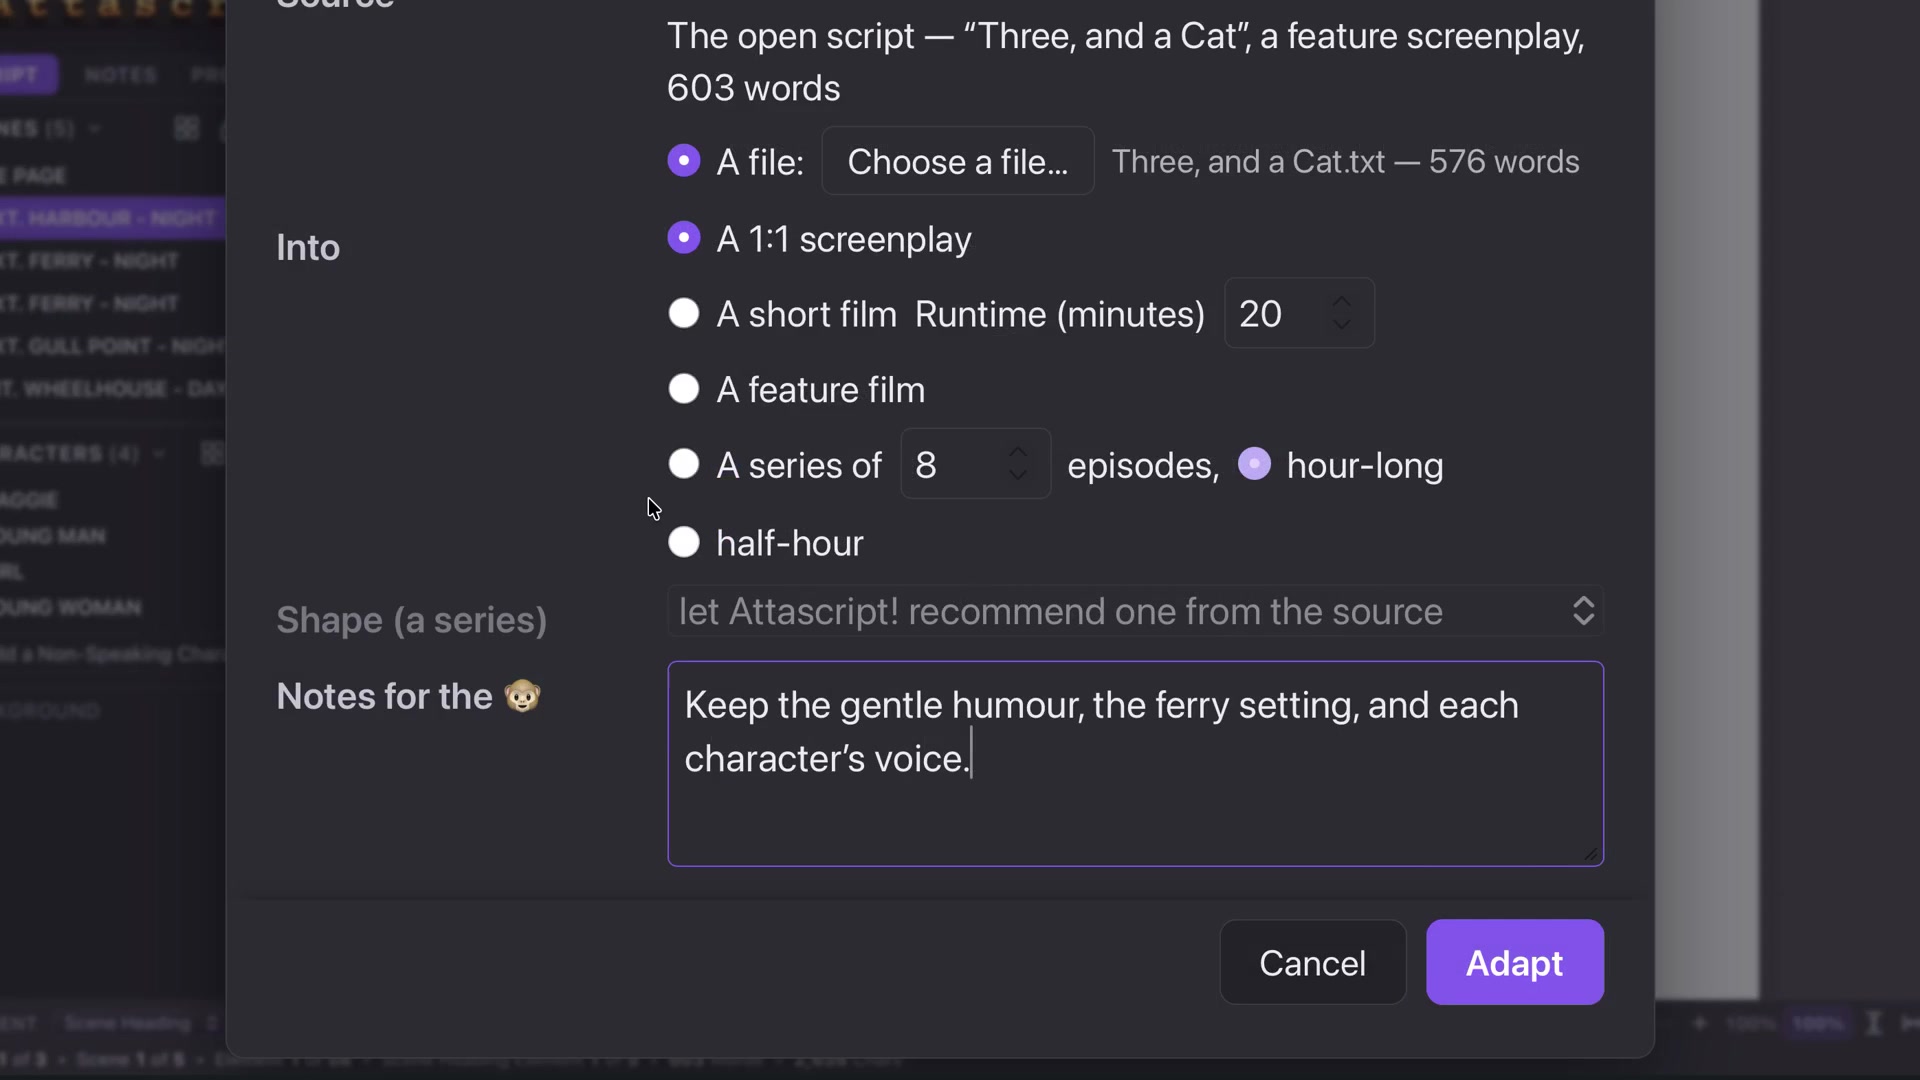
Notes for the Monkey explains what the adaptation should preserve.From lesson 31, 0:46 · Select the image to enlarge.
Give useful direction
Use Notes for the Monkey to describe the tone, setting and character qualities to preserve. The example asks to retain gentle humor, the ferry setting and each character’s voice. Click Adapt when the source and choices are correct.
Pause and resume
The destination opens as a new document and the progress card shows its stage. Pause allows the current part to finish. For a longer break, save the destination with its checkpoint. Reopen that same project to resume. Keep the unfinished destination unchanged while relying on the checkpoint.
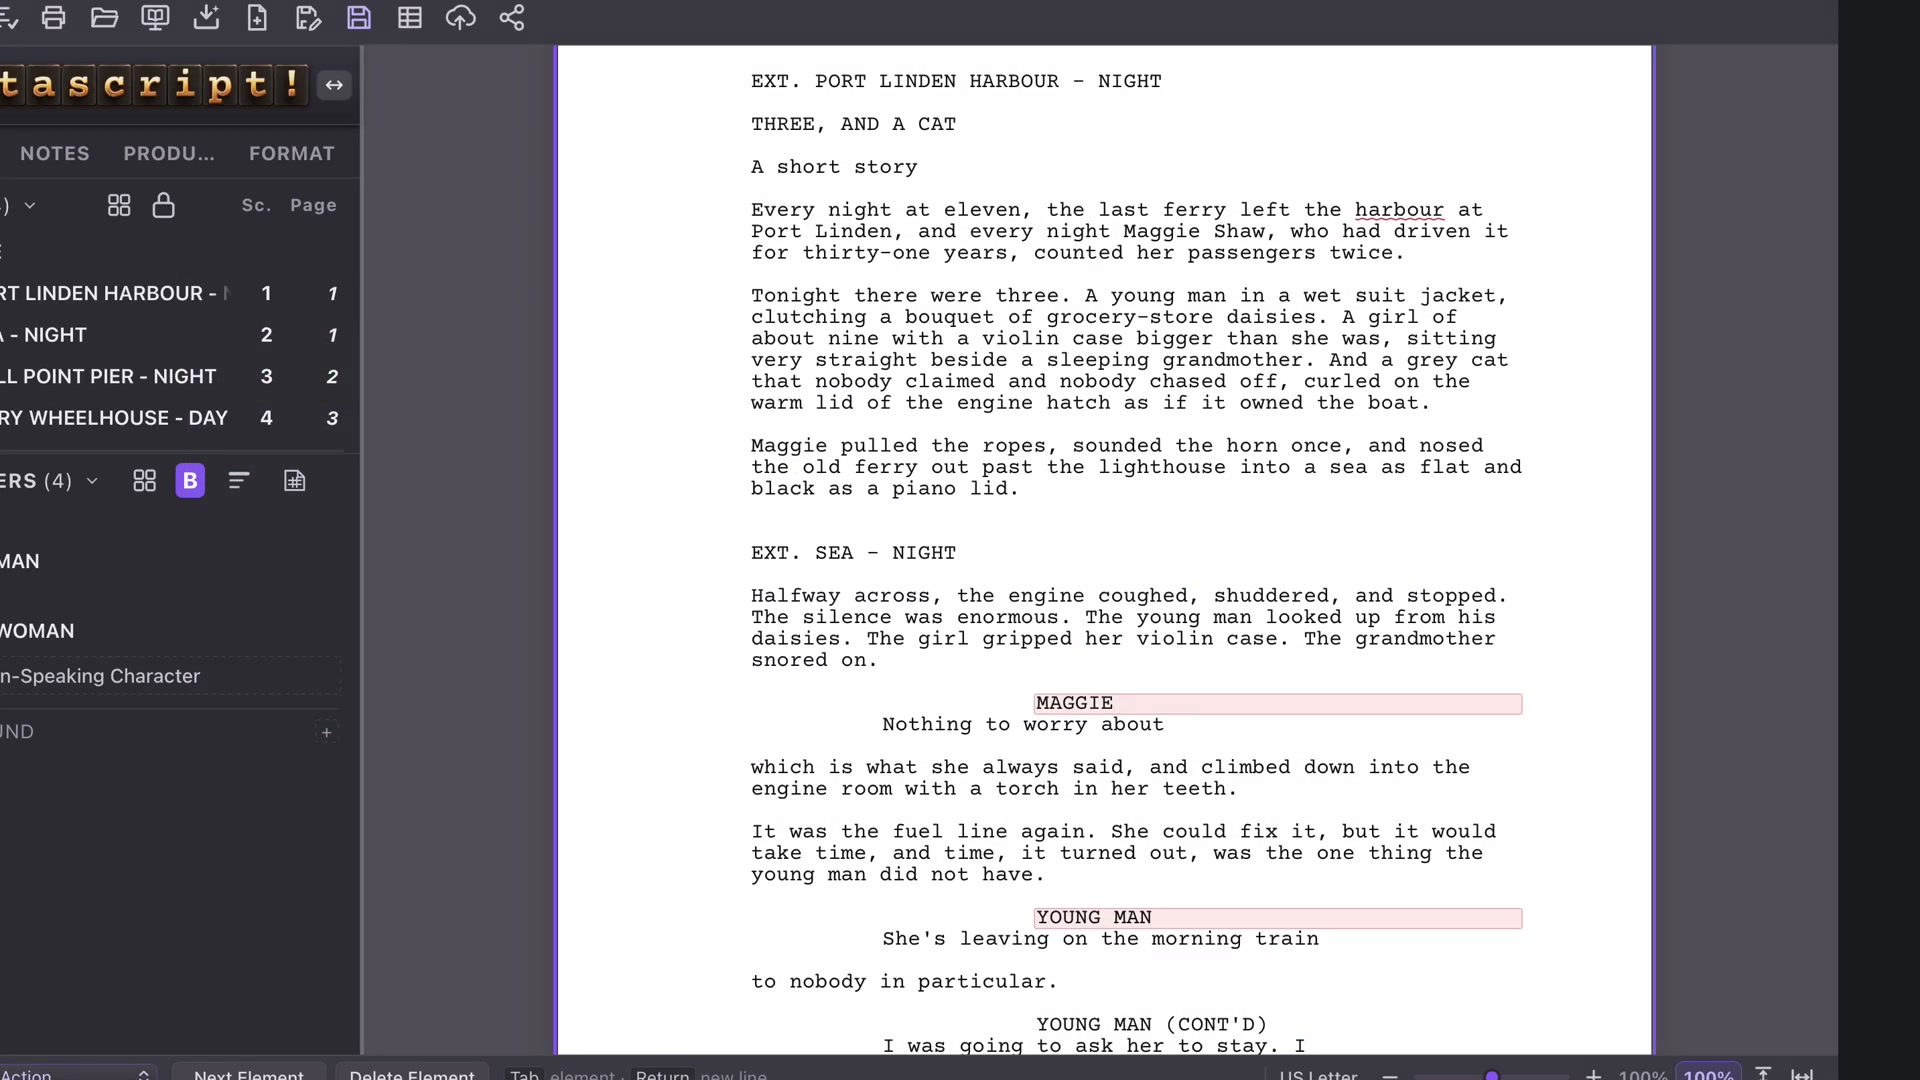
Review the finished screenplay against its source.From lesson 31, 1:17 · Select the image to enlarge.
Review the adaptation
Read against the original: who speaks, what happens and in what order? Tighten prose into visible Action, check character introductions, and use Format Review. If a speaking character needs a first introduction, add the appropriate capitals in Action and check that the flag clears.
Save your working project and keep developing it. Adapt provides a starting draft, not a final creative verdict.
CHAPTER 32
Voice Draft
Talk through a scene, review the transcript, and turn the description into screenplay action and dialogue.
Choose the insertion point
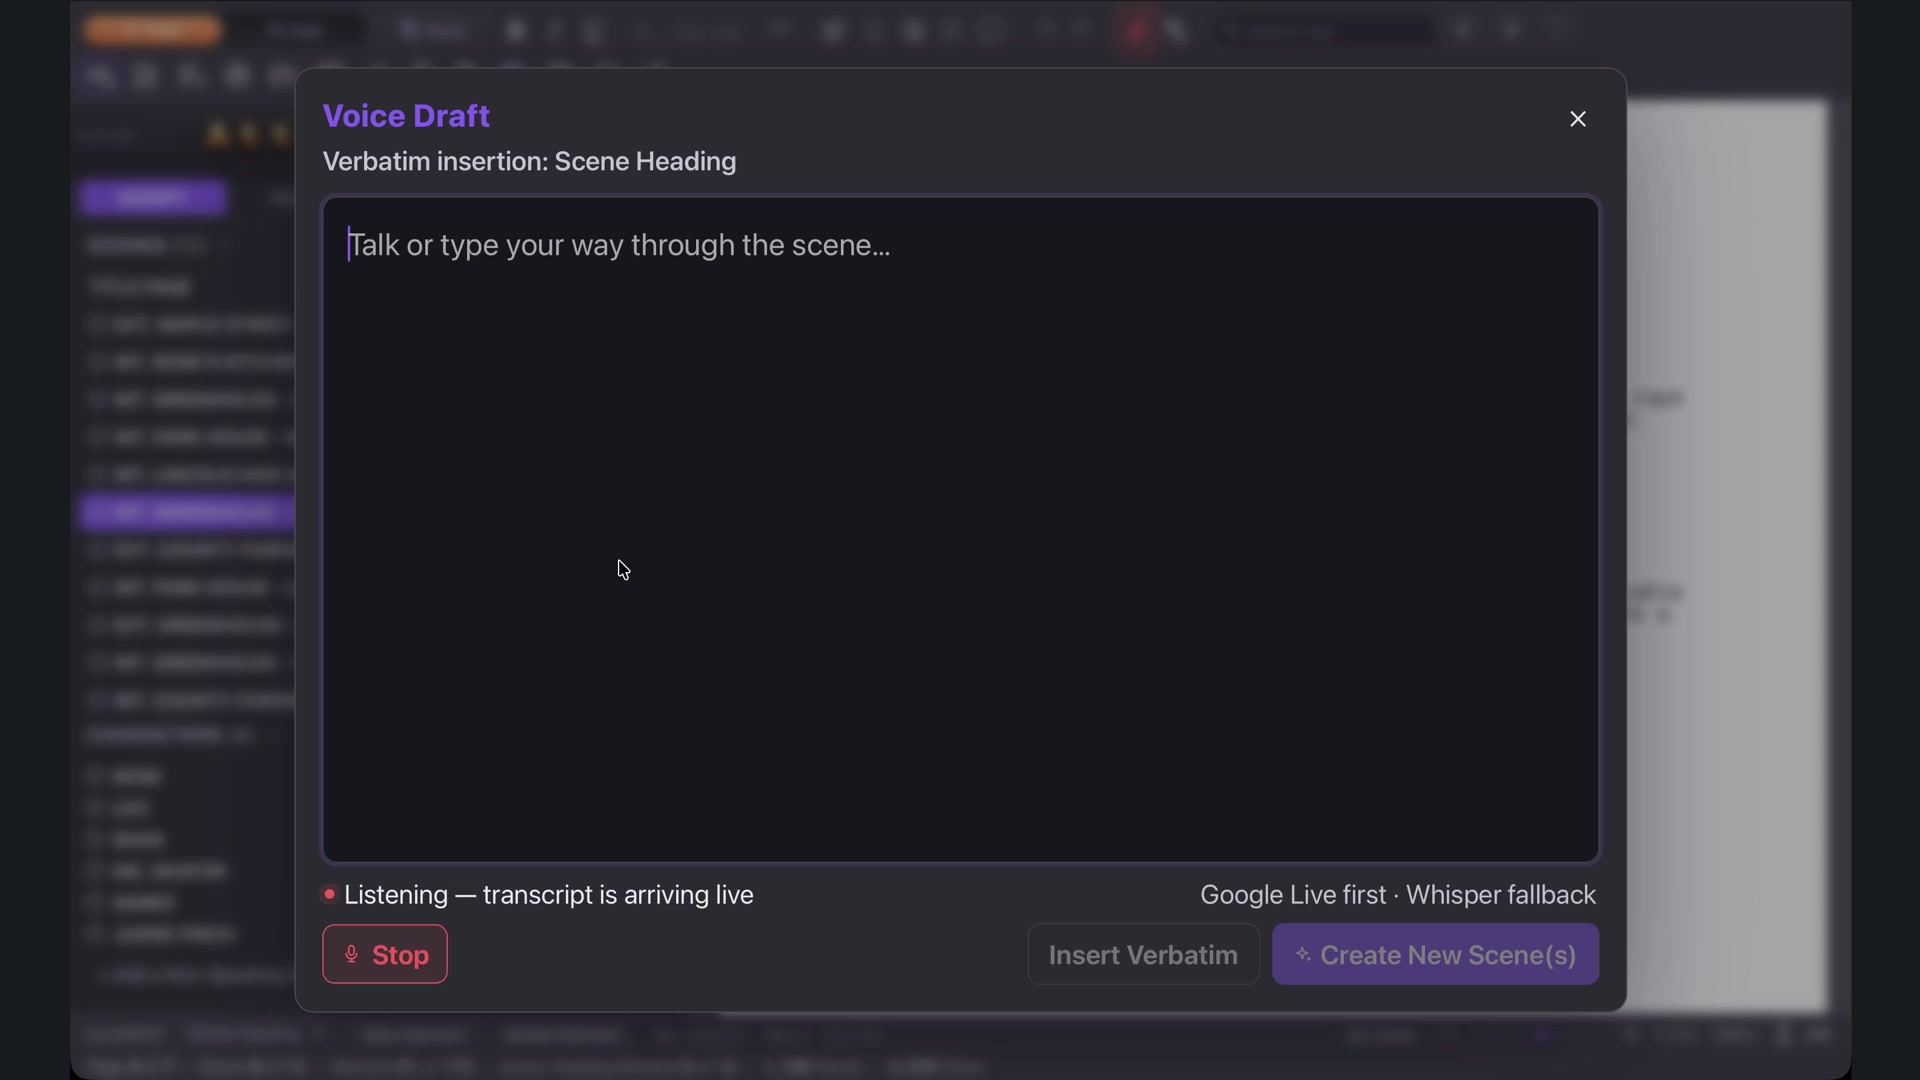
Select where the new scene belongs before opening the microphone in the top menu. Press Record and describe the location, time, action and kind of exchange you want. Your words appear as you speak.
The microphone opens the recording workflow.From lesson 32, 0:26 · Select the image to enlarge.
Describe the dramatic moment
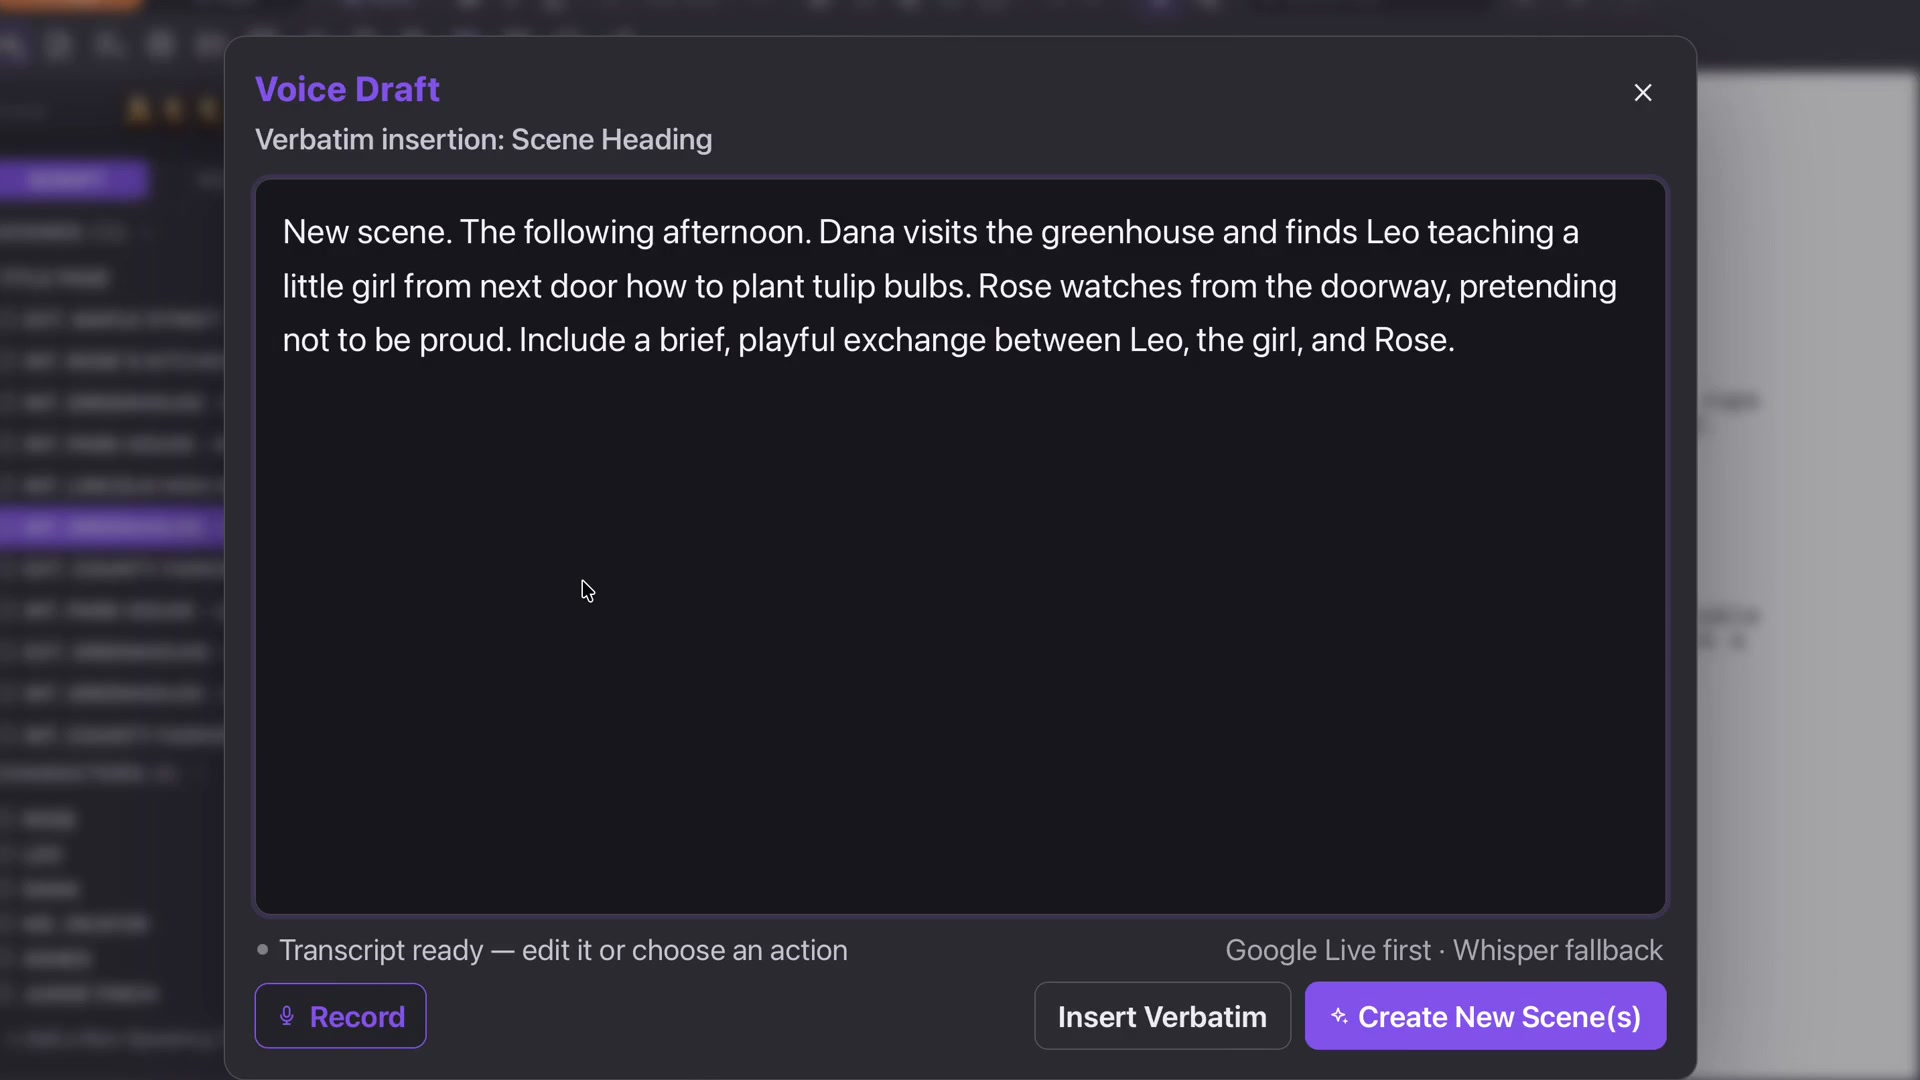
The course describes Dana arriving at the greenhouse to find Leo teaching a girl to plant bulbs while Rose pretends not to be proud. It also asks for a brief, playful exchange.
You do not have to dictate every screenplay margin or line. Give the people, situation and intention clearly enough to guide a draft.
Check before creating
Press Stop. Read and edit the transcript, especially names and any words the microphone misunderstood. Choose Create New Scene when the instruction says what you mean.
The resulting heading, Action and Dialogue are editable screenplay elements. Read the scene and refine it in your own voice.
Stop and review the transcript before creating the scene.From lesson 32, 0:54 · Select the image to enlarge.
Other ways in
Right-click a scene in the navigator for Write or Dictate New Scene, or Rewrite Scene. Select the appropriate action so a new-scene idea does not become an unintended rewrite of existing material.
CHAPTER 33
Spelling & Review
Review possible spelling errors and tracked wording changes without giving up control of the screenplay.
Work through spelling
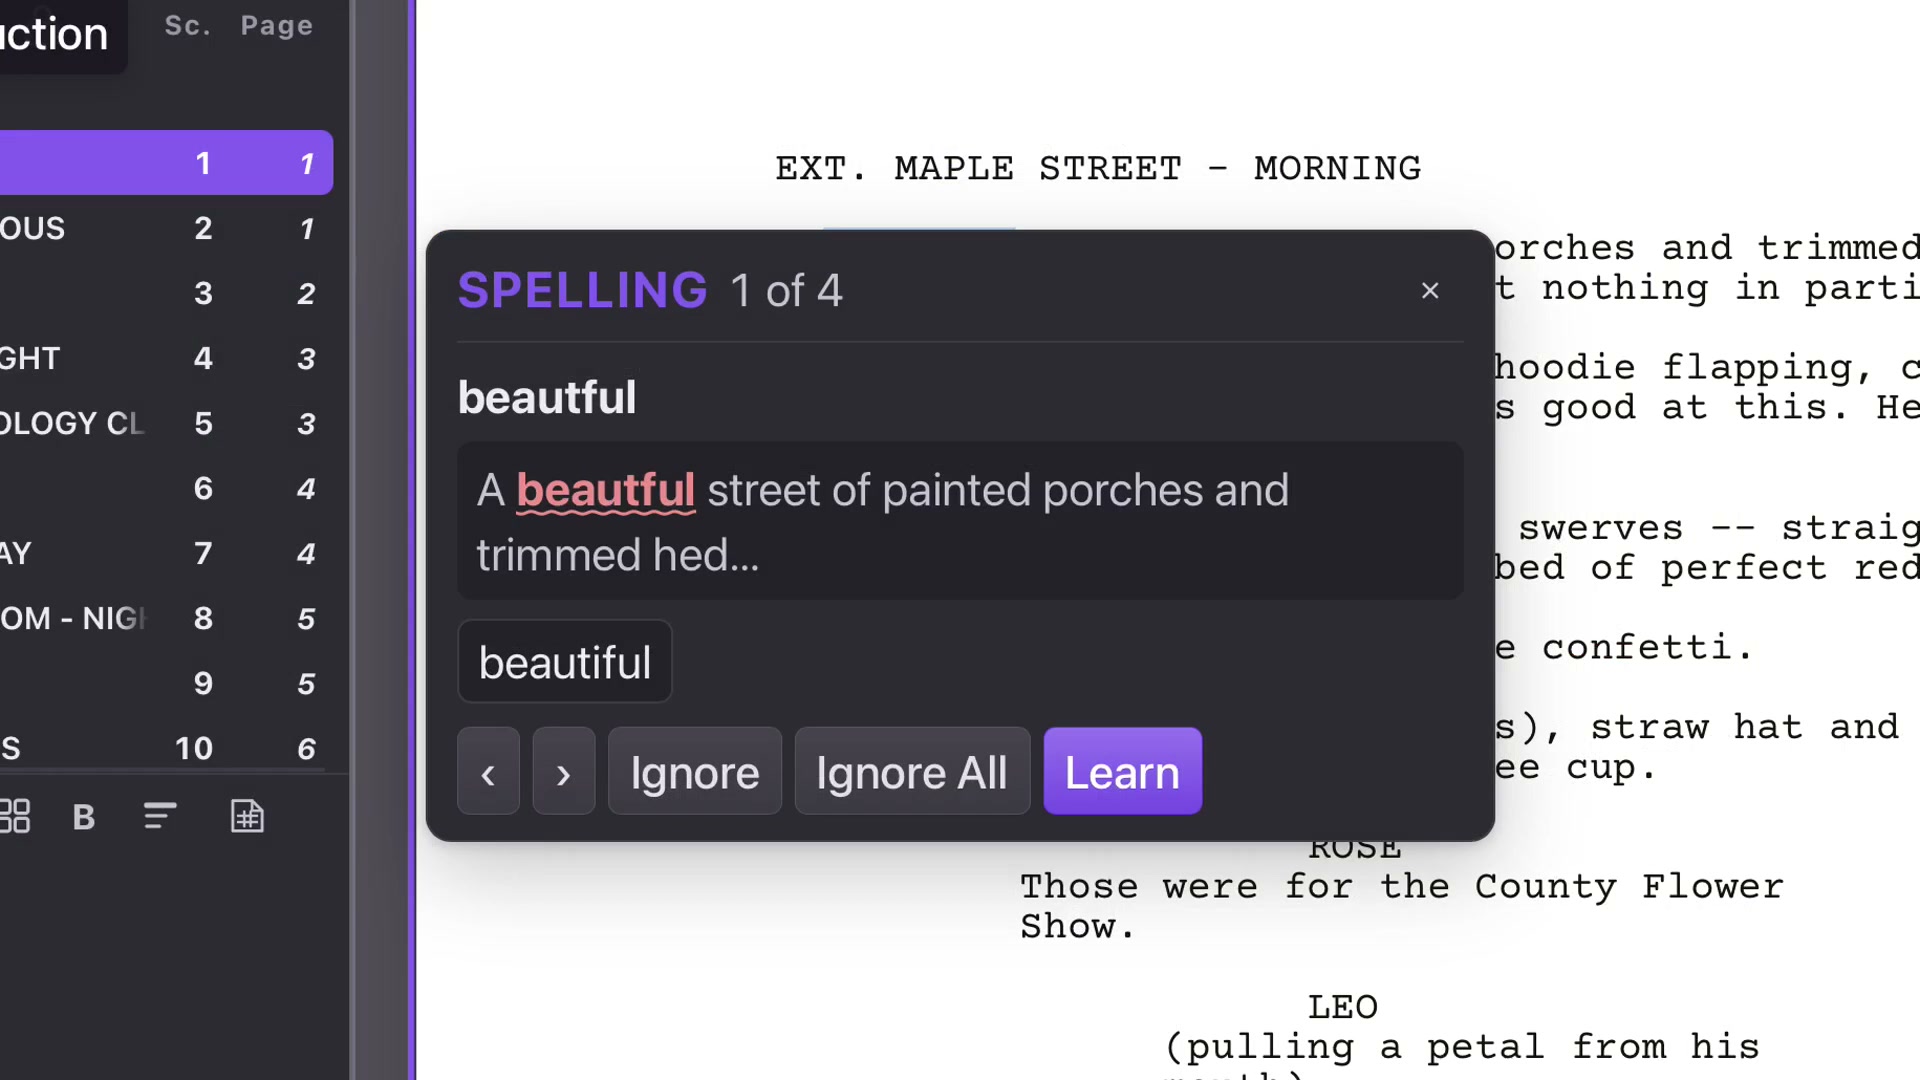
Open Spelling in the top menu. Live Spellcheck underlines possible mistakes on the page. Review Spelling takes you through the flagged words. Read each in context before choosing a suggestion.
Ignore skips the occurrence. Ignore All skips that word throughout the script. Learn adds an intentional word to your dictionary, useful for unusual names. A flag is a prompt to check, not proof that the word is wrong.
Review Spelling offers corrections in context.From lesson 33, 0:25 · Select the image to enlarge.
Track edits for discussion
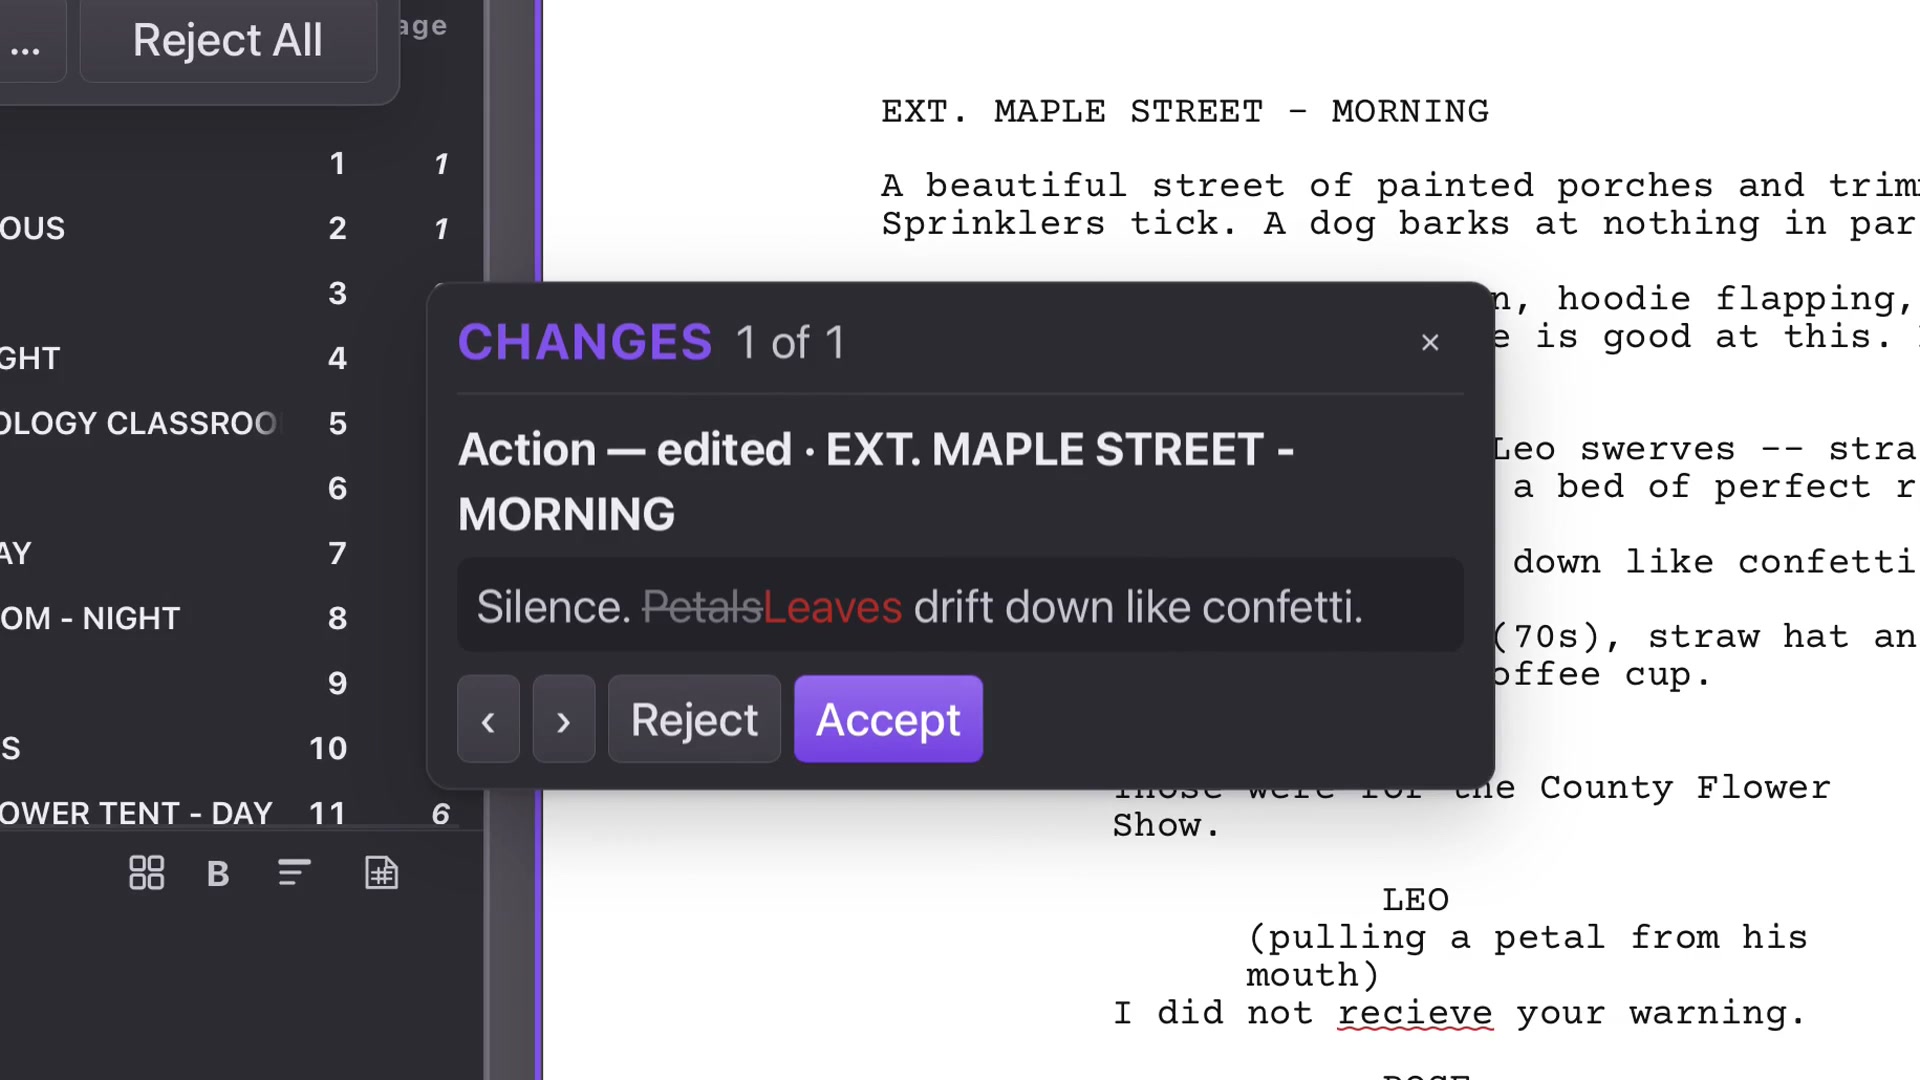
Enable Review Mode to show wording changes in color, with deleted text available for comparison. Review One-by-One presents the old and new wording. Accept keeps an edit; Reject restores the previous wording.
Review Mode is separate from production Revision Mode, which identifies changed pages and revision sets for production.
Ask for another pass
Correct Spelling checks spelling and grammar and proposes tracked corrections. Review the suggestions in context. Accept All and Reject All act on the remaining changes together, so use them only after deciding the scope is appropriate.
Review One-by-One compares wording before you accept or reject it.From lesson 33, 1:07 · Select the image to enlarge.
Language matters
Choose the intended Primary Language before reviewing spelling. After a profile change, allow the language’s spelling state to refresh. Save when the accepted wording is right, then use Format Review for screenplay conventions.
CHAPTER 34
Format Review
Check screenplay conventions, fix accidental slips and keep deliberate choices.
Open the review
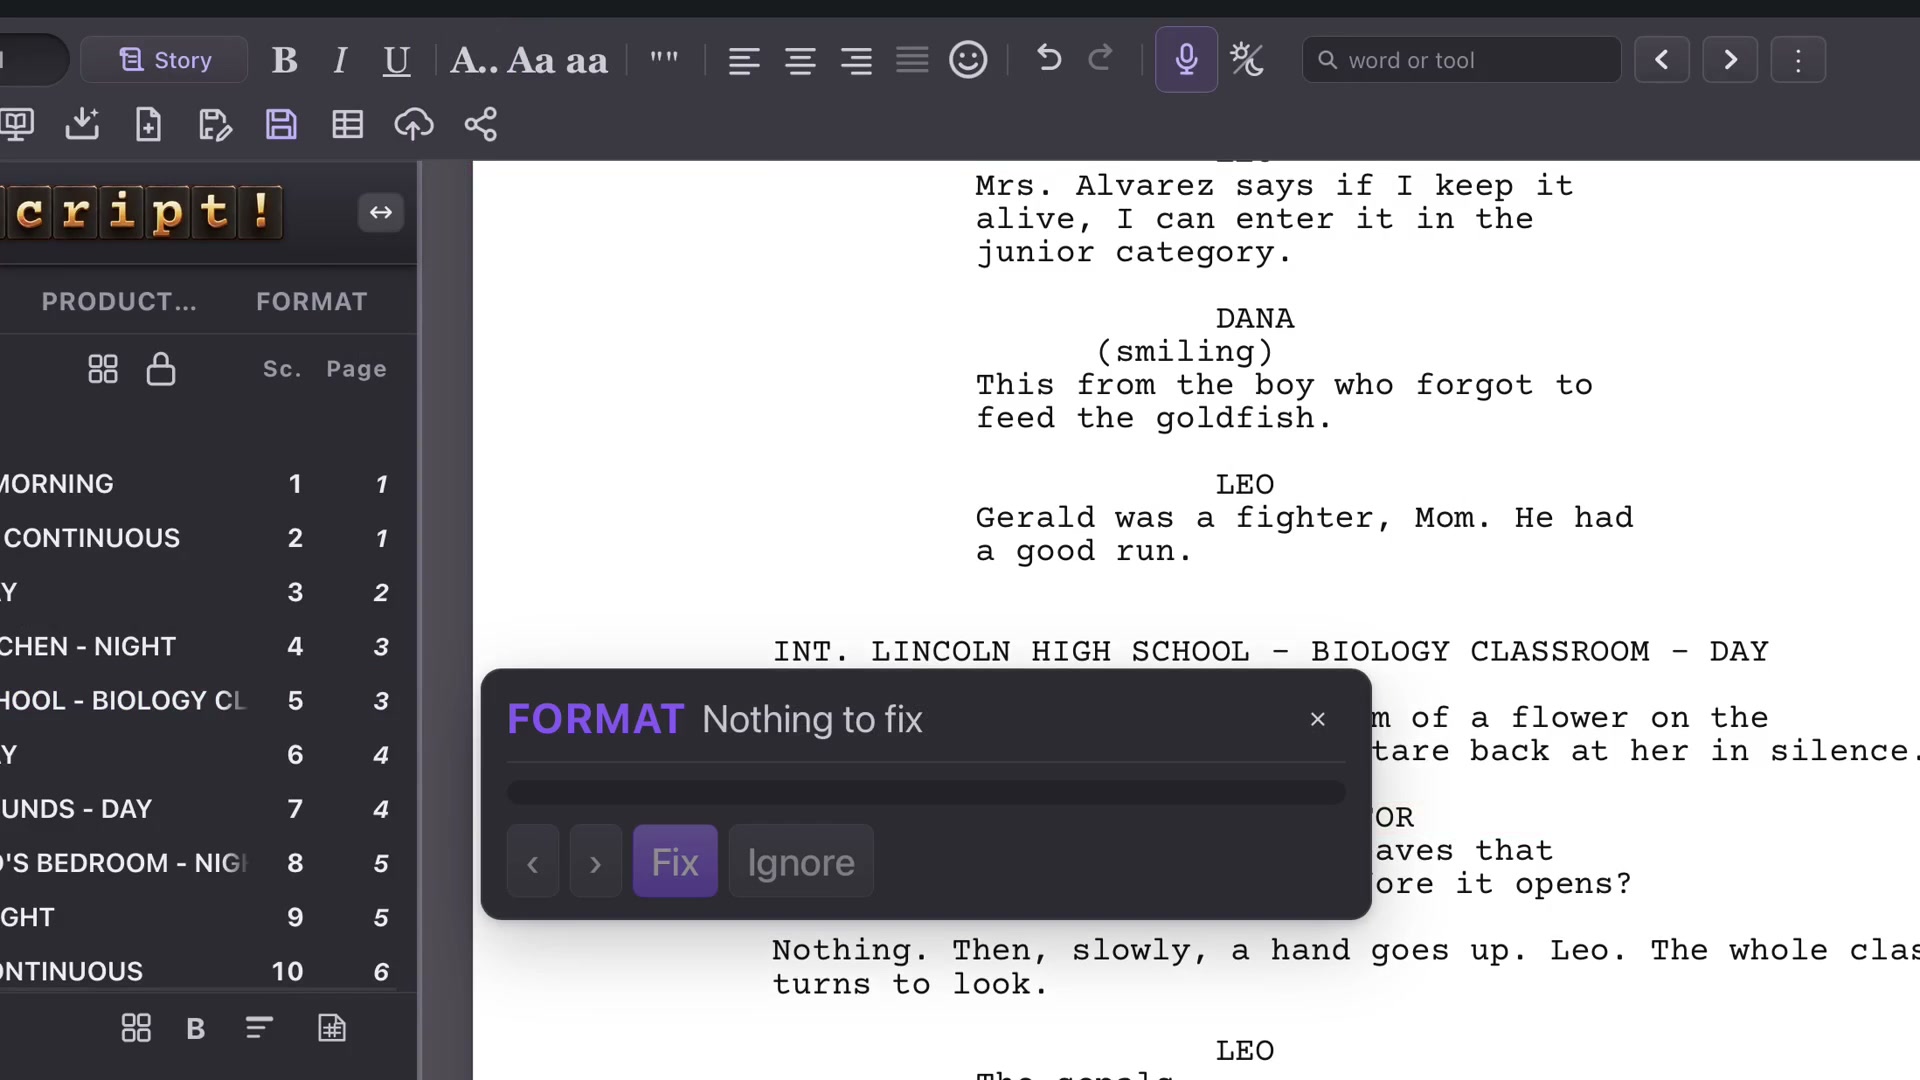
Choose Format Review in the top menu. The panel explains each issue and points to its element. Use its arrows to move among flags. The course checks a transition missing punctuation and a speaking character’s first introduction.
The panel explains the flagged element and provides navigation.From lesson 34, 0:11 · Select the image to enlarge.
Fix what can be fixed directly
When Fix is available, inspect what it will change. In the example, CUT TO becomes CUT TO: with its expected ending punctuation. Read the result before moving to the next flag.
Make a manual correction
Some issues require judgment and a text edit. Close the panel, select the first character introduction in Action and use Uppercase when appropriate. Open Format Review again to verify that the issue is resolved.
Zoom or Fit to Width can help inspect the affected line; Command+2 on Mac and Ctrl+2 on Windows select Fit to Width.
After correcting an introduction, verify that its flag clears.From lesson 34, 0:54 · Select the image to enlarge.
Keep an intentional choice
Ignore removes a flag without changing the words. Use it when the choice is deliberate and you understand the explanation. Format Review should support your decisions, not replace them. Save the corrected project before preparing a delivery.
CHAPTER 35
Find a word, or a tool
Find a word in the screenplay or jump to a tool by describing what you want to do.
Find text
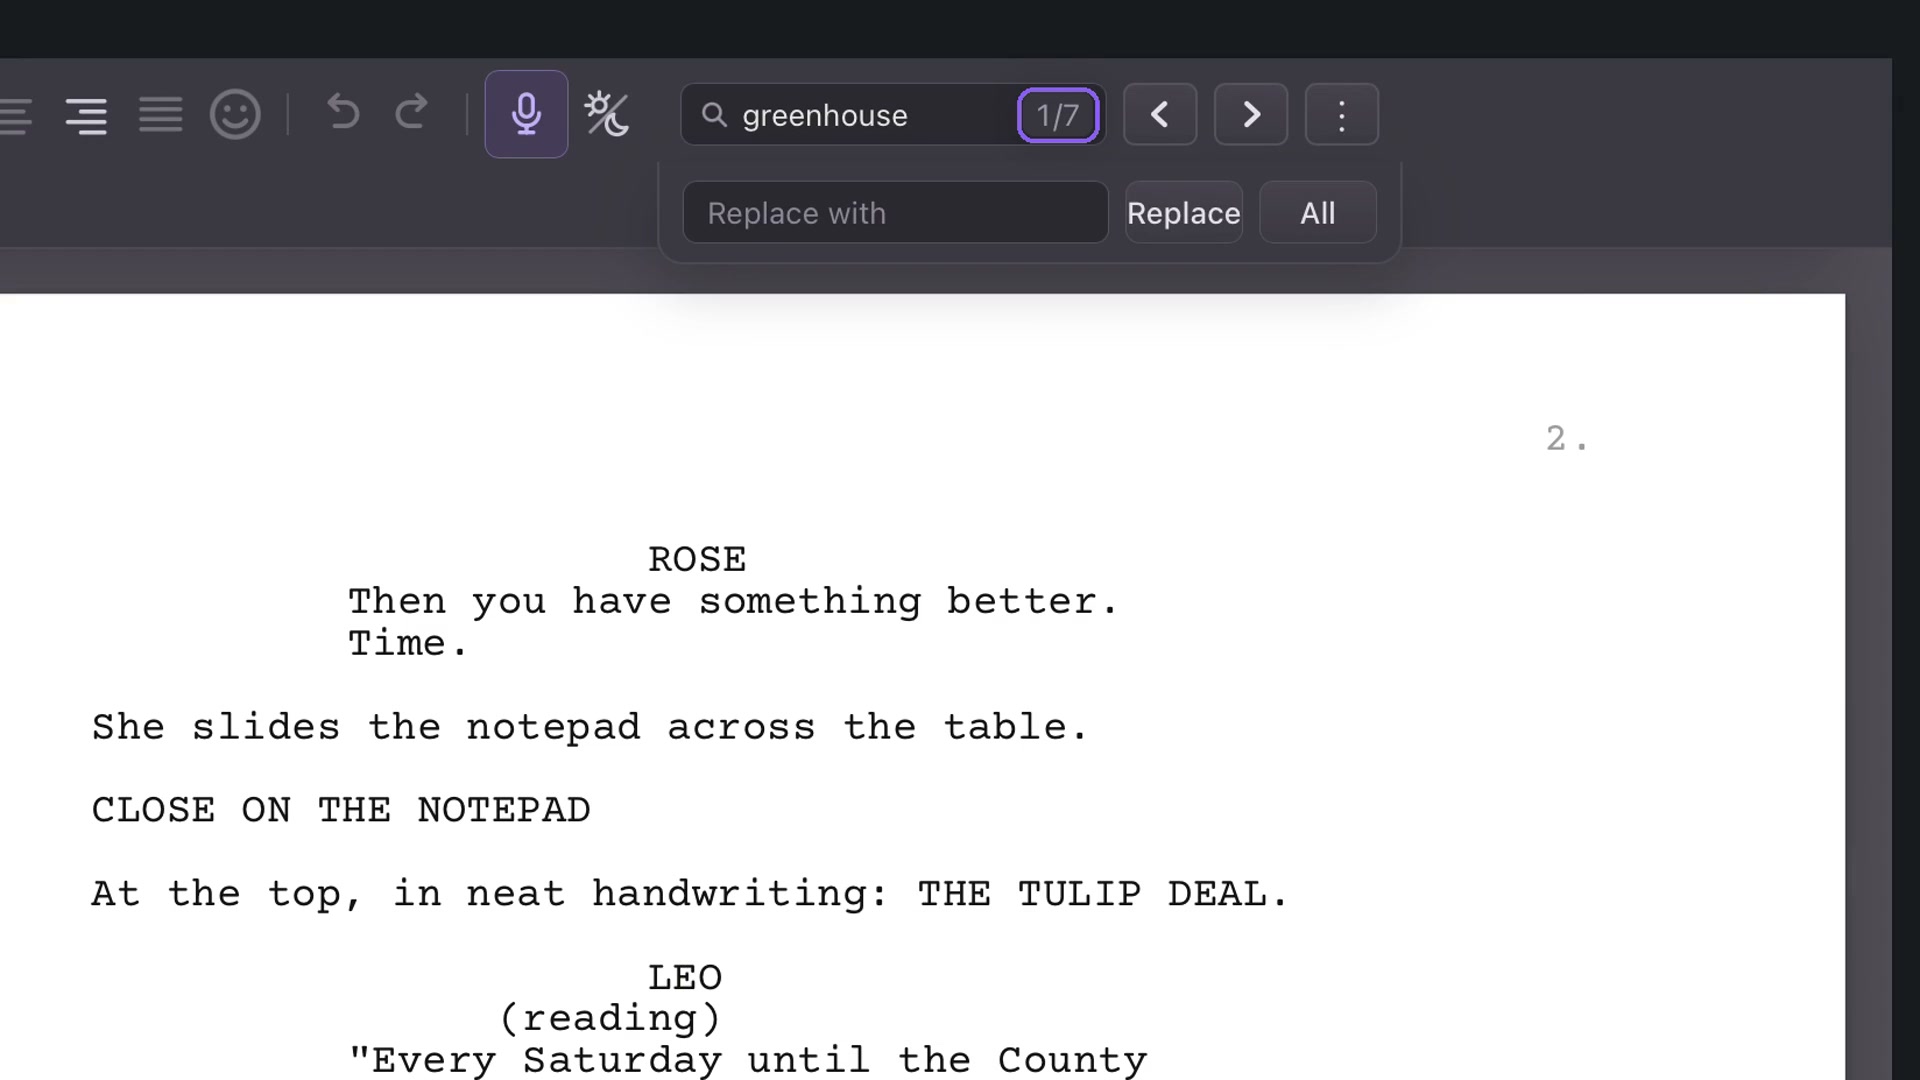
Press Command+F on Mac or Ctrl+F on Windows. Type a word such as greenhouse. The count reports matches; Next and Previous move between them. Read the surrounding text when several scenes use the same word.
The count and arrows help you work through text matches.From lesson 35, 0:09 · Select the image to enlarge.
Choose the search scope
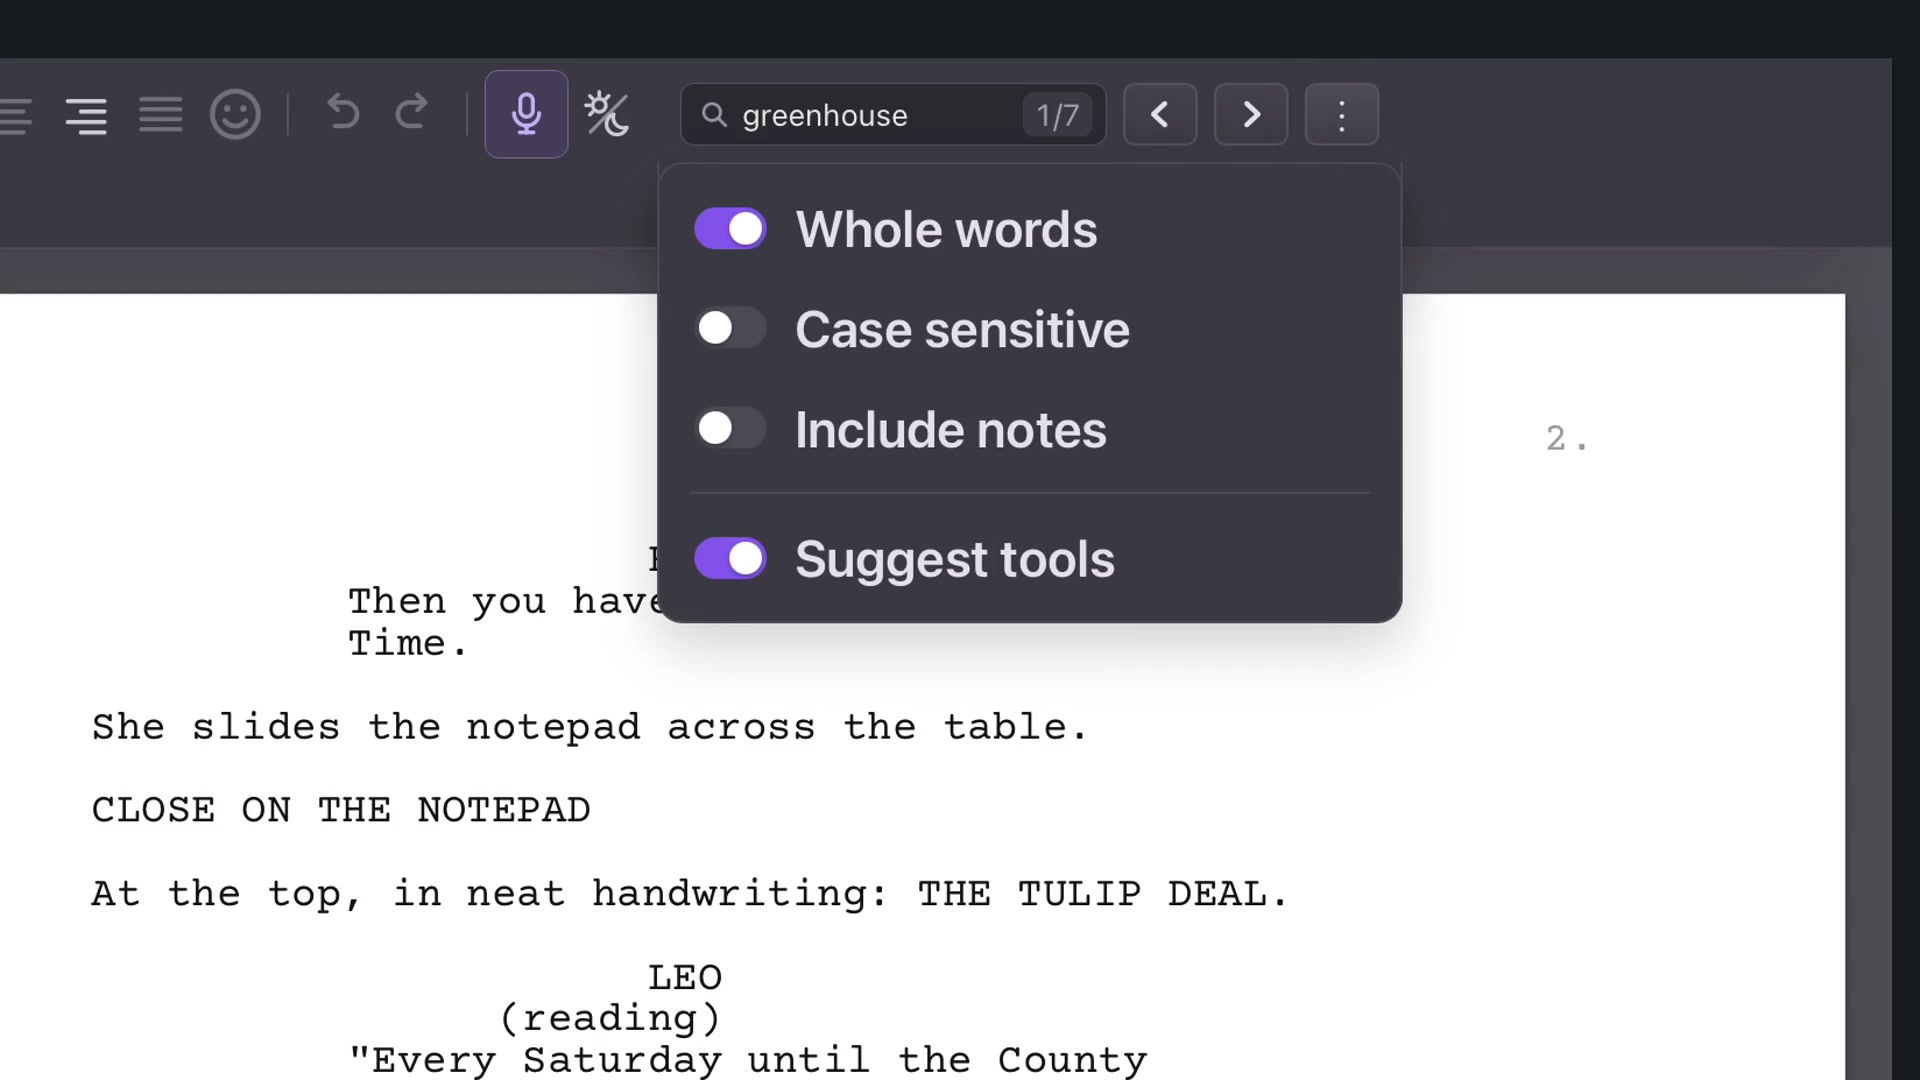
The three-dot Search settings offers whole-word matching, case sensitivity and inclusion of notes. Keep Suggest tools enabled when you also want matching commands.
Whole-word matching is useful when a short search could otherwise occur inside longer words.
Replace carefully
Enter replacement text beneath the search. Replace changes one match; All changes all matches in the selected scope. Review your search settings and the intended wording before applying a broad replacement. You can search without replacing anything.
The three-dot control opens Search settings.From lesson 35, 0:18 · Select the image to enlarge.
Find a control
Type a task such as scene numbers and choose its tool suggestion. The app takes you to the control. Try night or mixed to find appearance modes. Tool search is useful when you know the task but not where its button lives.
CHAPTER 36
Day, Mixed & Night
Choose comfortable light and page magnification without changing the words or delivery format.
Three appearances
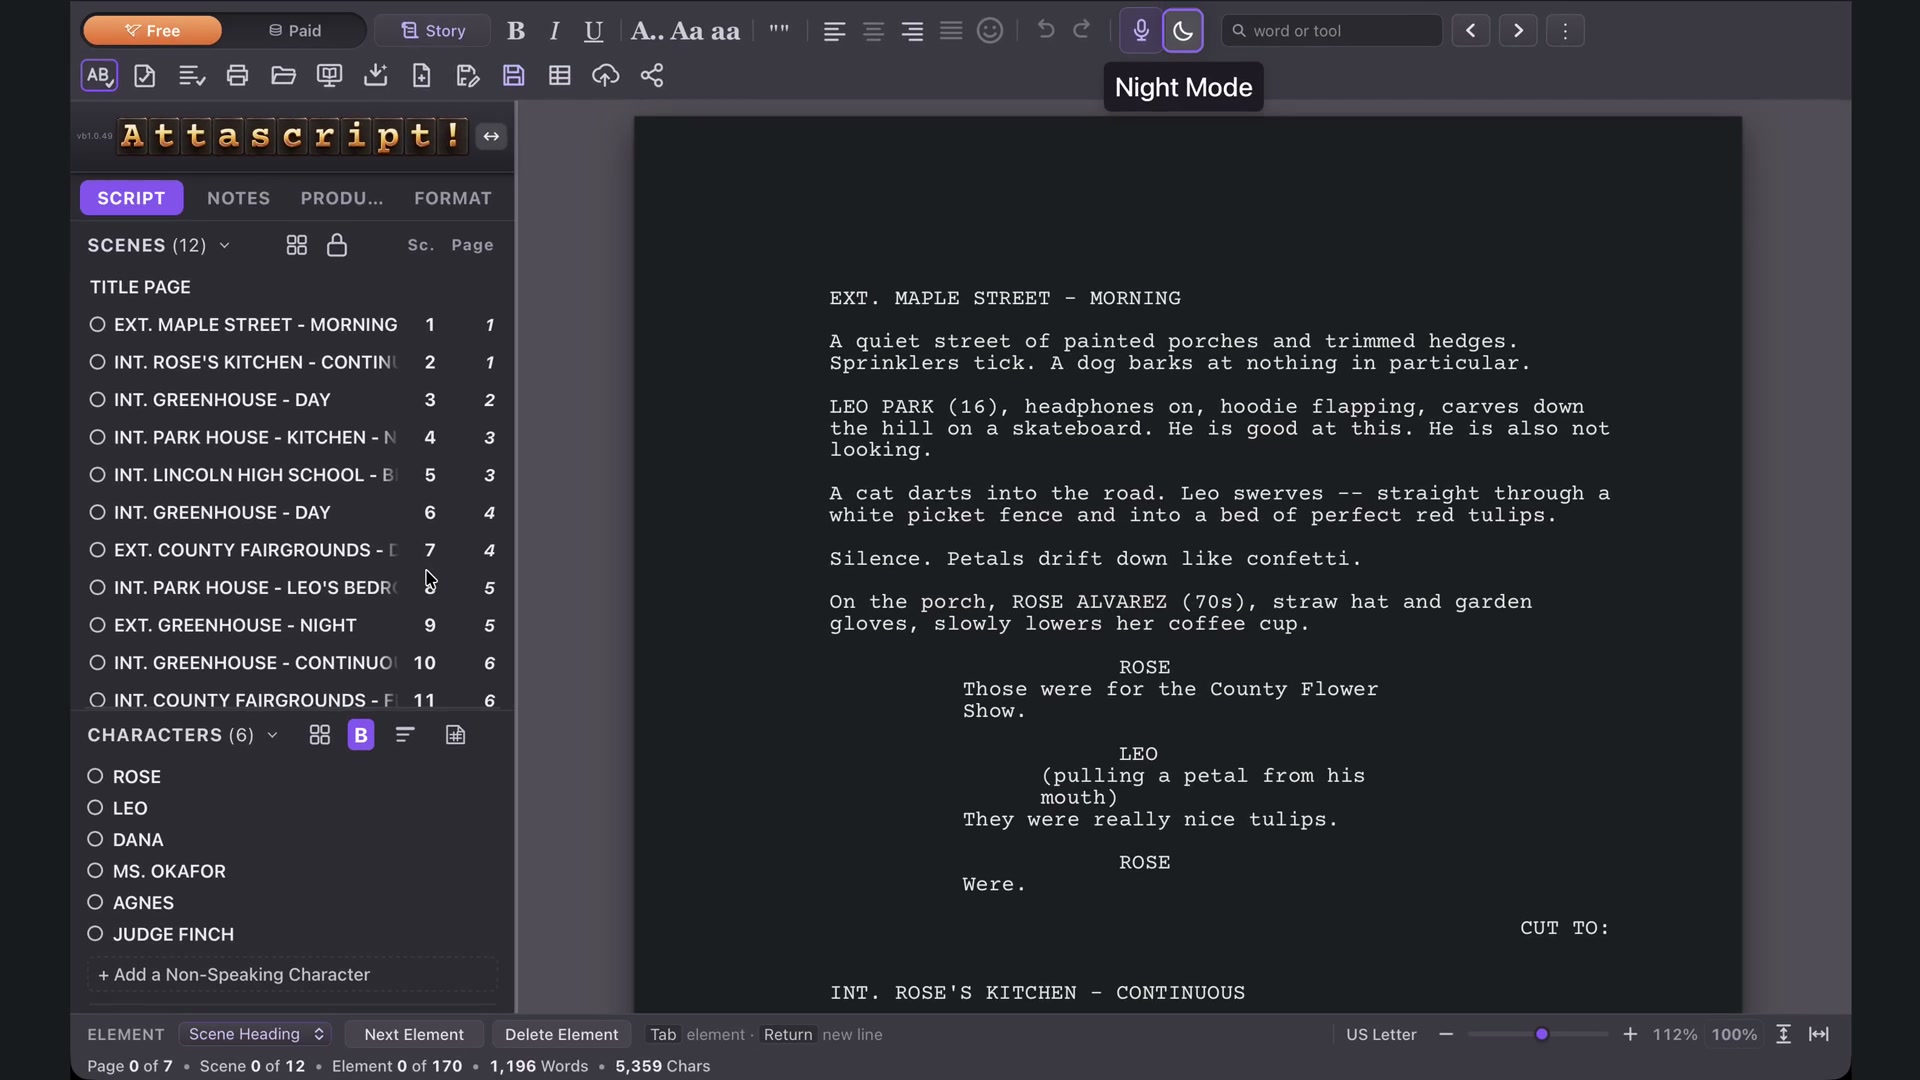
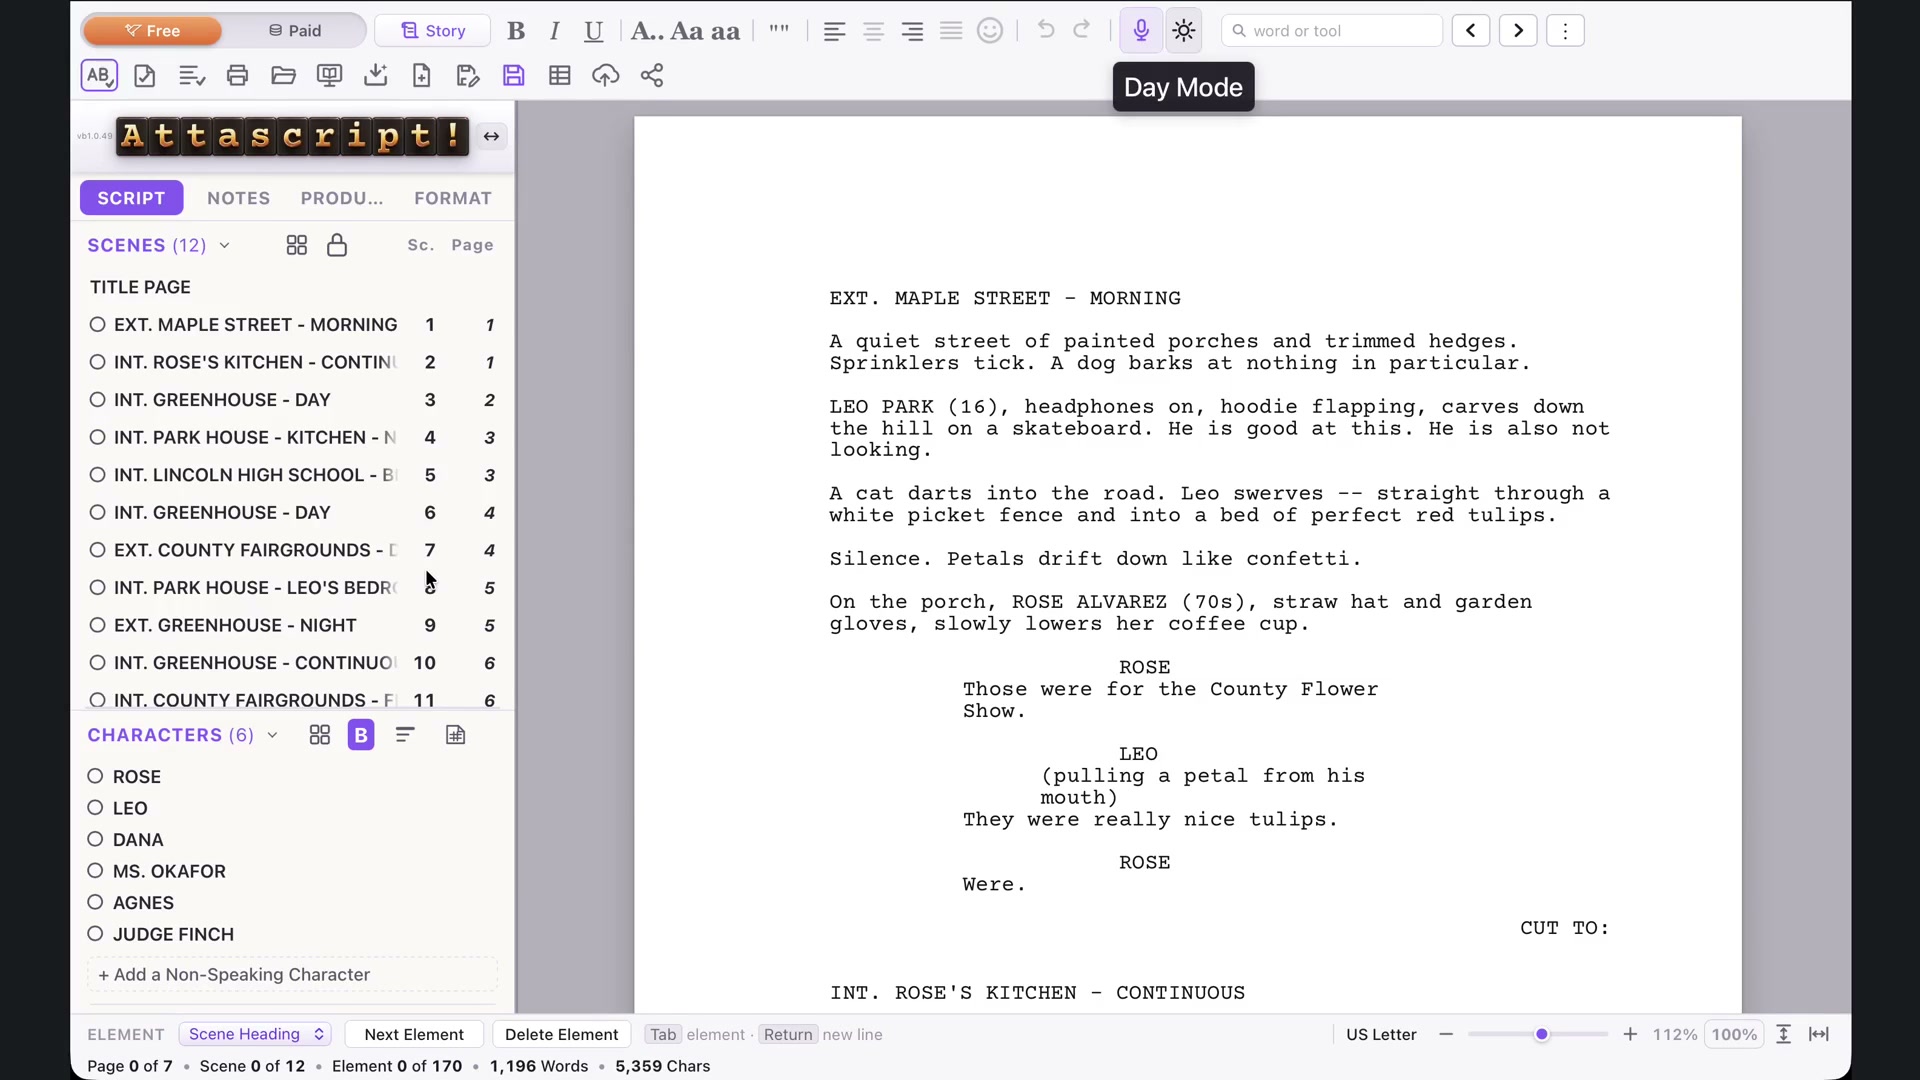
The appearance key in the top menu cycles Day, Mixed and Night. Day has light controls and a white page. Mixed puts a white page inside a darker workspace. Night darkens the page as well as the surrounding controls.
Choose according to your display, room and preference. The same screenplay remains in place as the appearance changes.
Night Mode changes the page and controls to a darker appearance.From lesson 36, 0:13 · Select the image to enlarge.
Fit the page
Fit to Length shows a full page: Command+1 on Mac, Ctrl+1 on Windows. Fit to Width uses the available horizontal space: Command+2 / Ctrl+2. The corresponding buttons are also in the footer.
Use the slider for intermediate magnification, or 100% for the dedicated normal view.
Day Mode provides a light workspace around the screenplay.From lesson 36, 0:23 · Select the image to enlarge.
Check the right thing
Magnification and workspace appearance are viewing choices. Paper size, margins and screenplay conventions live in Format. If the page is hard to read on screen, try a more suitable view before adjusting its actual layout.
CHAPTER 37
Feature, Television & Multi-Camera
Choose the medium and the act or scene-break conventions your production requires.
Select the medium
Open Format and choose Feature Film, Television or Multi-Camera. The applicable controls change with the medium. Use the format requested by the production or recipient rather than adding conventions merely for decoration.
Separate and Slashed change how act markers appear.From lesson 37, 0:14 · Select the image to enlarge.
Mark a television act
Choose Television. In the Script navigator, right-click the scene that begins an act and select Mark New Act Break. Enter the name and confirm. The act appears in the list and on the screenplay page.
Slashed joins the closing and opening act markers on one line. Separate gives the next act a new page. Switch between them and inspect the visible page to confirm the result.
Multi-Camera adds scene-break and spacing conventions.From lesson 37, 0:48 · Select the image to enlarge.
Multi-Camera controls
Multi-Camera displays Action in capitals and uses wider dialogue line spacing. Scene Breaks offers Line or Page: Page begins each scene on a new page, while Line keeps the flow between scenes.
Switch back to Feature Film when that is the required presentation. Review the pages before exporting after a medium change.
CHAPTER 38
Special elements
Use emoji, Split Screen and Dual Dialogue when the scene needs more than the usual single-column elements.
Place an emoji
Put the caret in an Action line, or select an existing emoji. Open the smiley tray and choose a symbol. The course replaces a tulip with a smile; Undo restores it. Use symbols when they belong to what the audience sees, such as a message on a phone.
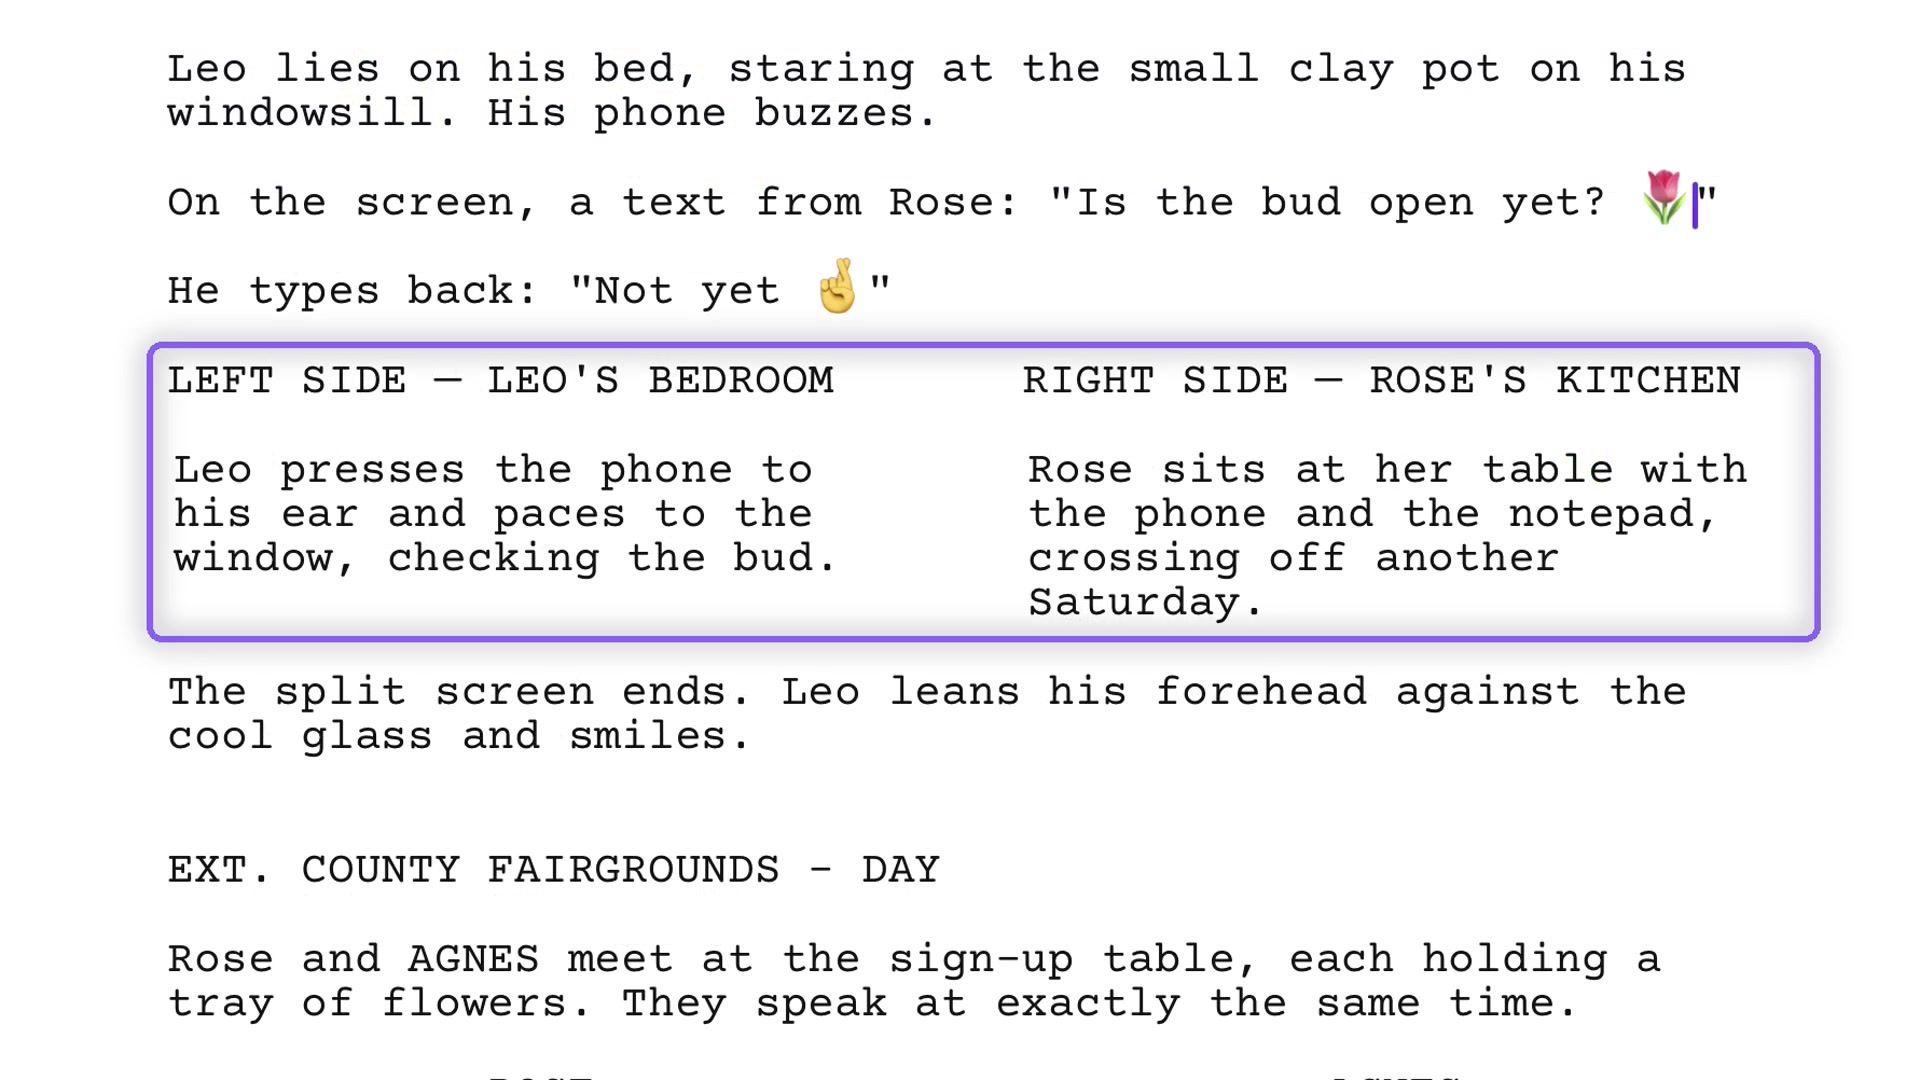
Split Screen places two settings side by side.From lesson 38, 0:32 · Select the image to enlarge.
Split Screen
Choose Split Screen from the Element list in the bottom bar. It places two locations side by side for an action such as a call across town. The example places Leo in his bedroom and Rose in her kitchen. The Action after the split returns to normal full text width.
Dual Dialogue
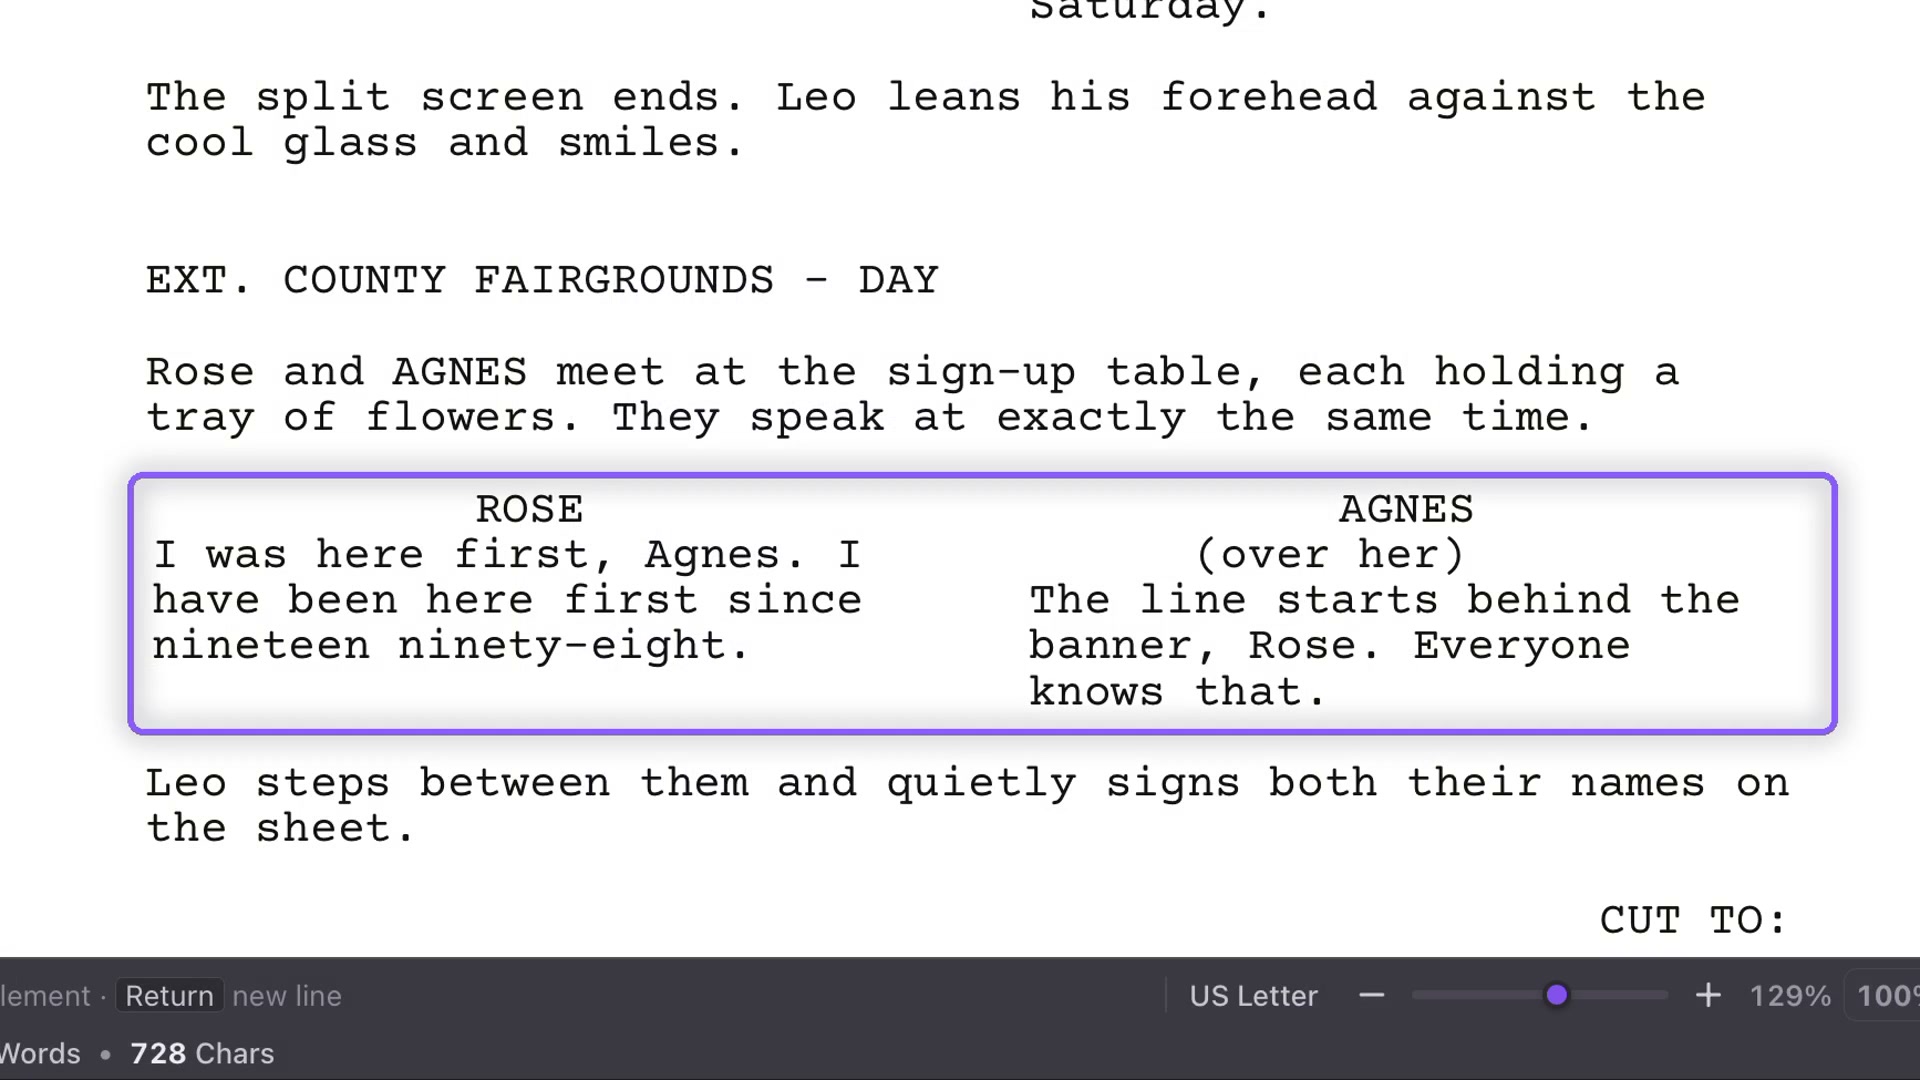
When two characters speak at once, choose Dual Dialogue from the same Element list. Their speeches occupy parallel columns. This communicates simultaneous speech, rather than two sequential speeches that happen to be short.
Dual Dialogue presents simultaneous speeches in parallel columns.From lesson 38, 0:50 · Select the image to enlarge.
Return to the scene
Use special layouts only where they clarify the intended action or sound. Inspect the page after the two-column passage to confirm that the ordinary elements continue correctly. Save and inspect an export if the recipient will read a fixed-layout copy.
CHAPTER 39
Write in any language
Choose among 123 primary writing profiles and use the conventions of the screenplay’s language.
Choose a profile
In Format, open Primary Language and type to find the language. Select its regional Style where available. This sets the interface and screenplay conventions. It does not translate existing dialogue; Translate to is a separate workflow.
The course demonstrates Spanish, French, Russian, Yoruba, Cantonese, Mandarin, Hindi, Dari, Pashto and Yiddish, among others.
Right-to-left profiles change the text direction and sidebar position.From lesson 39, 0:37 · Select the image to enlarge.
Direction and numerals
Arabic, Farsi and Hebrew use right-to-left text and move the sidebar to the right automatically. You can choose its side yourself with the sidebar arrows. Hebrew and Arabic examples in the course show scene numbers.
Where traditional numerals are supported, use the profile’s numeral control to choose the required form. Check the actual page, especially before printing.
Vertical layouts
Japanese uses vertical screenplay layouts. Chinese also offers a Vertical Writing control. Choose the intended convention and inspect the page at a useful magnification. Regional and competition styles can have their own formatting requirements.
Japanese profiles provide vertical screenplay layouts.From lesson 39, 0:49 · Select the image to enlarge.
Preview and continue
Use the website’s Preview page to inspect captured examples before returning to your own screenplay. The app offers 123 primary profiles; regional variants bring the course’s total to 130. Connect Gemini when you need AI tools, and review translation or generated text in its target language.
CHAPTER 40
Help, tutorials and support
Keep the course close at hand: find a lesson, search for a function, print a chapter and contact support when you need it.
Find the tutorial
On attascript.com, choose Tutorial in the top menu. The course follows the lesson numbers, with a video at the top of each chapter and written steps below it. You can watch, read or combine the two.
Search for a function such as “Pitch Deck,” “scene numbers” or “replace key.” Results link to the relevant chapter. Use its contents links to go straight to a section, or Previous and Next to follow the course in order.
Read without a video
The written edition contains the same explanations and screenshots without the video players. Read it independently, search for a function, or keep a PDF copy for use offline.
Use the chapter list to follow the course in order, or jump straight to the topic you need. Returning to a familiar chapter is often the quickest way to recall a control.
Print or save a PDF
Use Print this chapter for the chapter you are reading. The manual page offers the full guide and downloadable US Letter and A4 PDFs. Choose the paper size that matches your printer. The PDF includes a contents section and page numbers.
A saved copy is useful away from the web. Check its edition date when following a newer app version, as later updates may add or move controls.
Ask for help
Email support@attascript.com. Include your app version, whether you use Windows or macOS, what you tried and what happened. A short set of reproduction steps and a relevant screenshot make the problem easier to understand. Remove API keys and private material before sending.
Finishing the course is a beginning. Return to whichever chapter serves the story you are writing next, and keep making the screenplay your own.